
How to Train Stable Diffusion With Keras

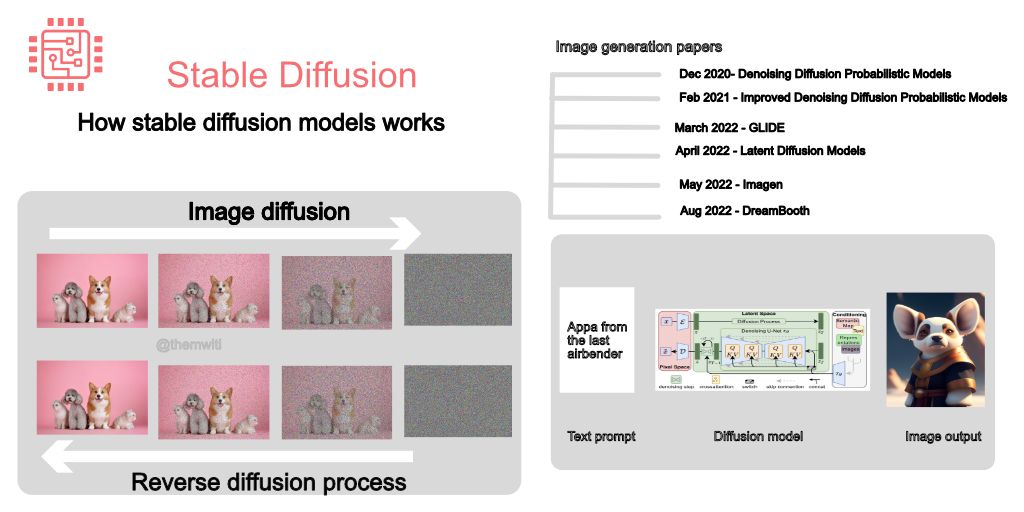
Image generation models are causing a sensation worldwide, particularly the powerful Stable Diffusion technique. With Stable Diffusion, you can generate images with your laptop, which was previously impossible.
Here's how diffusion models work in plain English:
1. Generating images involves two processes.
Diffusion adds noise gradually to the image until its unrecognizable, and a reversion diffusion process removes the noise.
The models then try to generate new images from the noise image.
2. Denoing
Denoising is done using convolutional neural networks such as UNet.
A UNet comprises an encoder for creating the latent representation of the image and a decoder for creating an image from the low-level image representation.
3. Gradual noise removal
Noise is not removed from the image at once but is done gradually for the defined number of steps.
Removing noise step-by-step makes the process of generating images from pure noise easier.
Therefore, the goal is to improve upon the previous step.
4. Generating the image in one step leads to a noisy image
At each time step, a fraction of the noise and not the entire noise is removed.
The same concept is used in text-to-image generation, where you inject the textual information gradually instead of at once.
5. Add textual information
The text information is added by concatenating the text representation from a language model on the image input and also through cross-attention.
Cross-attention enables the CNN attention layers to attend to the text tokens.
6. Train with small images
Diffusion models are compute-intensive because of the number of steps involved in the denoising process.
This can be solved by training the network with small images and adding a network to upsample the result to larger images.
7. Generate images in the latent space
Latent diffusion models (LDM) solve this problem by generating the image in the latent space instead of the image space.
LDMs create a low-dimensional image representation by passing it through an encoder network. Apply noise to the image representation instead of the image.
8. Reverse diffusion
The reverse diffusion process works with the low-dimensional image representation instead of the image itself.
This is a less compute-intensive process because the model is not working with the entire image. As a result, you can perform image generation on your laptop.
Fine-tune Stable Diffusion With Keras
DreamBooth is a technique for fine-tuning diffusion models with a few images while getting good results. This is a game-changer because training diffusion models from scratch requires a lot of images and is computationally expensive.
In this article, we will fine-tune it using KerasCV and TensorFlow.
pip install -q -U keras_cv
pip install -q -U tensorflow
By fine-tuning Stable Diffusion with DreamBooth, you can show the model a few images and have it generate similar images in various settings and locations.

Download Instance and Class Images
DreamBooth uses prior preservation to ensure that the generated images are similar to concepts provided during fine-tuning. During fine-tuning, you'll need to provide:
- Unique class to uniquely describes the object you are fine-tuning, e.g., dog, person, etc.
- An identifier that comes before the unique identifier, e.g., sks.
- An instance prompt that describes the concept you are fin-tuning, e.g., "a photo of sks person."
- Class prompt to describe the prompt without the unique identifier, e.g., "a photo of a person."
- Instance images representing the unique class, mostly 3-5 images, but more will give better results, especially when fine-tuning on faces.
- Class images to represent images generated using the class prompt.
Class images are used for prior preservation when fine-tuning DreamBooth. 200-300 images are usually sufficient. You can provide these images or generate them using the Stable Diffusion model.
Create some instances images of the concept you'd like to fine-tune, and then let's get going. For example, you can create an instance_images folder with 5 images of yourself.
from imutils import paths

instance_images_root = 'instance-images'
class_images_root = 'class-images'
instance_image_paths = list(paths.list_images(instance_images_root))
class_image_paths = instance_image_paths
I downloaded images of the class fantansy_world. Here's what they look like:
from PIL import Image
import numpy as np
import matplotlib.pyplot as plt

def load_images(image_paths):
    images = []
    for path in image_paths:
        image = Image.open(path)
        images.append(np.array(image))
    return images

def plot_images(images, title=None):
    plt.figure(figsize=(20, 20))
    for i in range(len(images)):
        ax = plt.subplot(1, len(images), i + 1)
        if title is not None:
            plt.title(title)
        plt.imshow(images[i])
        plt.axis("off")

plot_images(load_images(instance_image_paths[:5]))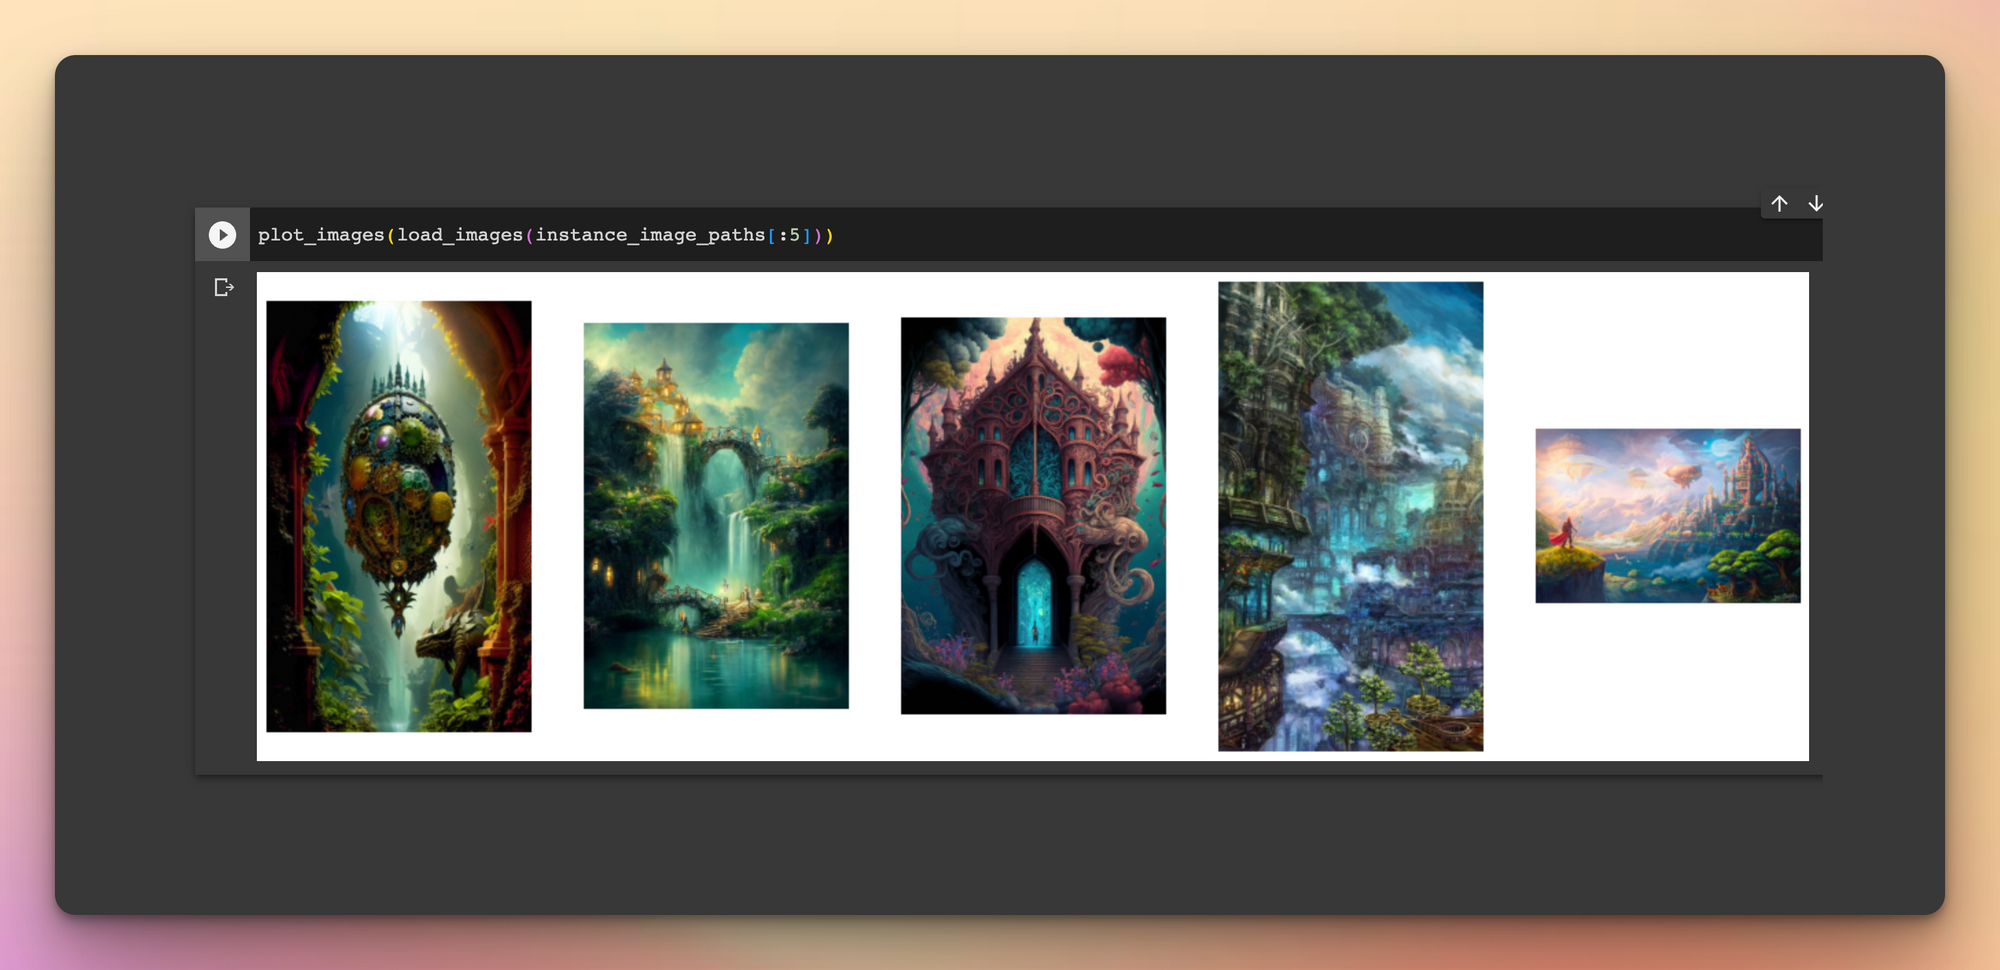
Import Required Packages
Next, import all the libraries and modules needed for this process:
import tensorflow as tf

from keras_cv.models.stable_diffusion.clip_tokenizer import SimpleTokenizer
from keras_cv.models.stable_diffusion.diffusion_model import DiffusionModel
from keras_cv.models.stable_diffusion.image_encoder import ImageEncoder
from keras_cv.models.stable_diffusion.noise_scheduler import NoiseScheduler
from keras_cv.models.stable_diffusion.text_encoder import TextEncoder
Prepare Datasets
Prepare the datasets in the format expected by the DreamBooth model. Hugging Face has provided the following scripts.
Preparing the captions:
# Since we're using prior preservation, we need to match the number
# of instance images we're using. We just repeat the instance image paths
# to do so.
new_instance_image_paths = []
for index in range(len(class_image_paths)):
    instance_image = instance_image_paths[index % len(instance_image_paths)]
    new_instance_image_paths.append(instance_image)

   # We just repeat the prompts / captions per images.
unique_id = "sks"
class_label = "fantasy_world"

instance_prompt = f"a photo of {unique_id} {class_label}"
instance_prompts = [instance_prompt] * len(new_instance_image_paths)

class_prompt = f"a photo of {class_label}"
class_prompts = [class_prompt] * len(class_image_paths)

import numpy as np
import itertools

# The padding token and maximum prompt length are specific to the text encoder.
# If you're using a different text encoder be sure to change them accordingly.
padding_token = 49407
max_prompt_length = 77

# Load the tokenizer.
tokenizer = SimpleTokenizer()

# Method to tokenize and pad the tokens.
def process_text(caption):
    tokens = tokenizer.encode(caption)
    tokens = tokens + [padding_token] * (max_prompt_length - len(tokens))
    return np.array(tokens)


# Collate the tokenized captions into an array.
tokenized_texts = np.empty((len(instance_prompts) + len(class_prompts), max_prompt_length))

for i, caption in enumerate(itertools.chain(instance_prompts, class_prompts)):
    tokenized_texts[i] = process_text(caption)


# We also pre-compute the text embeddings to save some memory during training.
POS_IDS = tf.convert_to_tensor([list(range(max_prompt_length))], dtype=tf.int32)
text_encoder = TextEncoder(max_prompt_length)

gpus = tf.config.list_logical_devices("GPU")

# Ensure the computation takes place on a GPU.
with tf.device(gpus[0].name):
    embedded_text = text_encoder(
        [tf.convert_to_tensor(tokenized_texts), POS_IDS], training=False
    ).numpy()

# To ensure text_encoder doesn't occupy any GPU space.
del text_encoder
Preparing the images:
import keras_cv

resolution = 512
auto = tf.data.AUTOTUNE

augmenter = keras_cv.layers.Augmenter(
    layers=[
        keras_cv.layers.CenterCrop(resolution, resolution),
        keras_cv.layers.RandomFlip(),
        tf.keras.layers.Rescaling(scale=1.0 / 127.5, offset=-1),
    ]
)


def process_image(image_path, tokenized_text):
    image = tf.io.read_file(image_path)
    image = tf.io.decode_png(image, 3)
    image = tf.image.resize(image, (resolution, resolution))
    return image, tokenized_text


def apply_augmentation(image_batch, embedded_tokens):
    return augmenter(image_batch), embedded_tokens


def prepare_dict(instance_only=True):
    def fn(image_batch, embedded_tokens):
        if instance_only:
            batch_dict = {
                "instance_images": image_batch,
                "instance_embedded_texts": embedded_tokens,
            }
            return batch_dict
        else:
            batch_dict = {
                "class_images": image_batch,
                "class_embedded_texts": embedded_tokens,
            }
            return batch_dict
    return fn


def assemble_dataset(
    image_paths, embedded_texts, instance_only=True, batch_size=1
):
    dataset = tf.data.Dataset.from_tensor_slices(
        (image_paths, embedded_texts)
    )
    dataset = dataset.map(process_image, num_parallel_calls=auto)
    dataset = dataset.shuffle(5, reshuffle_each_iteration=True)
    dataset = dataset.batch(batch_size)
    dataset = dataset.map(apply_augmentation, num_parallel_calls=auto)

    prepare_dict_fn = prepare_dict(instance_only=instance_only)
    dataset = dataset.map(prepare_dict_fn, num_parallel_calls=auto)
    return dataset
Assembling the dataset:
instance_dataset = assemble_dataset(
    new_instance_image_paths,
    embedded_text[:len(new_instance_image_paths)],
)
class_dataset = assemble_dataset(
    class_image_paths,
    embedded_text[len(new_instance_image_paths):],
    instance_only=False
)
train_dataset = tf.data.Dataset.zip((instance_dataset, class_dataset))
DreamBooth Training
Hugging Face provides the DreamBooth training loop. The script only fine-tunes the UNet and not the text encoder.
https://github.com/huggingface/diffusers/blob/main/examples/dreambooth/train_dreambooth.pyimport tensorflow.experimental.numpy as tnp

class DreamBoothTrainer(tf.keras.Model):
    # Reference:
    # https://github.com/huggingface/diffusers/blob/main/examples/dreambooth/train_dreambooth.py

    def __init__(
        self,
        diffusion_model,
        vae,
        noise_scheduler,
        use_mixed_precision=False,
        prior_loss_weight=1.0,
        max_grad_norm=1.0,
        **kwargs
    ):
        super().__init__(**kwargs)

        self.diffusion_model = diffusion_model
        self.vae = vae
        self.noise_scheduler = noise_scheduler
        self.prior_loss_weight = prior_loss_weight
        self.max_grad_norm = max_grad_norm

        self.use_mixed_precision = use_mixed_precision
        self.vae.trainable = False

    def train_step(self, inputs):
        instance_batch = inputs[0]
        class_batch = inputs[1]

        instance_images = instance_batch["instance_images"]
        instance_embedded_text = instance_batch["instance_embedded_texts"]
        class_images = class_batch["class_images"]
        class_embedded_text = class_batch["class_embedded_texts"]

        images = tf.concat([instance_images, class_images], 0)
        embedded_texts = tf.concat([instance_embedded_text, class_embedded_text], 0)
        batch_size = tf.shape(images)[0]

        with tf.GradientTape() as tape:
            # Project image into the latent space and sample from it.
            latents = self.sample_from_encoder_outputs(self.vae(images, training=False))
            # Know more about the magic number here:
            # https://keras.io/examples/generative/fine_tune_via_textual_inversion/
            latents = latents * 0.18215

            # Sample noise that we'll add to the latents.
            noise = tf.random.normal(tf.shape(latents))

            # Sample a random timestep for each image.
            timesteps = tnp.random.randint(
                0, self.noise_scheduler.train_timesteps, (batch_size,)
            )

            # Add noise to the latents according to the noise magnitude at each timestep
            # (this is the forward diffusion process).
            noisy_latents = self.noise_scheduler.add_noise(
                tf.cast(latents, noise.dtype), noise, timesteps
            )

            # Get the target for loss depending on the prediction type
            # just the sampled noise for now.
            target = noise  # noise_schedule.predict_epsilon == True

            # Predict the noise residual and compute loss.
            timestep_embedding = tf.map_fn(
                lambda t: self.get_timestep_embedding(t), timesteps, dtype=tf.float32
            )
            model_pred = self.diffusion_model(
                [noisy_latents, timestep_embedding, embedded_texts], training=True
            )
            loss = self.compute_loss(target, model_pred)
            if self.use_mixed_precision:
                loss = self.optimizer.get_scaled_loss(loss)

        # Update parameters of the diffusion model.
        trainable_vars = self.diffusion_model.trainable_variables
        gradients = tape.gradient(loss, trainable_vars)
        if self.use_mixed_precision:
            gradients = self.optimizer.get_unscaled_gradients(gradients)
        gradients = [tf.clip_by_norm(g, self.max_grad_norm) for g in gradients]
        self.optimizer.apply_gradients(zip(gradients, trainable_vars))

        return {m.name: m.result() for m in self.metrics}

    def get_timestep_embedding(self, timestep, dim=320, max_period=10000):
        half = dim // 2
        log_max_preiod = tf.math.log(tf.cast(max_period, tf.float32))
        freqs = tf.math.exp(
            -log_max_preiod * tf.range(0, half, dtype=tf.float32) / half
        )
        args = tf.convert_to_tensor([timestep], dtype=tf.float32) * freqs
        embedding = tf.concat([tf.math.cos(args), tf.math.sin(args)], 0)
        return embedding

    def sample_from_encoder_outputs(self, outputs):
        mean, logvar = tf.split(outputs, 2, axis=-1)
        logvar = tf.clip_by_value(logvar, -30.0, 20.0)
        std = tf.exp(0.5 * logvar)
        sample = tf.random.normal(tf.shape(mean), dtype=mean.dtype)
        return mean + std * sample

    def compute_loss(self, target, model_pred):
        # Chunk the noise and model_pred into two parts and compute the loss
        # on each part separately.
        # Since the first half of the inputs has instance samples and the second half
        # has class samples, we do the chunking accordingly.
        model_pred, model_pred_prior = tf.split(model_pred, num_or_size_splits=2, axis=0)
        target, target_prior = tf.split(target, num_or_size_splits=2, axis=0)

        # Compute instance loss.
        loss = self.compiled_loss(target, model_pred)

        # Compute prior loss.
        prior_loss = self.compiled_loss(target_prior, model_pred_prior)

        # Add the prior loss to the instance loss.
        loss = loss + self.prior_loss_weight * prior_loss
        return loss

    def save_weights(self, filepath, overwrite=True, save_format=None, options=None):
        # Overriding this method will allow us to use the `ModelCheckpoint`
        # callback directly with this trainer class. In this case, it will
        # only checkpoint the `diffusion_model` since that's what we're training
        # during fine-tuning.
        self.diffusion_model.save_weights(
            filepath=filepath,
            overwrite=overwrite,
            save_format=save_format,
            options=options,
        )
Next, train the model:
# Comment it if you are not using a GPU having tensor cores.
tf.keras.mixed_precision.set_global_policy("mixed_float16")

use_mp = True # Set it to False if you're not using a GPU with tensor cores.

image_encoder = ImageEncoder(resolution, resolution)
dreambooth_trainer = DreamBoothTrainer(
    diffusion_model=DiffusionModel(resolution, resolution, max_prompt_length),
    # Remove the top layer from the encoder, which cuts off the variance and only
    # returns the mean.
    vae=tf.keras.Model(
        image_encoder.input,
        image_encoder.layers[-2].output,
    ),
    noise_scheduler=NoiseScheduler(),
    use_mixed_precision=use_mp,
)

# These hyperparameters come from this tutorial by Hugging Face:
# https://github.com/huggingface/diffusers/tree/main/examples/dreambooth
lr = 2e-6
beta_1, beta_2 = 0.9, 0.999
weight_decay = (1e-2,)
epsilon = 1e-08

optimizer = tf.keras.optimizers.experimental.AdamW(
    learning_rate=lr,
    weight_decay=weight_decay,
    beta_1=beta_1,
    beta_2=beta_2,
    epsilon=epsilon,
)
dreambooth_trainer.compile(optimizer=optimizer, loss="mse")

import math

num_update_steps_per_epoch = train_dataset.cardinality()
max_train_steps = 1200
epochs =  math.ceil(max_train_steps / num_update_steps_per_epoch)
print(f"Training for {epochs} epochs.")

ckpt_path = "dreambooth-unet.h5"
ckpt_callback = tf.keras.callbacks.ModelCheckpoint(
    ckpt_path,
    save_weights_only=True,
    monitor="loss",
    mode="min",
)
dreambooth_trainer.fit(train_dataset, epochs=epochs, callbacks=[ckpt_callback])
Hosting the Model
Once training is complete, saving the model is vital so that you don't have to train it again since training takes long.
Host the model on Hugging Face for free:
from huggingface_hub import notebook_login
from huggingface_hub import push_to_hub_keras

# Initialize a new Stable Diffusion model.
dreambooth_model = keras_cv.models.StableDiffusion(
    img_width=resolution, img_height=resolution, jit_compile=True
)
dreambooth_model.diffusion_model.load_weights(ckpt_path)
notebook_login()

config = dreambooth_model.diffusion_model.get_config()
repo_id = "mwitiderrick/fantasy_dreambooth_diffusion_model"
push_to_hub_keras(dreambooth_model.diffusion_model, repo_id, config=config)
Run Inference
You can generate new images once the model is saved to your Hugging Face account.
from huggingface_hub import from_pretrained_keras


sd_dreambooth_model = keras_cv.models.StableDiffusion(
    img_width=resolution, img_height=resolution, jit_compile=True,
)
loaded_diffusion_model = from_pretrained_keras("mwitiderrick/fantasy_dreambooth_diffusion_model")
sd_dreambooth_model._diffusion_model = loaded_diffusion_model
# Note how the unique idenitifer and the class have been used in the prompt.
prompt = f"A photo of {unique_id} {class_label}"
num_imgs_to_gen = 3

generated_img = sd_dreambooth_model.text_to_image(
    prompt, batch_size=num_imgs_to_gen, num_steps=100,
)
plot_images(generated_img, prompt)

How to Get Realistic People When Fine-Tuning DreamBooth
Getting good images when fine-tuning people's faces is challenging. Here are some tips for getting good results:
1. Training steps
When fine-tuning on a faces dataset, use more training steps such as 800-1200 at a batch size of two and a learning rate of 1e-6 to 2e-6.
2. Use prior preservation
Use prior preservation to prevent overfitting on the training faces.
Prior preservation reduces overfitting using images of the person together with other images from the class "person".
Stable diffusion can generate these `class-images`.
3. Use more images
Use 20-25 images of the same person in different angles, postures, and backgrounds.
Don't use images containing multiple persons.
4. Tune prompts
Using the right positive and negative prompts will make a world of difference between good-looking and bad-looking images.
Final Thoughts
Apart from fine-tuning DreamBooth from scratch, you can also use no-code platforms created for this purpose, for example, Leap API.
Training models like Stable Diffusion is 5% of the work. The rest is deployment. Very few people know how to build production-ready machine learning systems because they are difficult to deploy, monitor and maintain.
Check out ML school if you want to build end-to-end ML systems.