
Object detection with TensorFlow 2 Object detection API

Building object detection and image segmentation models is slightly different from other models. Majorly because you have to use specialized models and prepare the data in a particular way. This article will examine how to perform object detection and image segmentation on a custom dataset using the TensorFlow 2 Object Detection API.
Let's dive right in!
Object detection datasets
In this article, we'll use the Coco Car Damage Detection Dataset available on Kaggle. It contains car images with damages. It can be used to train a model to detect damages on cars and car parts. The dataset has already been annotated, and the corresponding COCO files are provided.
Preparing datasets for object detection
If you have a custom dataset you'd like to use, then you have to do the labeling and annotation yourself. There are many tools and online platforms that can help you achieve this. If you would like to stick to open source, Labelme is an excellent alternative.
The video below shows how to create polygons on the car dataset. After completing an annotation, you will have to save it. Once you save it, Labelme will store the resulting JSON file in the same folder as the data.
If you are looking for an online tool, here are some platforms that I have interacted with:
- Roboflow Universe provides numerous object detection and image segmentation datasets. You can search the platform and switch the car images dataset. If you choose that route, download the TFRecord format from the platform. If you have a custom dataset, you can also perform the annotation on Roboflow.
- Ango AI provides some public datasets to kickstart your classification and object detection projects. They also offer a platform that you can use to label and annotate the images.
- Segments AI lists some object detection and image segmentation datasets that you can clone into your projects. You can also perform annotation on their platform.
What is TensorFlow 2 Object Detection API?
The TensorFlow Object Detection API is an open-source computer vision framework for building object detection and image segmentation models that can localize multiple objects in the same image. The framework works for both TensorFlow 1 and 2. Users are, however, encouraged to use the TF 2 version because it contains new architectures.
 tensorflow
Some of the architectures and models that TensorFlow 2 Object Detection API supports include:
The models can be downloaded from the TensorFlow 2 Detection Model Zoo. You need their corresponding config files to train one of the object detection models from scratch. In this project, we'll use the Mask RCNN model, but you can also try the other models.
Install TensorFlow 2 Object Detection API on Google Colab
At this point, you now have an object detection dataset. Either the car images data and the corresponding COCO JSON files or a dataset you have created yourself or downloaded somewhere.
We will run this project on Google Colab to utilize free GPU resources for training the model. Let's install the TensorFlow 2 Object Detection API on Colab. The first step is to clone the TF 2 Object Detection GitHub repo:
!git clone https://github.com/tensorflow/models.gitNext, run these commands to install TF 2 Object Detection API on Colab:
%%bash
cd models/research
# Compile protos.
protoc object_detection/protos/*.proto --python_out=.
# Install TensorFlow Object Detection API.
cp object_detection/packages/tf2/setup.py .
python -m pip install --use-feature=2020-resolver .
Install TensorFlow 2 Object Detection API locally
If you'd like to use the API locally, the developers recommend that you install it using Docker:
# From the root of the git repository
docker build -f research/object_detection/dockerfiles/tf2/Dockerfile -t od .
docker run -it od
Next, import the Object Detection API plus a couple of other common data science packages. If you are able to import the Object Detection package, it means that the installation ran successfully.
Download object detection dataset
The dataset and the config file for the model we'll be training can be downloaded from this GitHub repo. You have to make some changes after you download the config from the object detection repo. We'll discuss those changes in a moment.
!git clone https://github.com/mlnuggets/maskrcnn.gitDownload Mask R-CNN model
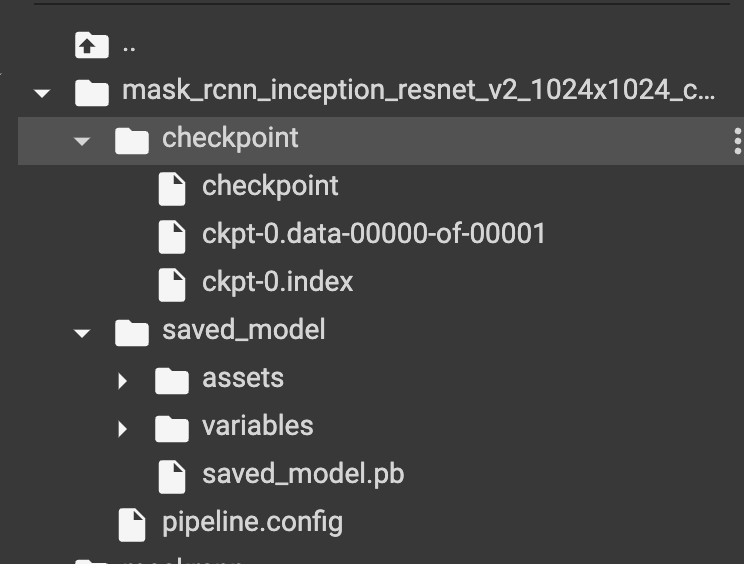
The next step is to download the Mask R-CNN model that we'll fine tune. Extract the file to get the trained model checkpoint.
The compressed file also contains the model's configuration file. You will always have to edit this file after downloading each model.
Let's look at the items in the configuration file that you need to update.
Edit the object detection pipeline config file
The config file you'll get after cloning this repo has been edited to run smoothly on Google Colab. If you are running this project elsewhere you'll need to update the file paths. In a nutshell, here are the items you need to update after downloading the Mask RCNN config file from the TensorFlow 2 Object Detection API repo:
-
num_classesto 5 because the dataset has 5 classes,headlamp,front_bumper,hood,door, andrear_bumper. image_resizerto 512 from 1024 reducing the size of the images hence reducing training time.num_stepsto 1000 from 200000 to reduce the training time. The more the steps the longer it will take to train the model. You can increase the steps if the loss is still decreasing and validation metrics are going up.batch_size = 1to dictate the number of images to be fed in memory while training.fine_tune_checkpointto point to the path of the Mask R-CNN model downloaded above. This ensures that we are not training the model from scratch.fine_tune_checkpoint_typetodetectionfromclassificationsince we are training an object detection model.train_input_readerto point to thelabel_map_pathand path to the TFRecords. More on TF Records later.eval_input_readeris the same astrain_input_readerbut for the test data.
Convert the images to TFRecords
The object detection models expect the images to be in TFRecord format. Fortunately, the TensorFlow 2 Object Detect API repo provides a script for performing the conversion. The script takes the following arguments:
- Directory of the training images.
- Folder containing the test images.
- File containing training image annotations.
- File containing test image annotation.
- Directory where the generated TFRecords should be stored.
Train the model
You now have everything you need to train this Mask R-CNN object detection model. The next step is to run the training script. The model training script takes the following arguments:
pipeline_config_paththe path to the updated model configuration file.model_dirthe directory where the trained model will be saved.

pip uninstall opencv-python-headless==4.5.5.62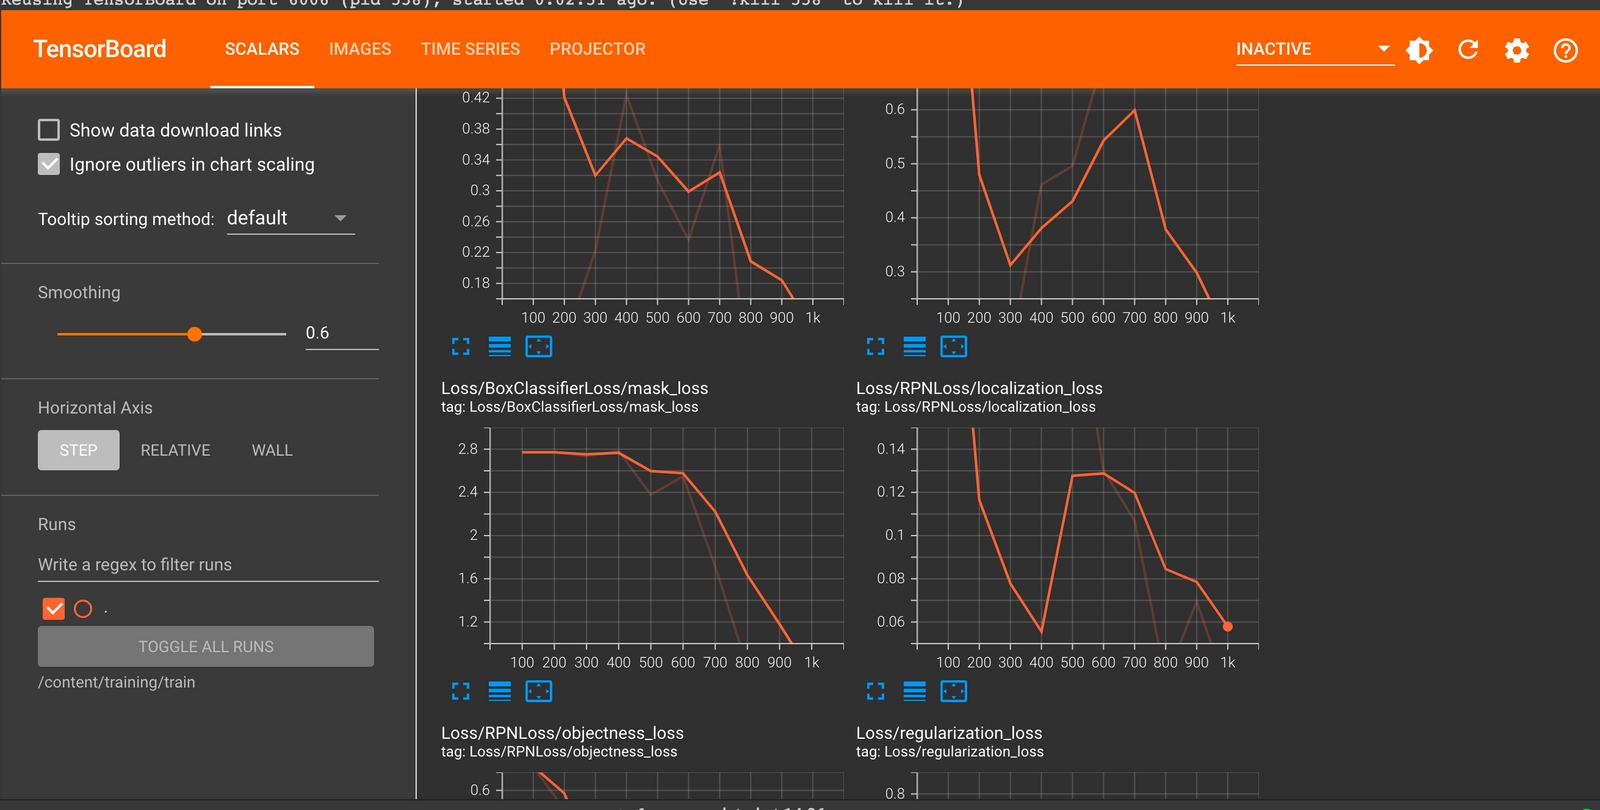
pip install opencv-python-headless==4.5.2.52!apt install --allow-change-held-packages libcudnn8=8.1.0.77-1+cuda11.2Model evaluation and visualization
When training is complete you can run TensorBoard to show the visualization of the training and testing metrics such as the localization loss.
Read more: TensorBoard tutorial (Deep dive with examples and notebook)
Run conversion script
The next step is to export the model for inference. The conversion script expects:
trained_checkpoint_dirthe last checkpoint of the trained model.output_directorywhere the exported model will be saved.pipeline_config_paththe path to the pipeline configuration file.
The conversion script will output checkpoint files, a SavedModel, and the model config file.

Download model from Google Colab
You may want to download the converted model or trained model. That can be done by zipping the files and using Colab utilities to download the compressed file.
Object detection with Mask R-CNN
It's now time to use the trained Mask R-CNN model to perform object detection on test car images. Luckily, the TensorFlow 2 Object Detection API provides all the utilities needed to do this. The first one is a function that loads an image and converts it into a NumPy array.
Load an image from file into a NumPy array
The function expects a path to an image file and returns a NumPy array.
Visualize detections
The next utility is a function for plotting the detections using Matplotlib.
Create model from the last checkpoint
Let's now create a detection model from the last saved model checkpoint.
Map labels for inference decoding
Next, we declare variables that are important for decoding the model output. For instance, the categories and file containing the training categories.
Run detector on test image
The next step is to run the Mask R-CNN object detection model on some test images.
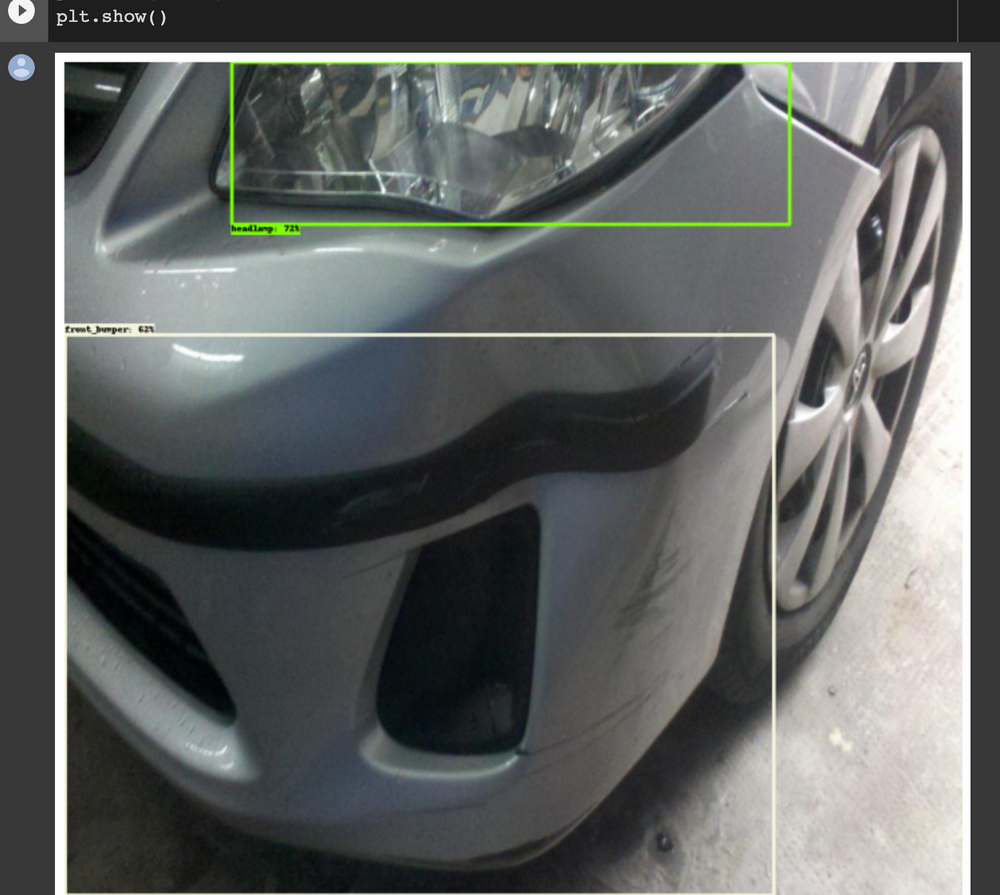
Image segmentation with Mask R-CNN
The Mask R-CNN object detection model can be used for both object detection and image segmentation. Let's start by loading the fined tuned model.
Set label map
The model also needs labels for decoding the output.
Set test image paths
The next step is to define the path to the test images. In this case, we'll use all the test images because they aren't that many.
Create inference function
The segmentation utility is also provided on the TensorFlow 2 Object Detection API repo.
Perform segmentation and detection
The next step is to load an image as a NumPy array and use the above function to start detecting objects.
Final thoughts
In this article, we have seen how you can train an object detection model using the TensorFlow 2 Object Detection API. More specifically, we covered:
- Dataset preparation for object detection tasks.
- The TensorFlow 2 Object Detection API.
- How to install the TensorFlow Object Detection API locally and on Google Colab.
- Setting the configurations for the Mask R-CNN object detection model.
- Converting images into TFRecord format.
- Training an object detection model.
- Evaluating the object detection model.
- Using the Mask R-CNN for object detection.
- Image segmentation with the Mask R-CNN model.
Click the Colab link below to try the project from start to finish. You can also replace the dataset with another one. If you change the model, remember to edit the model configuration file. Always ensure that the paths in the configuration file point to the right locations.
TensorFlow resources
How to create custom training loops in Keras
How to train deep learning models on Apple Silicon GPU
How to build CNN in TensorFlow(examples, code, and notebooks)
How to build artificial neural networks with Keras and TensorFlow
Follow us on LinkedIn, Twitter, GitHub, and subscribe to our blog, so you don't miss a new issue.