
Implementing Transformer decoder for text generation in Keras and TensorFlow

The recent wave of generative language models is the culmination of years of research starting with the seminal "Attention is All You Need" paper. The paper introduced the Transformer architecture that would later be used as the backbone for numerous language models. These text generation language models are autoregressive, meaning that they predict one token at a time. They work by masking future tokens such that the model doesn't have access to the token that it's about to predict, hence the word causal language modeling.
In this blog, we will take a step back and build a text generation model using Keras and TensorFlow. This will involve building the following building blocks:
- The position encoding layer
- The embedding layer
- The Transformer decoder layer
- The Transformer decoder Keras model
- The Keras module for text generation
This piece assumes you know how to build artificial neural networks with Keras and TensorFlow. Check out the notebook with the entire code at the end of the post.
Check if GPU is available
Training a Transformer-based model is compute-intensive and requires a GPU accelerator. Ensure that you have one by running this command:
nvidia-smi
If no GPU shows up, ensure that you have a GPU and have installed all the required GPU drivers and libraries. Otherwise, you may still be able to train the Transformer but it will be extremely slow.
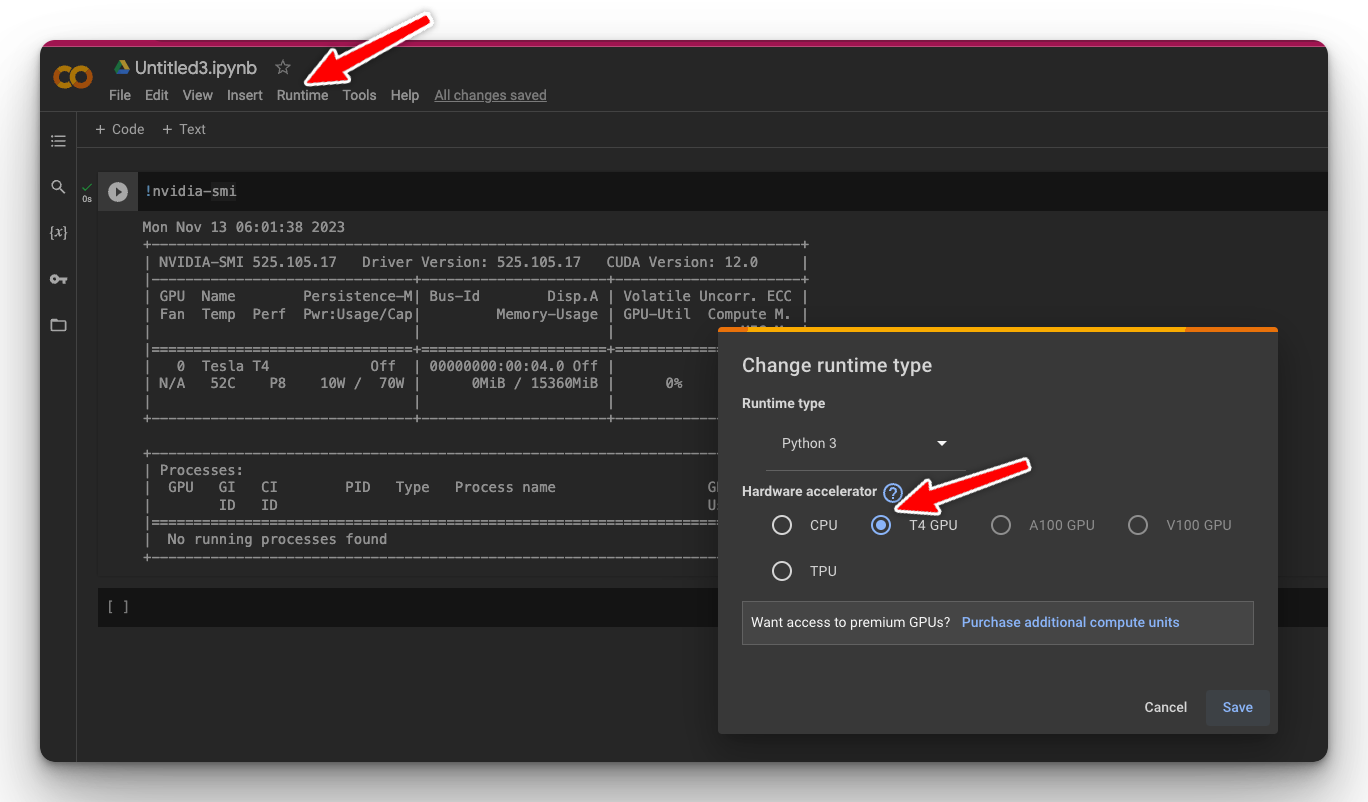
You can access GPUs for free on Google Colab by clicking on Runtime and changing the Hardware accelerator to T4 GPU.
Kaggle Notebooks also gives access to GPUs for free.

Install TensorFlow and CUDA binaries
Follow the instructions on the Install TensorFlow with pip page to install TensorFlow locally if you have a GPU.
python3 -m pip install tensorflow[and-cuda]Check if TensorFlow can access GPU
Confirm that TensorFlow can access the GPU:
import tensorflow as tf

tf.config.list_physical_devices("GPU")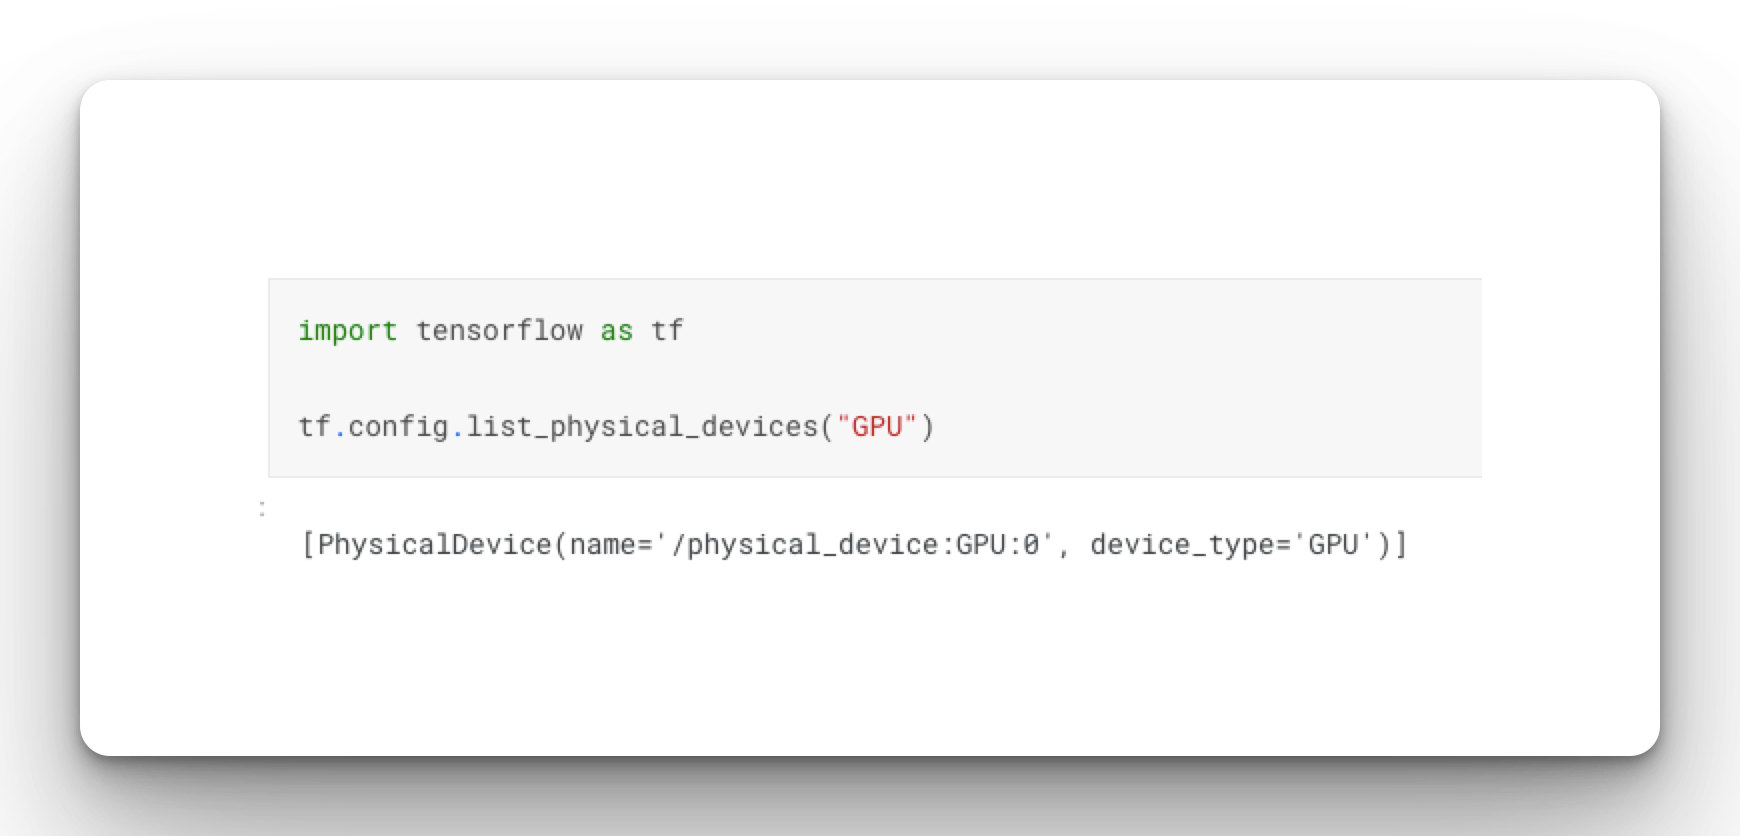
Load dataset using Pandas
We will use the 190k+ Medium Articles dataset to train the Tranformer. Import the packages needed for this project and load the dataset using Pandas.
import numpy as np
import matplotlib.pyplot as plt
import tensorflow as tf
import seaborn as sns
import pandas as pd
df = pd.read_csv(
"/kaggle/input/medium-articles/medium_articles.csv",
)
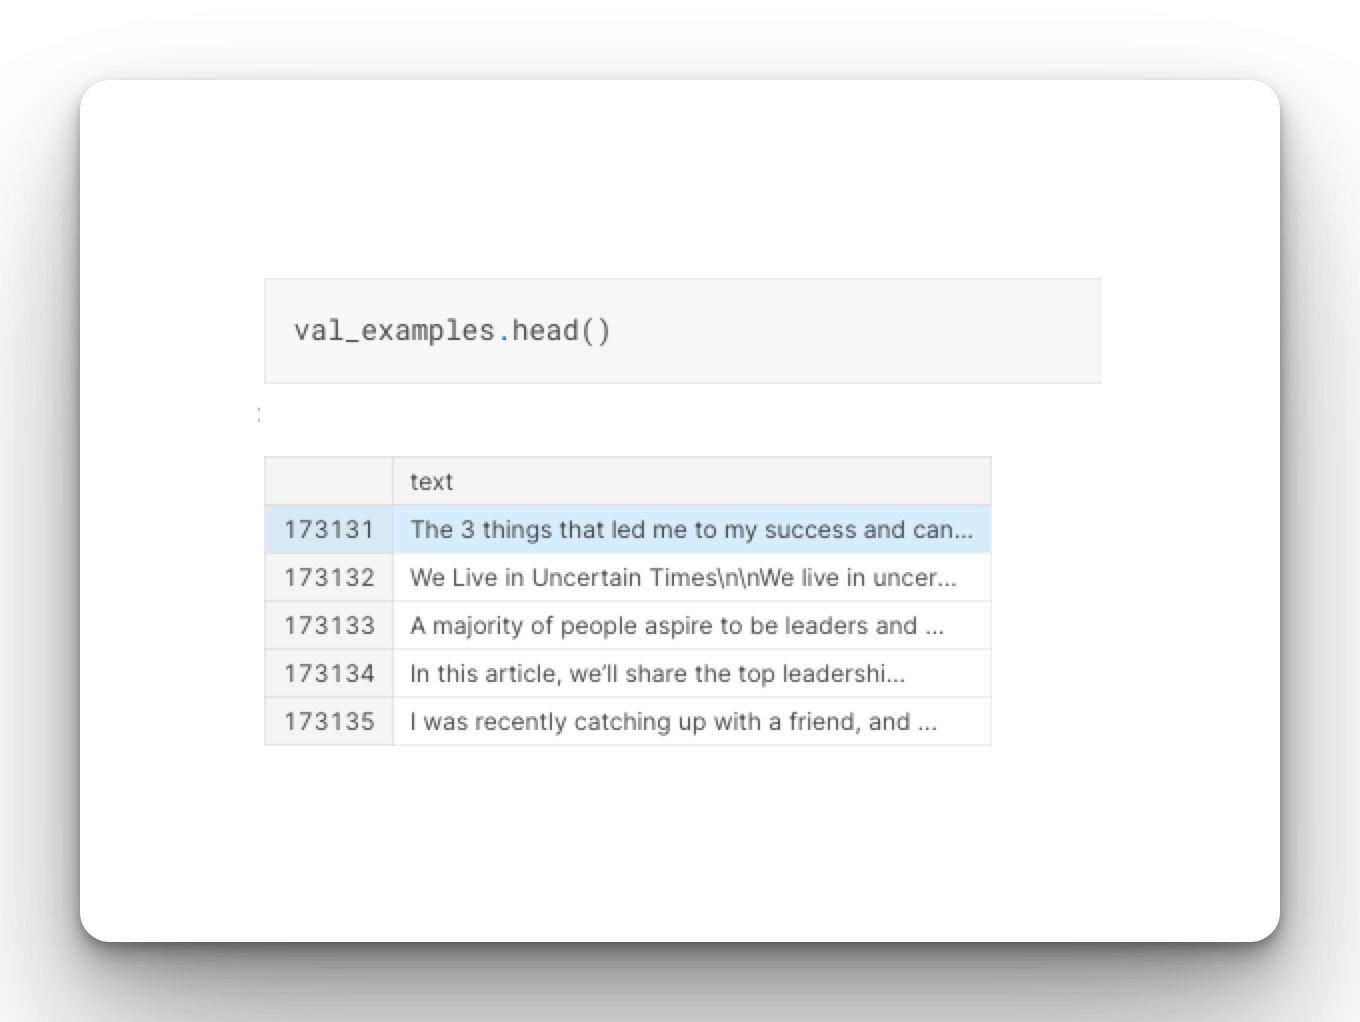
df = df[["text"]]
df.head()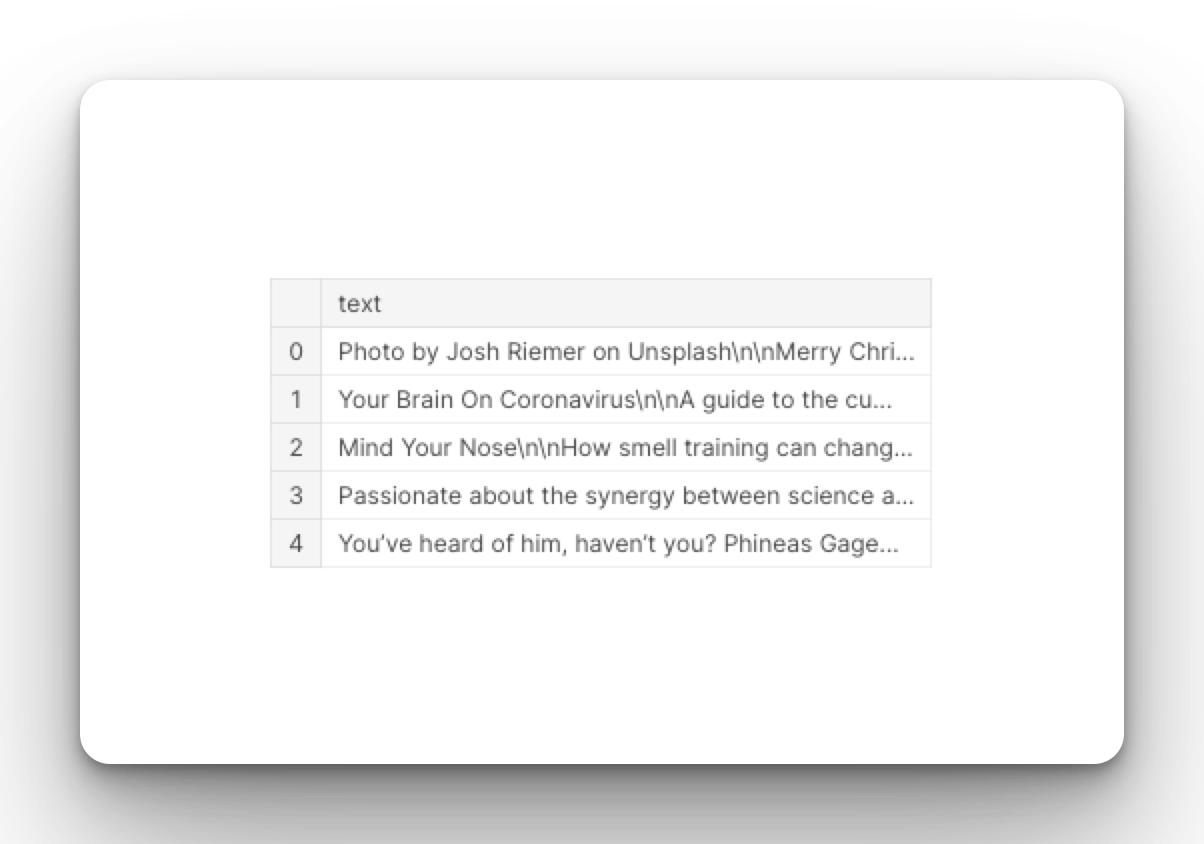
Split the dataset
We will train the Transformer using the first 90% of the samples and use the rest for validation. Split the data using this criterion:
n = int(0.9 * len(df))  # first 90% will be train, rest val
train_examples = df[:n]
val_examples = df[n:]
Convert dataset to tf.data
Next, ensure that the data is in the tf.data format for easy caching and batch creation.
train_examples = tf.data.Dataset.from_tensor_slices((train_examples))
val_examples = tf.data.Dataset.from_tensor_slices((val_examples))
Perform text vectorization with TensorFlow
Up to this point, the data is still in text form. We need to convert it into a numerical form before we can pass it to the Transformer model. The TextVectorization layer maps the text into integers. Some of the parameters it accepts are:
standardizein this caselower_and_strip_punctuationto lowercase the text and remove punctuationsmax_tokensto determine the maximum size of the vocabulary
Call adapt once the TextVectorization layer has been initialized to create the vocabulary.
max_features = 5000  # Maximum vocab size
BATCH_SIZE = 32
MAX_TOKENS = 128
vectorize_layer = tf.keras.layers.TextVectorization(
    standardize="lower_and_strip_punctuation",
    max_tokens=max_features,
)
vectorize_layer.adapt(train_examples, batch_size=None)
Create a vocabulary variable that we will use for converting the predicted token IDs to words.
vocabulary = vectorize_layer.get_vocabulary()
Prepare batches of data
Instead of feeding the data one by one into the Transformer, we create batches because it is more effective.
def prepare_batch(data):
    x = vectorize_layer(data)
    x = x[:, :(MAX_TOKENS)]  # Trim to MAX_TOKENS
    X_train = x[:, :-1]  # Shift by one
    y_train = x[:, 1:]  # Shift by one
    return (X_train, y_train)
On lines 4 and 5 above we shift the values by one to ensure that the Transformer decoder doesn't see a future word when trying to predict it. Check out the NumPy tutorial to learn more about indexing arrays.

Setting prefetch allows the data to be fetched ahead of time meaning that fetching data is not a bottleneck in the training process. Setting tf.data.AUTOTUNE means that the buffer size for the prefetching will be set dynamically. You can however set this value manually.
def make_batches(ds):
    return (
        ds.shuffle(BUFFER_SIZE)
        .batch(BATCH_SIZE)
        .map(prepare_batch, tf.data.AUTOTUNE)
        .prefetch(buffer_size=tf.data.AUTOTUNE)
    )
Next, run the functions to create training and validation batches:
# Create training and validation set batches
train_batches = make_batches(train_examples)
val_batches = make_batches(val_examples)
Check the shapes for future reference:
for X_train, y_train in train_batches.take(1):
    break
print(X_train.shape)
print(y_train.shape)
"""
(32, 127)

(32, 127)
"""
Grab one batch for testing various components of the Transformer decoder:
for x_batch, y_batch in train_batches.take(1):
    break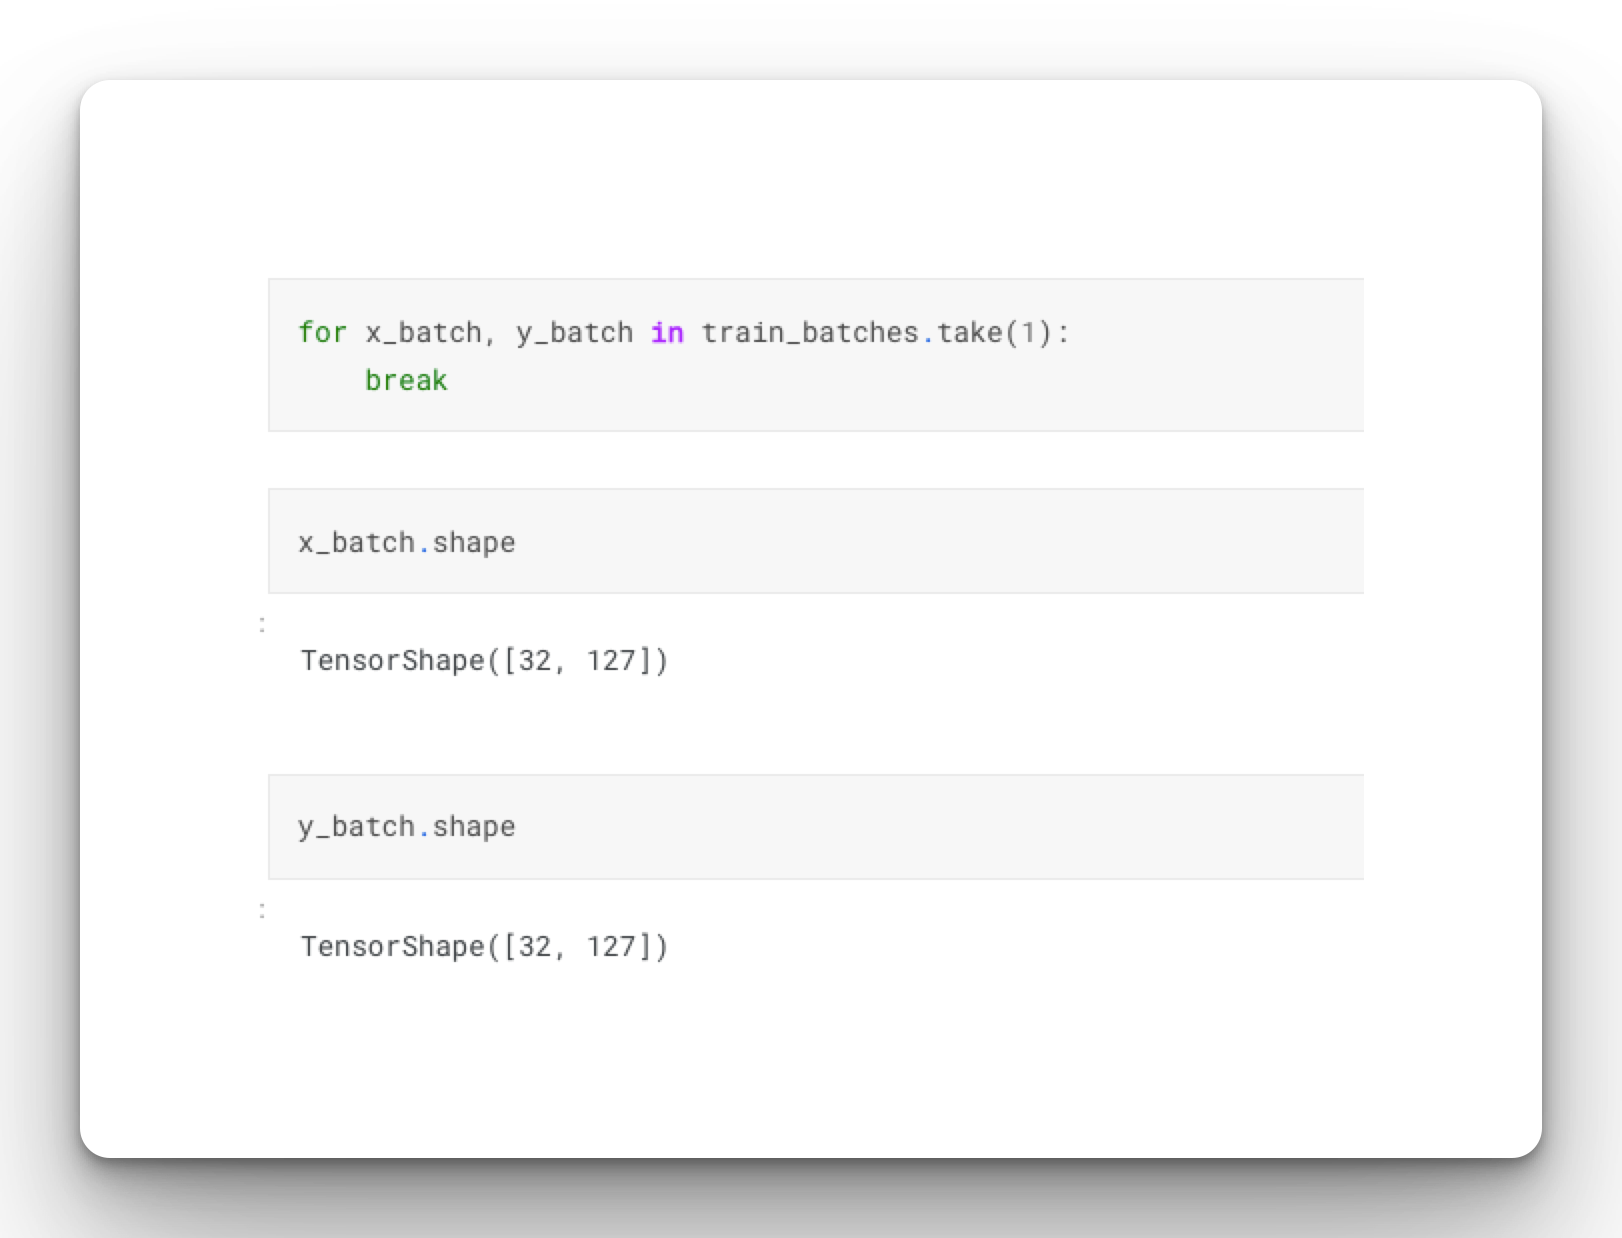
RNN vs Transformer
Recurrent Neural Networks (RNNs) were a popular way of dealing with sequence data before the introduction of the Transformer architecture. Transformers are better than RNNs because they:
- Can run in parallel hence they are more computationally efficient on accelerators such as GPUs
- Are better at modeling long-range relationships and thus can easily learn longer connections
- Are great at modeling sequence data
Create Transformer position encoding layer in TensorFlow
The Transformer we will build is modified from the official TensorFlow docs that was built for machine translation. We will modify it for text generation.
Our attention will be on the right side of the Transformer architecture:
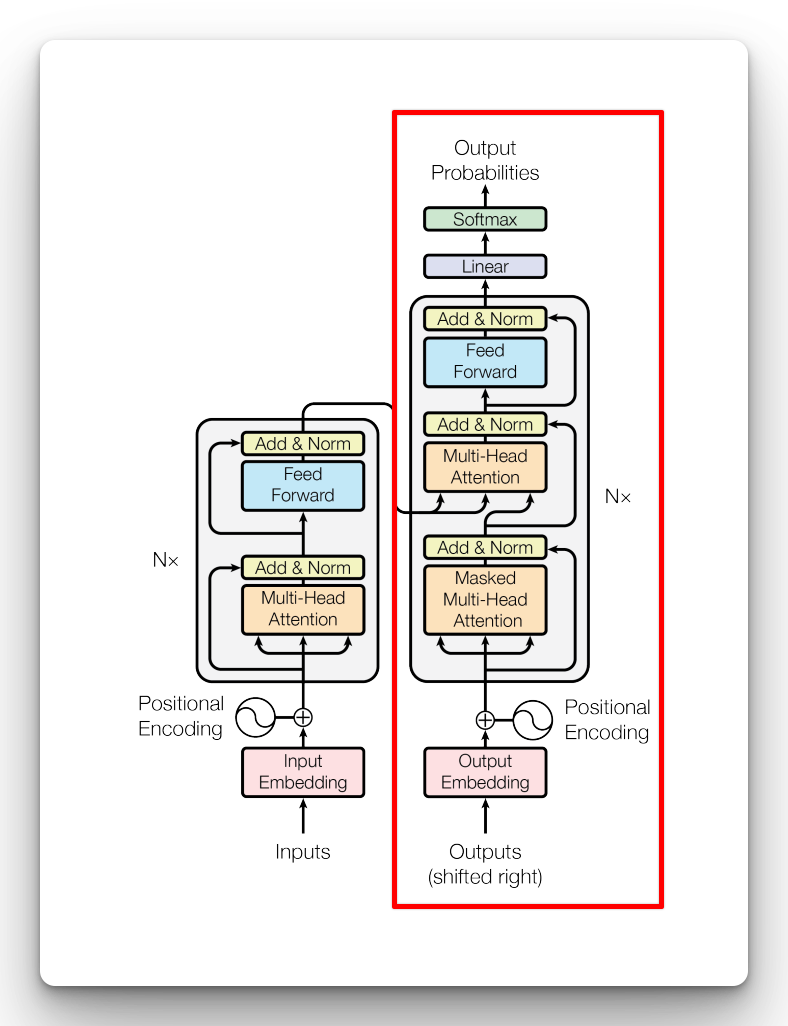
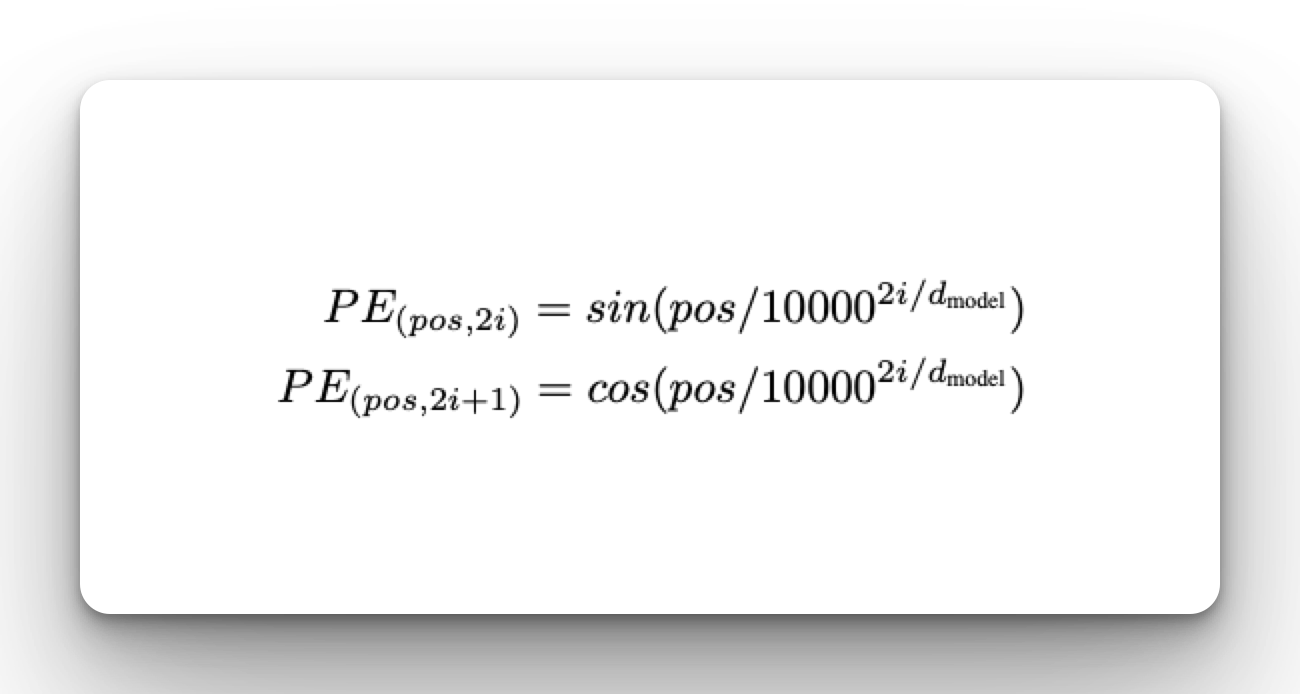
We will use the Keras Embedding Layer to convert the tokens we created to vectors when passing them to the decoder. However, since the Transformer network has no recurrent layers, all the positional information would be lost. This is solved by introducing positional encoding into the network. In practice, this is done using a set of sines and cosines at different frequencies. In the original paper, the proposed formulae were:
def positional_encoding(length, depth):
    depth = depth / 2

    positions = np.arange(length)[:, np.newaxis]  # (seq, 1)
    depths = np.arange(depth)[np.newaxis, :] / depth  # (1, depth)

    angle_rates = 1 / (10000**depths)  # (1, depth)
    angle_rads = positions * angle_rates  # (pos, depth)

    pos_encoding = np.concatenate([np.sin(angle_rads), np.cos(angle_rads)], axis=-1)

    return tf.cast(pos_encoding, dtype=tf.float32)
This can be visualized using Matplotlib as follows:
pos_encoding = positional_encoding(length=2048, depth=512)

# Check the shape.
print(pos_encoding.shape)

# Plot the dimensions.
plt.pcolormesh(pos_encoding.numpy().T, cmap="RdBu")
plt.ylabel("Depth")
plt.xlabel("Position")
plt.colorbar()
plt.show()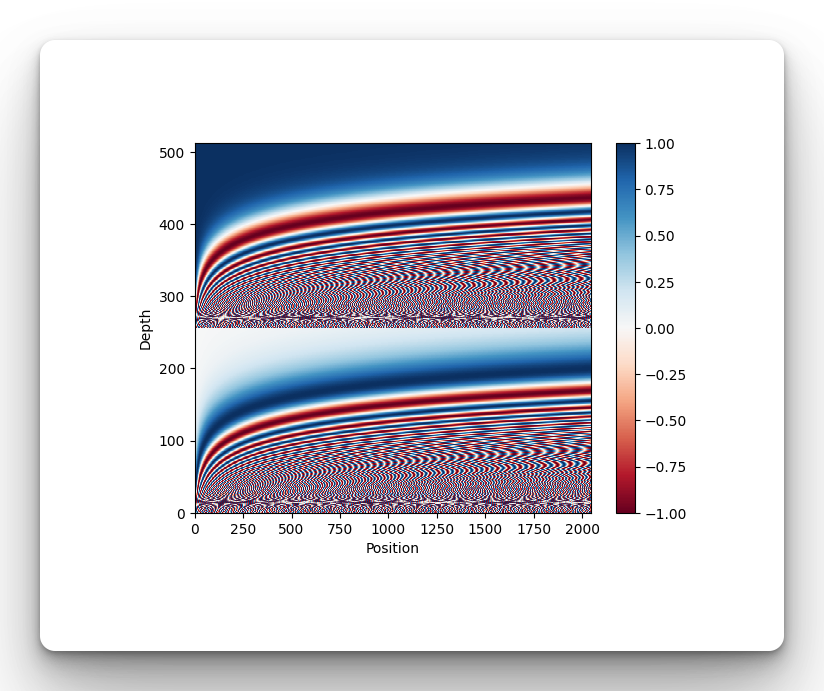
Create Transformer position embedding layer in Keras
With position encoding set up, we can proceed to create the position embedding layer. The objective is to get the embedding vector of a token and add its position vector. That way, position information will not be lost.
class PositionalEmbedding(tf.keras.layers.Layer):
def __init__(self, vocab_size, d_model):
super().__init__()
self.d_model = d_model
self.embedding = tf.keras.layers.Embedding(vocab_size, d_model, mask_zero=True)
self.pos_encoding = positional_encoding(length=2048, depth=d_model)
def compute_mask(self, *args, **kwargs):
return self.embedding.compute_mask(*args, **kwargs)
def call(self, x):
length = tf.shape(x)[1]
x = self.embedding(x)
# This factor sets the relative scale of the embedding and positonal_encoding.
x *= tf.math.sqrt(tf.cast(self.d_model, tf.float32))
x = x + self.pos_encoding[tf.newaxis, :length, :]
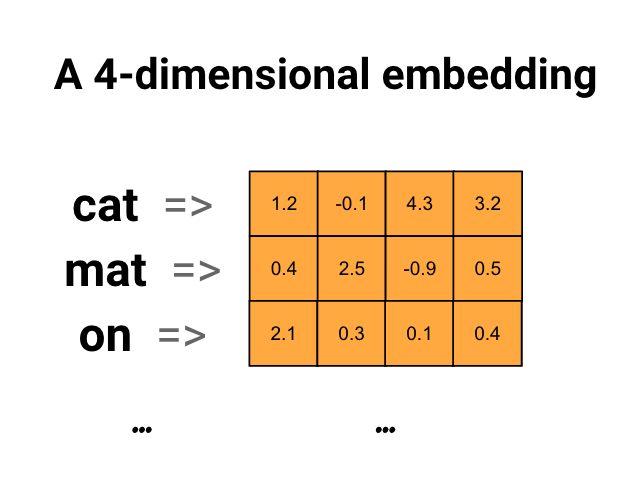
return xOn line 5 above, we set up the word embeddings. Word embedding is a technique used to represent documents with a dense vector representation. The vocabulary in these documents is mapped to real number vectors. Semantically similar words are mapped close to each other in the vector space.
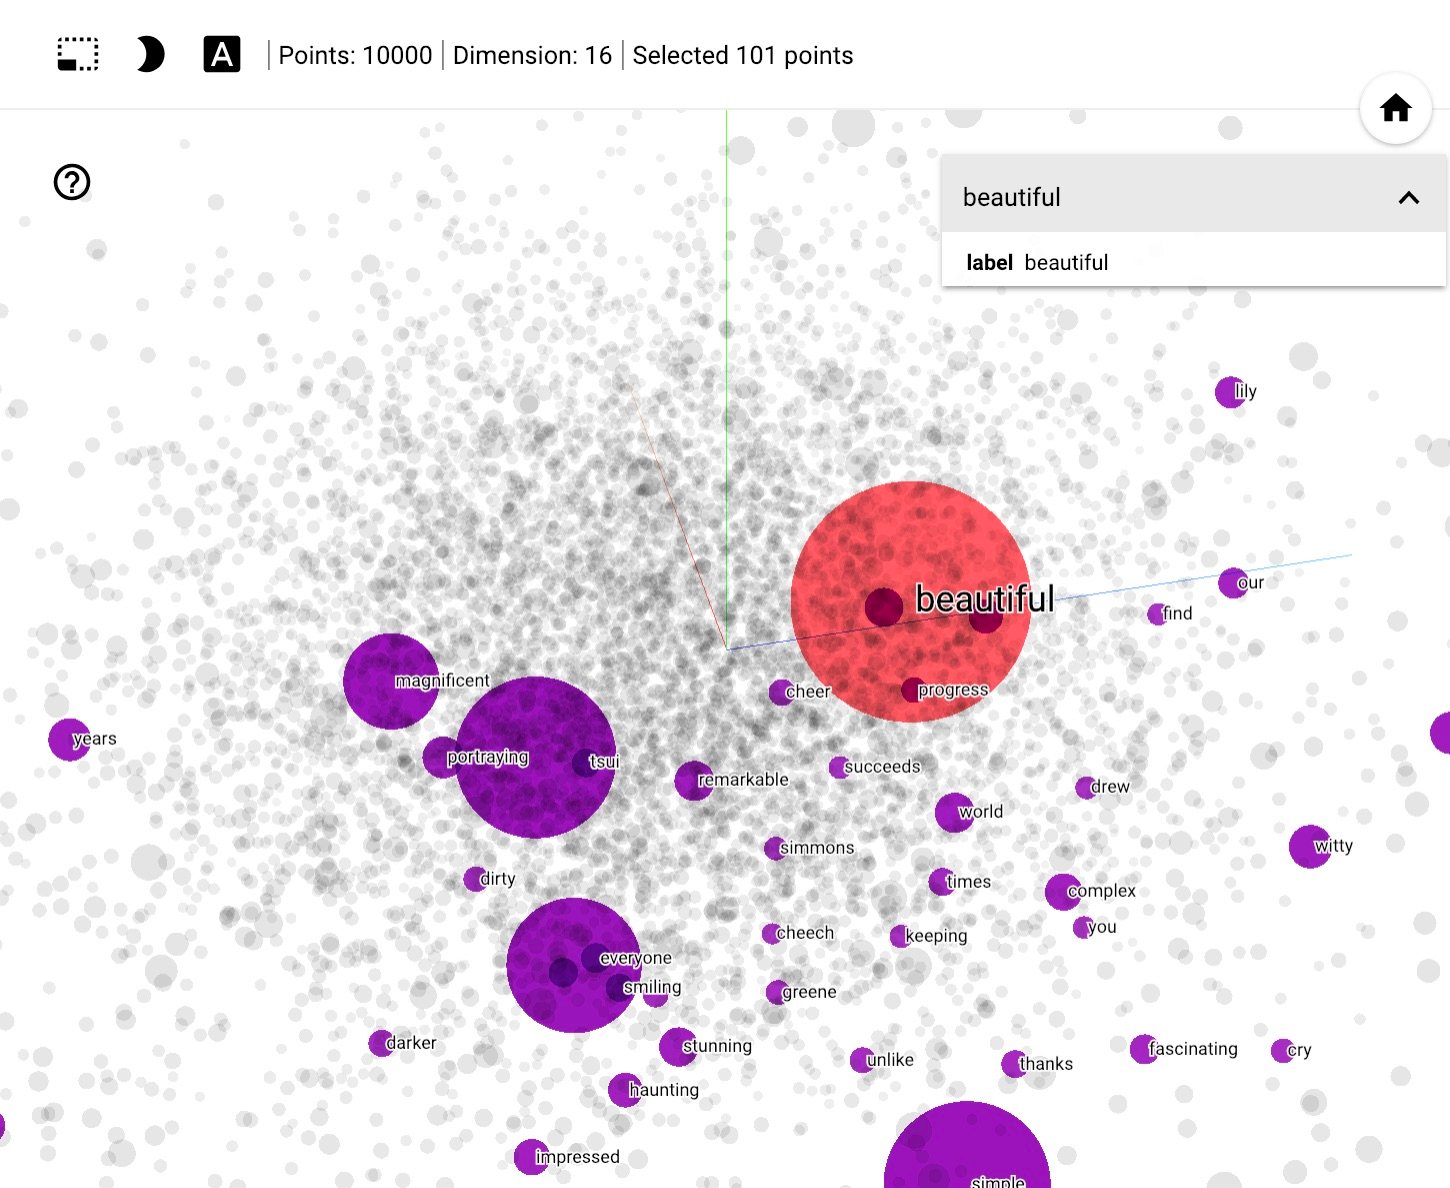
A word embedding represents the words in a text corpus with floating point values while considering the relationship between the different words. These relationships are learned when training the embeddings. The size of the embedding vector can be assigned manually. The Embedding layer is used for learning word embeddings in TensorFlow.
Set up attention layer in Keras
Understanding attention is critical before we start using the building blocks provided by TensorFlow.
Scaled Dot-Product attention
In the Transformer attention is computed using queries, keys, and values. The computation is done by weighting the sum of the values by mapping the key-value pairs with each value having a given weight.
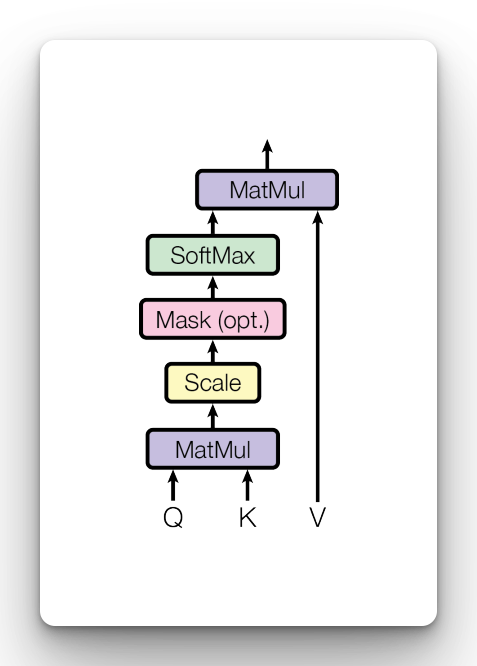
The attention is computed using the formula:
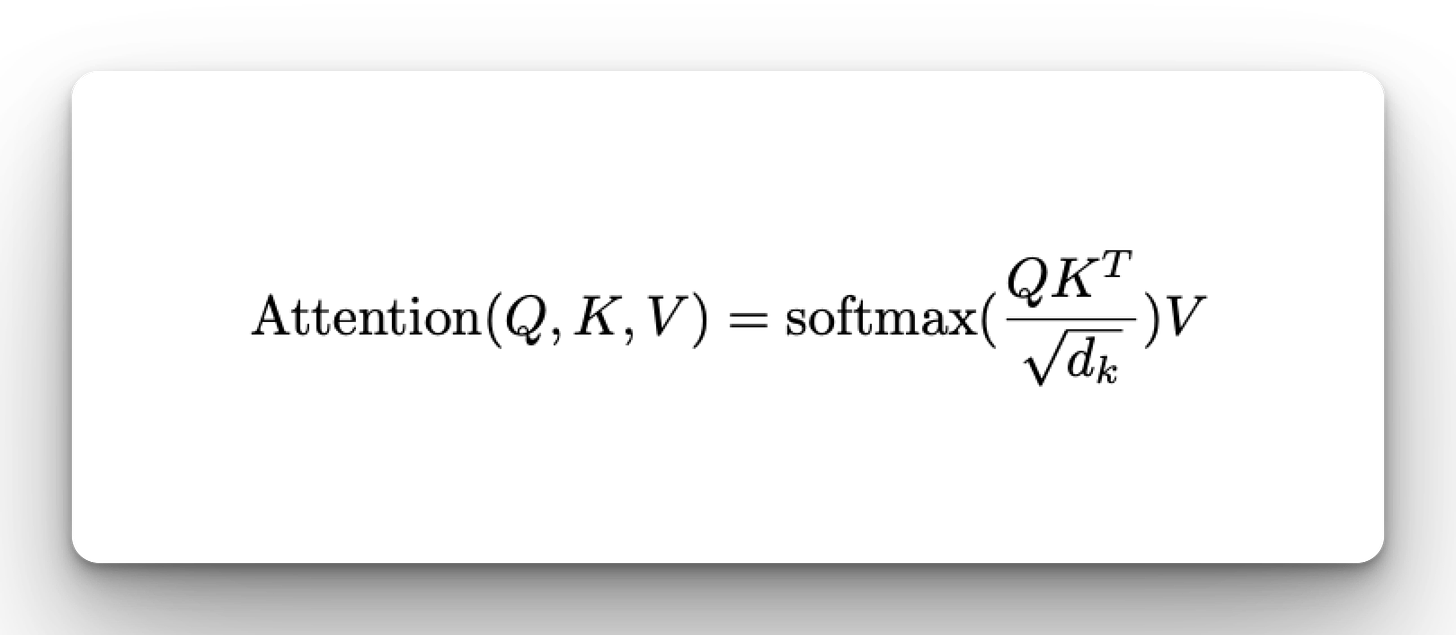
where:
dkis the dimension of the key vector, making the square root 8- Q is the query matrix
- K and V are the key and value matrices
- Dividing by the square root of
dkis a scaling factor that stabilizes gradients
To obtain Query, Key, and Value matrices the input query, key, and value are multiplied.
Self-attention comes from the factor each word in the sentence is scored against all the words. So a word can attend to itself. The scores are passed through a softmax function where they will sum to 1, making them easy to interpret as probabilities.
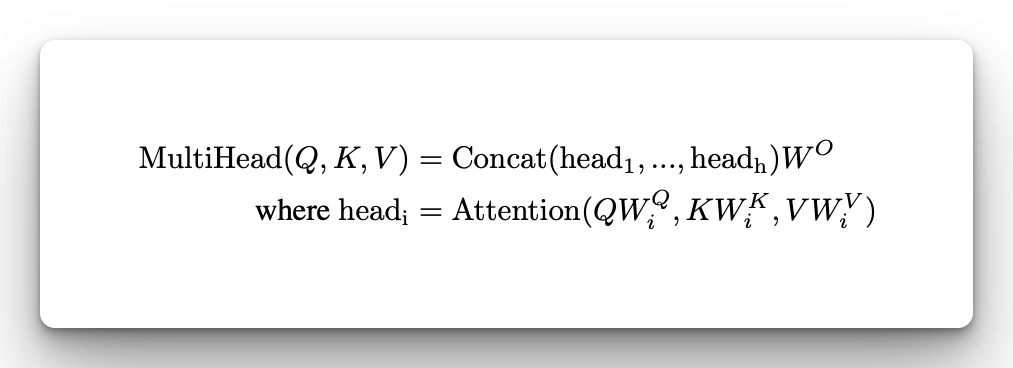
Multi-head Attention
When you run multiple attention layers at the same time it leads to Multi-head Attention. This is done by running the attention layers at the same time, concatenating the results, and passing them to the feedforward layer.
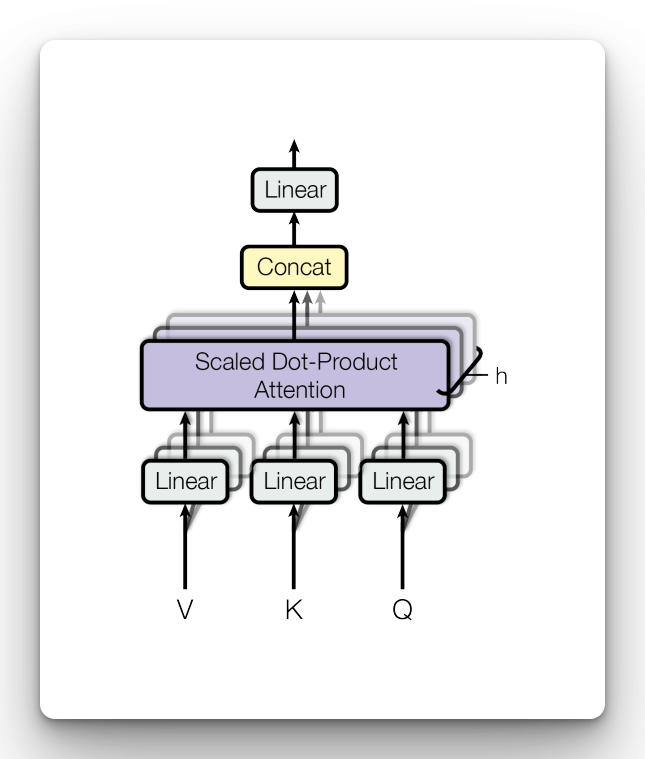
The original paper has 8 parallel heads. After concatenation, the results are multiplied with another weight to form a one-weight matrix that is passed to the feed-forward network.
The attention layer is defined using:
- MultiHeadAttention an implementation of the query, key, and value mechanism as defined in the Transformer paper
- LayerNormalization for efficient Transformer training
- Add for adding multiple layers, popularly known as residual connections
The following defines self-attention since the query, key, and value are the same. Projecting it several times makes it multihead attention.
The decoder network is autoregressive meaning that it generates one token at a time. It should, therefore, not see future tokens during training, otherwise, it would start memorizing them and not learning anything. To make this possible, pass the use_causal_mask=True in the MultiHeadAttention layer to mask future tokens. Setting return_attention_scores to True is important so that they are available for plotting after training.
class BaseAttention(tf.keras.layers.Layer):
    def __init__(self, **kwargs):
        super().__init__()
        self.mha = tf.keras.layers.MultiHeadAttention(**kwargs)
        self.layernorm = tf.keras.layers.LayerNormalization()
        self.add = tf.keras.layers.Add()

class CausalSelfAttention(BaseAttention):
    def call(self, x):
        attn_output, attn_scores = self.mha(
            query=x, value=x, key=x, return_attention_scores=True, use_causal_mask=True
        )
        # Cache the attention scores for plotting later.
        self.last_attn_scores = attn_scores
        x = self.add([x, attn_output])
        x = self.layernorm(x)
        return x
Test the attention layer:
sample_csa = CausalSelfAttention(num_heads=2, key_dim=512)

print(x_batch_emb.shape)
print(sample_csa(x_batch_emb).shape)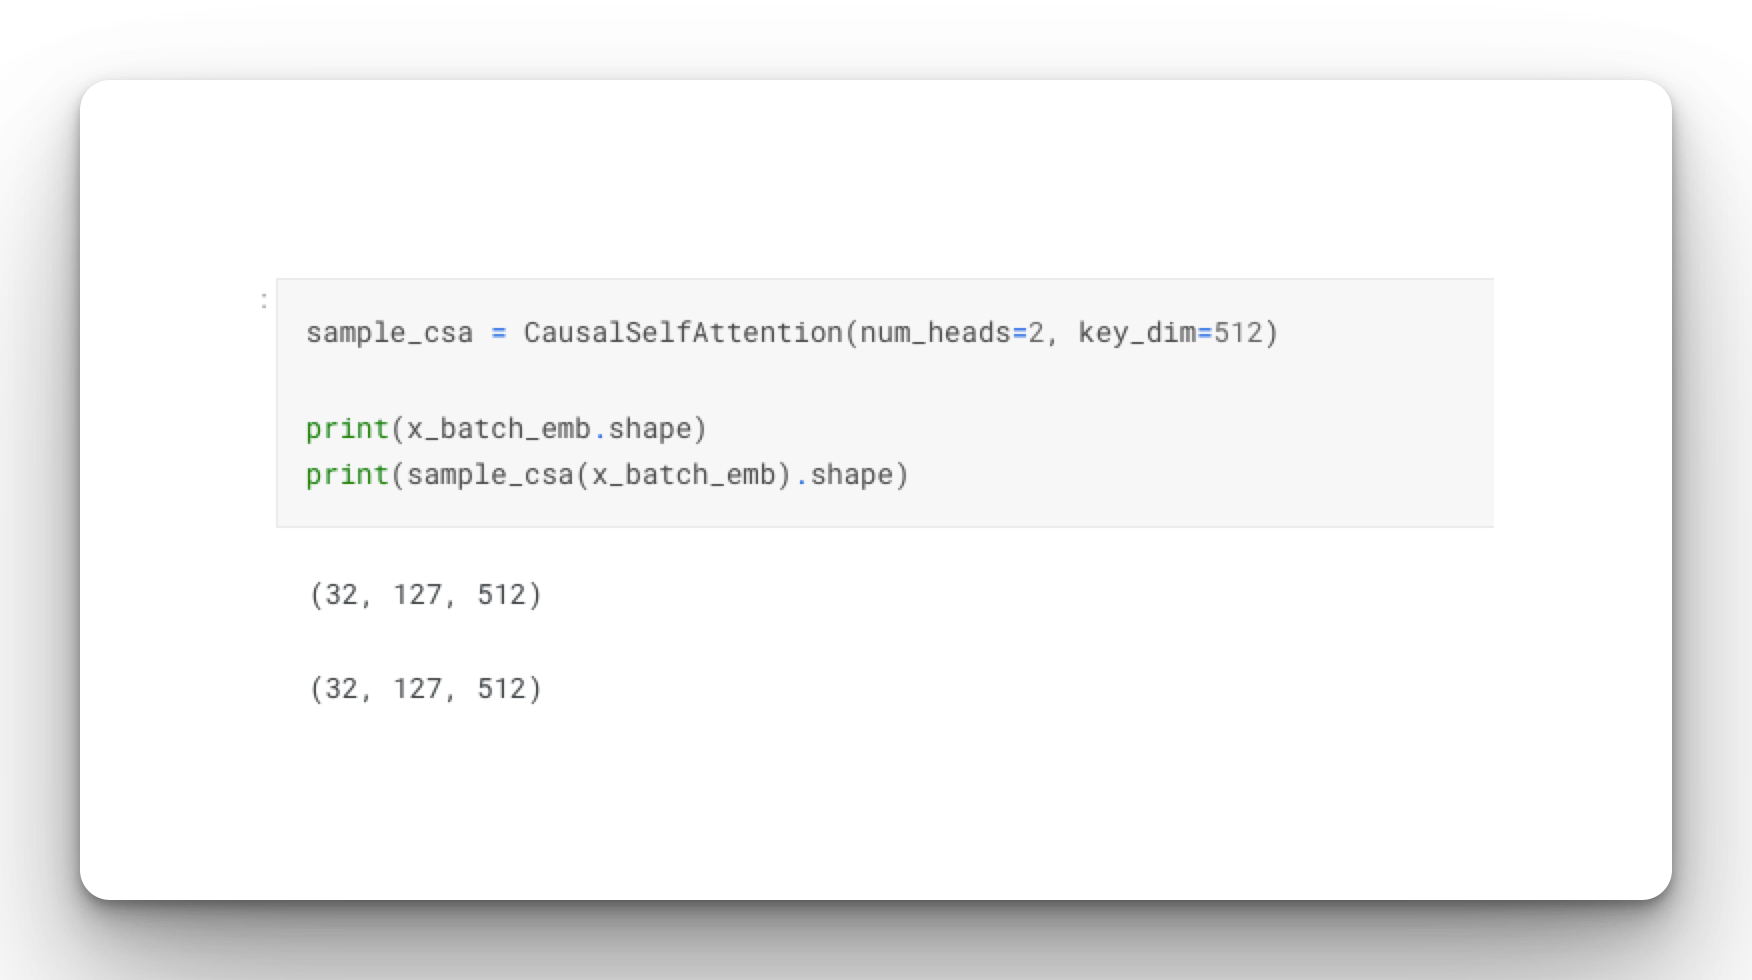
Define Transformer feedforward network
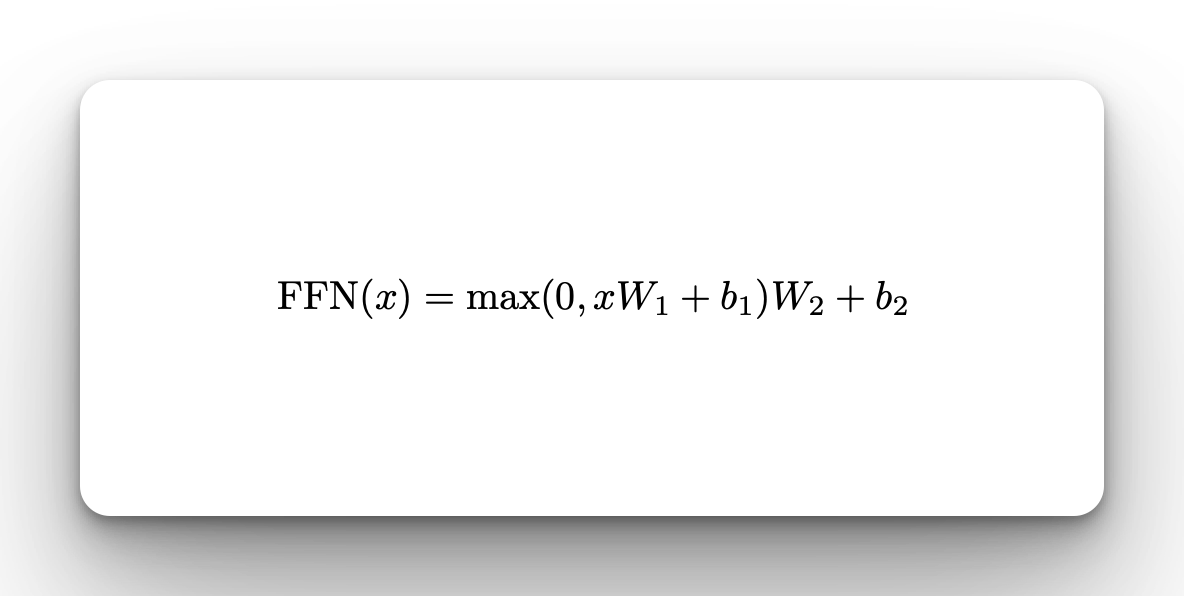
The Transformer decoder includes a feedforward network with a ReLU activation. The network has two linear layers and a dropout layer.
class FeedForward(tf.keras.layers.Layer):
    def __init__(self, d_model, dff, dropout_rate=0.1):
        super().__init__()
        self.seq = tf.keras.Sequential(
            [
                tf.keras.layers.Dense(dff, activation="relu"),
                tf.keras.layers.Dense(d_model),
                tf.keras.layers.Dropout(dropout_rate),
            ]
        )
        self.add = tf.keras.layers.Add()
        self.layer_norm = tf.keras.layers.LayerNormalization()

    def call(self, x):
        x = self.add([x, self.seq(x)])
        x = self.layer_norm(x)
        return x
Create decoder layer in TensorFlow
The Transformer decoder layer will contain two main building blocks:
- The self-attention layer
- The feedforward network
class DecoderLayer(tf.keras.layers.Layer):
    def __init__(self, *, d_model, num_heads, dff, dropout_rate=0.1):
        super(DecoderLayer, self).__init__()

        self.causal_self_attention = CausalSelfAttention(
            num_heads=num_heads, key_dim=d_model, dropout=dropout_rate
        )

        self.ffn = FeedForward(d_model, dff)

    def call(self, x):
        x = self.causal_self_attention(x=x)
        # Cache the last attention scores for plotting later
        self.last_attn_scores = self.causal_self_attention.last_attn_scores
        x = self.ffn(x)  # Shape `(batch_size, seq_len, d_model)`.
        return x
Implement Transformer decoder in Keras
To define the Transformer decoder in TensorFlow you need:
- The positional embedding layer
- A stack of decoder layers
class Decoder(tf.keras.layers.Layer):
    def __init__(
        self, *, num_layers, d_model, num_heads, dff, vocab_size, dropout_rate=0.1
    ):
        super(Decoder, self).__init__()

        self.d_model = d_model
        self.num_layers = num_layers

        self.pos_embedding = PositionalEmbedding(vocab_size=vocab_size, d_model=d_model)
        self.dropout = tf.keras.layers.Dropout(dropout_rate)
        self.dec_layers = [
            DecoderLayer(
                d_model=d_model, num_heads=num_heads, dff=dff, dropout_rate=dropout_rate
            )
            for _ in range(num_layers)
        ]

        self.last_attn_scores = None

    def call(self, x):
        # `x` is token-IDs shape (batch, target_seq_len)
        x = self.pos_embedding(x)  # (batch_size, target_seq_len, d_model)

        x = self.dropout(x)

        for i in range(self.num_layers):
            x = self.dec_layers[i](x)

        self.last_attn_scores = self.dec_layers[-1].last_attn_scores

        # The shape of x is (batch_size, target_seq_len, d_model).
        return x
Test the decoder:
# Instantiate the decoder.
sample_decoder = Decoder(
    num_layers=4, d_model=512, num_heads=8, dff=2048, vocab_size=8000
)

output = sample_decoder(x=x_batch)

# Print the shapes.
print(x_batch.shape)
print(x_batch_emb.shape)
print(output.shape)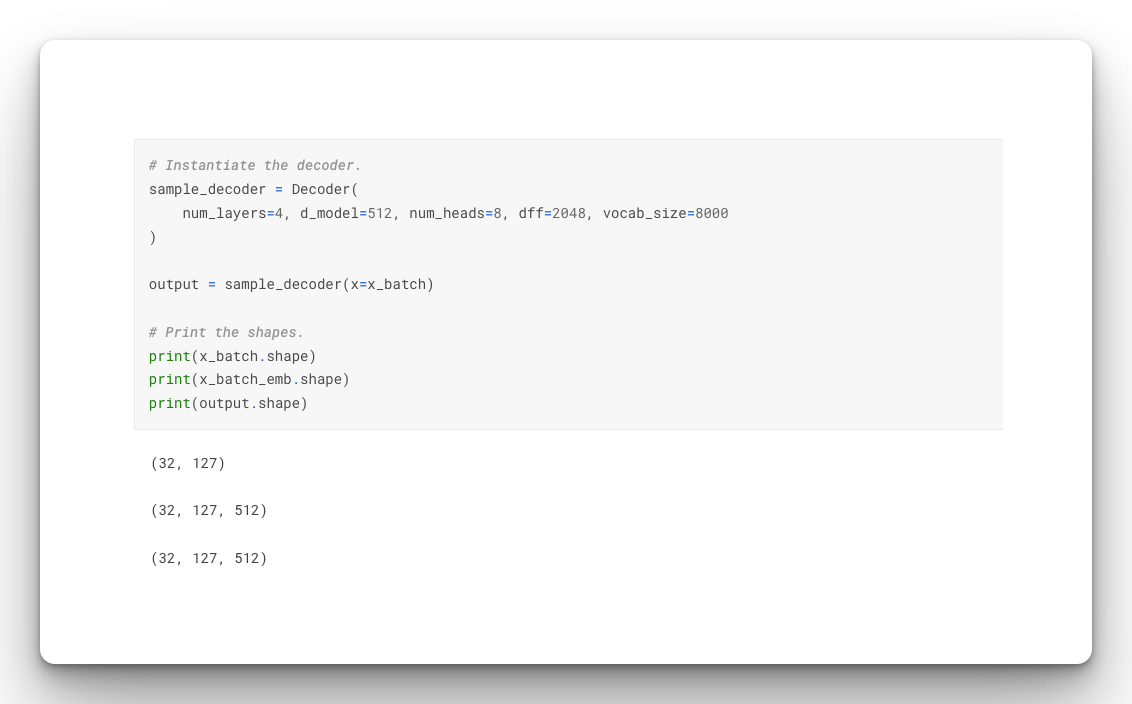
Define Transformer model With Keras and TensorFlow
We now have all the building blocks required to define the Keras Transformer decoder. The final step is to put them together and add a final dense layer to output final predictions from the network as logits.
class Transformer(tf.keras.Model):
    def __init__(
        self, *, num_layers, d_model, num_heads, dff, input_vocab_size, dropout_rate=0.1
    ):
        super().__init__()

        self.decoder = Decoder(
            num_layers=num_layers,
            d_model=d_model,
            num_heads=num_heads,
            dff=dff,
            vocab_size=input_vocab_size,
            dropout_rate=dropout_rate,
        )

        self.final_layer = tf.keras.layers.Dense(input_vocab_size)

    def call(self, inputs):
        # To use a Keras model with `.fit` you must pass all your inputs in the
        # first argument.
        x = inputs

        x = self.decoder(x)  # (batch_size, target_len, d_model)

        # Final linear layer output.
        logits = self.final_layer(x)  # (batch_size, target_len, target_vocab_size)

        try:
            # Drop the keras mask, so it doesn't scale the losses/metrics.
            # b/250038731
            del logits._keras_mask
        except AttributeError:
            pass

        # Return the final output and the attention weights.
        return logits
Train Transformer decoder
Before we can train the model we have to get some settings out of the way.
Keras Transformer learning rate
The original paper proposed training the Transformer with the Adam optimizer with a custom scheduler:
class CustomSchedule(tf.keras.optimizers.schedules.LearningRateSchedule):
    def __init__(self, d_model, warmup_steps=4000):
        super().__init__()

        self.d_model = d_model
        self.d_model = tf.cast(self.d_model, tf.float32)

        self.warmup_steps = warmup_steps

    def __call__(self, step):
        step = tf.cast(step, dtype=tf.float32)
        arg1 = tf.math.rsqrt(step)
        arg2 = step * (self.warmup_steps**-1.5)

        return tf.math.rsqrt(self.d_model) * tf.math.minimum(arg1, arg2)
learning_rate = CustomSchedule(d_model)

optimizer = tf.keras.optimizers.Adam(
    learning_rate, beta_1=0.9, beta_2=0.98, epsilon=1e-9
)
Set up Transformer decoder loss and accuracy
Define masked loss and accuracy:
def masked_loss(label, pred):
    mask = label != 0
    loss_object = tf.keras.losses.SparseCategoricalCrossentropy(
        from_logits=True, reduction="none"
    )
    loss = loss_object(label, pred)

    mask = tf.cast(mask, dtype=loss.dtype)
    loss *= mask
    loss = tf.reduce_sum(loss) / tf.reduce_sum(mask)
    return loss


def masked_accuracy(label, pred):
    pred = tf.argmax(pred, axis=2)
    label = tf.cast(label, pred.dtype)
    match = label == pred

    mask = label != 0

    match = match & mask

    match = tf.cast(match, dtype=tf.float32)
    mask = tf.cast(mask, dtype=tf.float32)
    return tf.reduce_sum(match) / tf.reduce_sum(mask)
Train the Transformer decoder with Keras fit method
Train the model and save the history variable for easy plotting:
transformer.compile(loss=masked_loss, optimizer=optimizer, metrics=[masked_accuracy])
history = transformer.fit(train_batches, epochs=10, validation_data=val_batches)
Plot Transformer validation metrics
Plot the model's accuracy and loss using Matplotlib:
metrics_df = pd.DataFrame(history.history)
metrics_df[["loss", "val_loss"]].plot()
metrics_df[["masked_accuracy", "val_masked_accuracy"]].plot()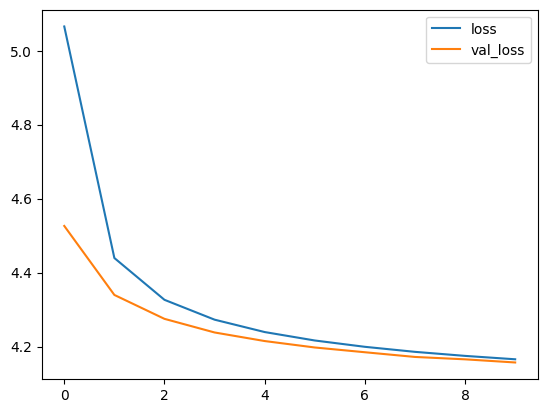

The accuracy is not the best. We will provide suggestions for improvement at the end, but this is a great start.
Run inference with trained Keras Transformer decoder
Next, try to predict a single token. The process is as follows:
- Provide a sentence, in this case, "Python"
- Vectorized the sentence
- Expand the dimensions to add a batch dimension
- Perform prediction
- Select the last token from the predictions
- Decode the prediction, in this case using the
argmaxto give the token with the highest score - Convert the token to a word using StringLookup
sentence = "Python"
x = vectorize_layer(sentence)
x = tf.expand_dims(x, axis=0)
prediction = transformer(x)
predicted_id = tf.argmax(predictions, axis=-1)
id_to_word = tf.keras.layers.StringLookup(
    vocabulary=vocabulary, mask_token="", oov_token="[UNK]", invert=True
)
In this case, the Transformer predicted "is" as the next likely word:
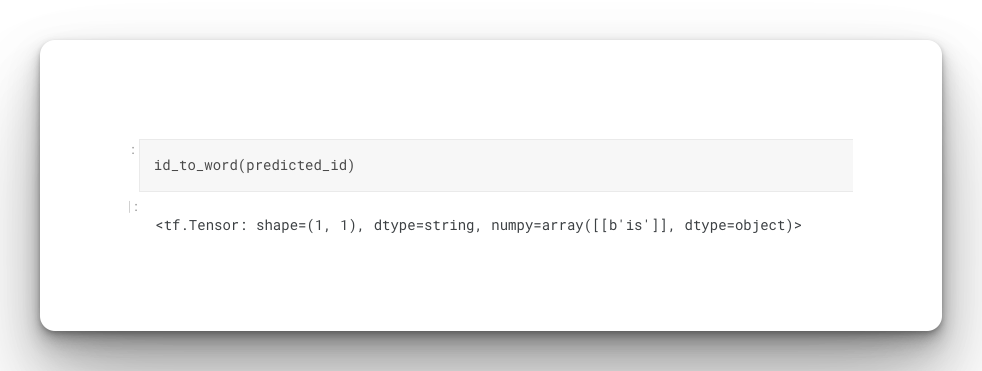
The word "is" has the highest score, but there are other words the model could have chosen if we had picked a different decoding strategy. Dump all the words and their scores into a Pandas DataFrame, sort them by the scores, and plot them using Seaborn. This will allow us to see the other words that the Transformer predicted.
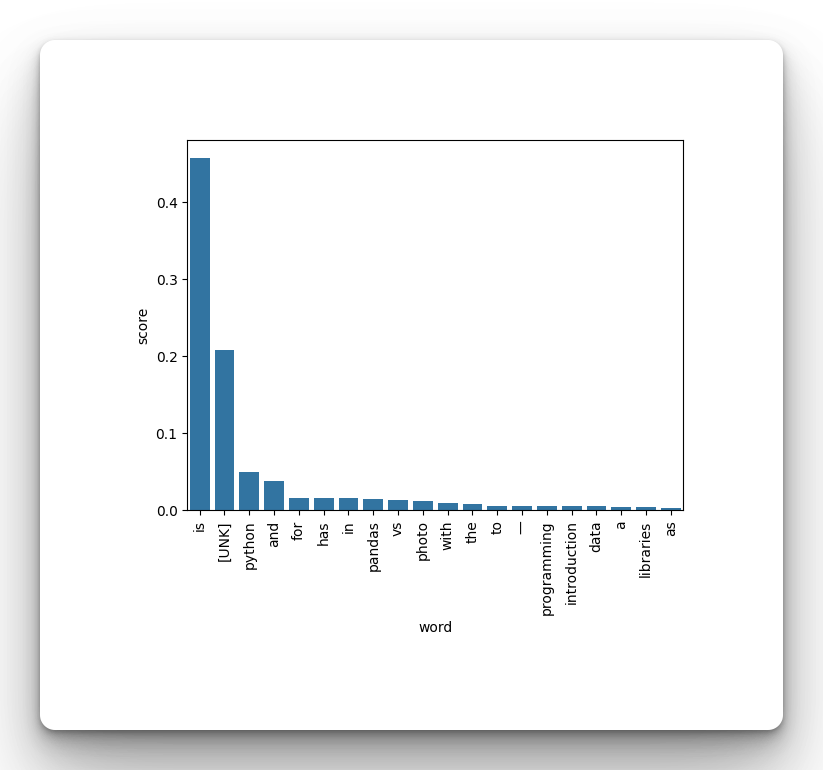
Interestingly, you can see that the Transformer was able to associate Python with other related terms such as data, libraries, Pandas, and programming.
Generating multiple tokens with Keras Transformer
Now generating one word is not fun. We need to be able to generate many words. To make that possible you would need to append the word that was just predicted to the sentence so that it can use that to generate the next word. The process would repeat until you get the maximum number of words you are interested in.
Here is how to append the generated token to the previous sentence:
x_concat = tf.experimental.numpy.append(x, predicted_id[0], axis=None)
Next, define a class that will generate as many tokens as you would like. The more tokens you generate the longer it will take to get the final output.
class Generator(tf.Module):
    def __init__(
        self,
        tokenizer,
        vocabulary,
        transformer,
        max_new_tokens,
        temperature=0.0,
    ):
        self.tokenizer = tokenizer
        self.transformer = transformer
        self.vocabulary = vocabulary
        self.max_new_tokens = max_new_tokens
        self.temperature = temperature

    def __call__(self, sentence, max_length=MAX_TOKENS):
        sentence = self.tokenizer(sentence)
        sentence = tf.expand_dims(sentence, axis=0)
        encoder_input = sentence
        # `tf.TensorArray` is required here (instead of a Python list), so that the
        # dynamic-loop can be traced by `tf.function`.
        output_array = tf.TensorArray(dtype=tf.int64, size=0, dynamic_size=True)

        print(f"Generating {self.max_new_tokens} tokens")
        for i in tf.range(self.max_new_tokens):
            output = tf.transpose(output_array.stack())
            predictions = self.transformer(encoder_input, training=False)

            # Select the last token from the `seq_len` dimension.
            predictions = predictions[:, -1:, :]  # Shape `(batch_size, 1, vocab_size)`.
            if self.temperature == 0.0:
                # greedy sampling, output always the same
                predicted_id = tf.argmax(predictions, axis=-1)
            else:
                predictions = predictions / self.temperature
                predicted_id = tf.random.categorical(predictions[0], num_samples=1)

            # Concatenate the `predicted_id` to the output which is given to the
            # decoder as its input.
            output_array = output_array.write(i + 1, predicted_id[0])
            encoder_input = tf.experimental.numpy.append(encoder_input, predicted_id[0])
            encoder_input = tf.expand_dims(encoder_input, axis=0)

        output = tf.transpose(output_array.stack())
        # The output shape is `(1, tokens)`.
        id_to_word = tf.keras.layers.StringLookup(
            vocabulary=self.vocabulary, mask_token="", oov_token="[UNK]", invert=True
        )

        print(f"Using temperature of {self.temperature}")
        text = id_to_word(output)
        tokens = output

        # `tf.function` prevents us from using the attention_weights that were
        # calculated on the last iteration of the loop.
        # So, recalculate them outside the loop.
        self.transformer(output[:, :-1], training=False)
        attention_weights = self.transformer.decoder.last_attn_scores

        return text, tokens, attention_weights
Keras Transformer decoding strategies
In the Generator above we define temperature as a decoding strategy. When you set the temperature the model doesn't pick the token with the highest score. Instead, the Transformer uses tf.random.categorical to draw one sample from the categorical distribution.
Decoding using temperature works by affecting the logits produced by the decoder. A value of 1 has no effect. Lowering the temperature is ideal for factual applications where you want the model to be more confident in its responses. You can increase the temperature for creative applications to make the responses from the Transformer more random hence more creative. However, the model can start making mistakes as you increase the temperature.
Other Transformer decoding strategies include:
Top K sampling
In Top K sampling, the number of words to sample from is given. For example, if K is 80, the model will sample from the top 80 words words meaning that lower probability words won't get a chance to be selected. The problem with this strategy is that you have to manually select the value of K.
Top P sampling (Neuclus Sampling)
In Top P sampling, the words are chosen dynamically as long as their total cumulative probability exceeds p. For example, if the desired probability is 0.9, the model can choose 0.5 + 0.3 + 0.1. This is a better strategy because the number of words can be adjusted dynamically.
Generate 50 new tokens using a temperature of 0.92:
max_new_tokens = 50
temperature = 0.92
generator = Generator(
    vectorize_layer, vocabulary, transformer, max_new_tokens, temperature,
)
def print_generation(sentence, generated_text):
    print(f'{"Input:":15s}: {sentence}')
    print(f'{"Generation":15s}: {generated_text}')
sentence = "Machine learning"
generated_text, generated_tokens, attention_weights = generator(sentence)
print_generation(sentence, generated_text)
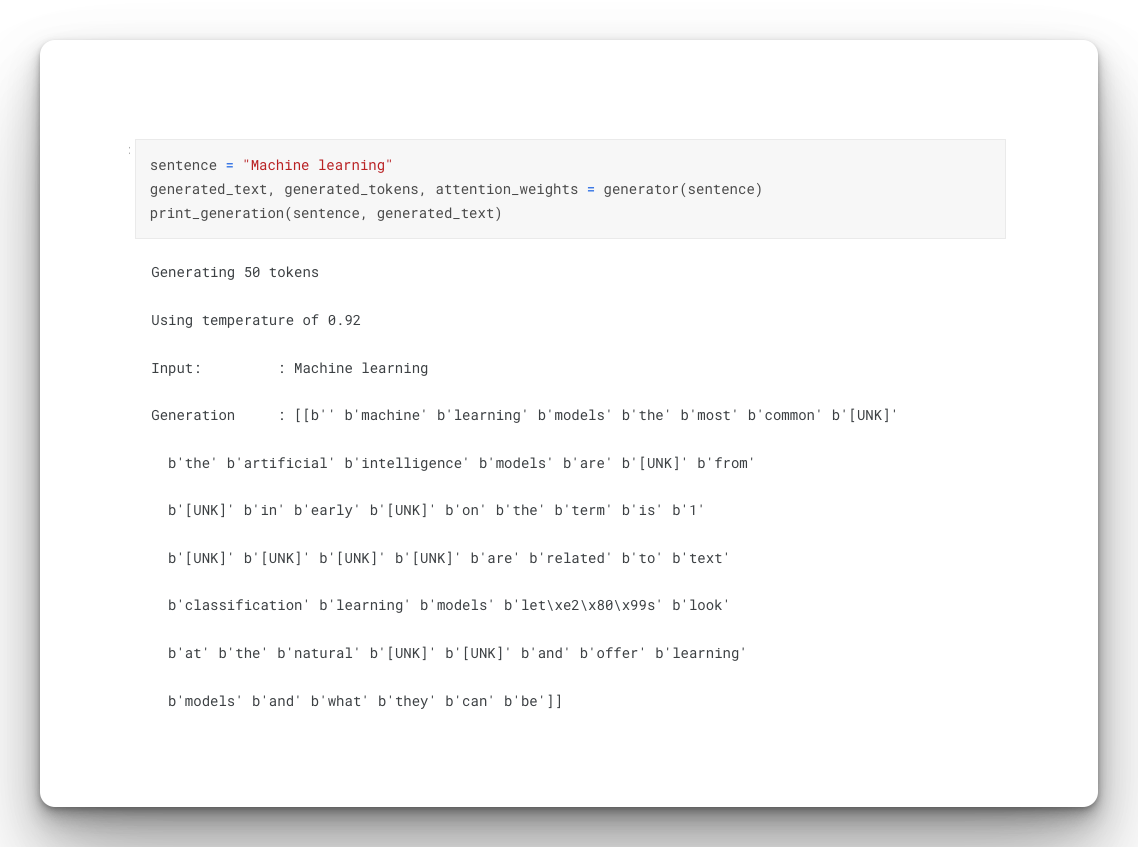
Repetition penalty
From the above output, you can see that given the prompt "machine learning" the Transformer was able to generate some related text such as models and artificial intelligence. However, there is a lot of repetition of words such as "models". One of the strategies for solving this is to train a better model and to introduce repetition penalty where the model is penalized for repeating certain phrases and words. This can be ideal in creative writing.
Create Tensorflow Transformer attention plots
You can create attention plots because the Transformer returns attention weights:
sentence = "Python"

def plot_attention_weights(sentence, generated_tokens, attention_heads):
    in_tokens = vectorize_layer([sentence])

    fig = plt.figure(figsize=(16, 8))

    for h, head in enumerate(attention_heads):
        ax = fig.add_subplot(2, 4, h + 1)

        plot_attention_head(in_tokens, generated_tokens, head)

        ax.set_xlabel(f"Head {h+1}")

    plt.tight_layout()
    plt.show()

generated_text, generated_tokens, attention_weights = generator(sentence)
print_generation(sentence, generated_text)
plot_attention_weights(sentence, generated_tokens, attention_weights[0])
plt.tight_layout()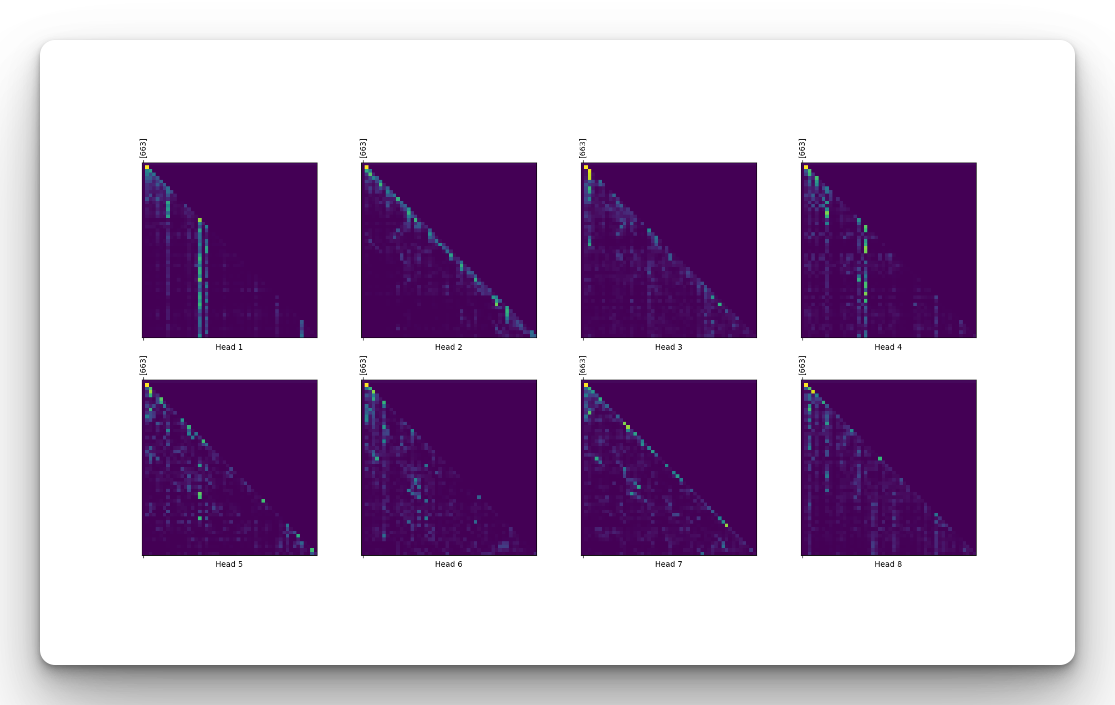
How to improve the accuracy of the Keras Transformer for text generation
Transformers are compute-intensive to train. It's unlikely that you will be training one from scratch unless you are a researcher in which case, you will most likely have the resources for doing so. The main aim of the project was for learning purposes and to see how these Transformer models are built. However, if you'd like to improve this model's performance there are several things you can try:
- Get better text generation data from Hugging Face
- Source more text generation data
- Create a better network
- Train longer
- Use a pre-trained network (Best choice for production)
Final thoughts
In this article, you have learned how to build a text generation model using Keras and TensorFlow using the Transformer decoder. You have seen how the various building blocks come together to build an end-to-end system that can generate text. However, since the model wasn't trained for so long and with limited compute, it wasn't able to generate coherent text. You can attempt to improve this by using a bigger dataset and training for a longer time. For production use cases, check out MakerSuite, which provides simple APIs that you can use to fine-tune and build your generative AI model in various languages.