
How to Perform Image Augmentation With KerasCV


Training computer vision models with little data can lead to poor model performance. This problem can be solved by generating new data samples from the existing images. For example, you can create new images by flipping and rotating the existing ones. Generating new image samples from existing ones is known as image augmentation.
Image augmentation improves the model's performance by creating images in various angles, lighting, etc. Performing these transformations also prevents the model from memorizing and overfitting the training data. In this article, you will discover how to perform image augmentation using KerasCV.
mlnuggets newsletter
Join the newsletter to receive the technical deep dives in your inbox.
Data Preparation With TensorFlow
We will use the cats and dogs dataset from Kaggle for this project. Download the dataset, extract it, and move the images to their corresponding folders. You can follow along with this Kaggle Notebook.
import wget # pip install wget
import zipfile
import shutil

wget.download("https://ml.machinelearningnuggets.com/train.zip")
with zipfile.ZipFile('train.zip', 'r') as zip_ref:
  zip_ref.extractall('.')

filenames = os.listdir('train')
for filename in filenames:
    category = filename.split('.')[0]
    if category == 'dog':
        shutil.move(f'train/{filename}', f'animals/dog/{filename}')
    else:
        shutil.move(f'train/{filename}', f'animals/cat/{filename}')
Generate a tf.data.Dataset
Next, import all the required packages and load the dataset using TensorFlow.
from PIL import Image
import matplotlib.pyplot as plt
import tarfile
from tensorflow import keras
import pandas as pd
from tensorflow.keras import layers
import tensorflow as tf
import keras_cv # pip install keras_cv

batch_size = 32
img_height = 128
img_width = 128

training_set = tf.keras.utils.image_dataset_from_directory(
  base_dir,
  validation_split=0.2,
  subset="training",
  seed=100,
  image_size=(img_height, img_width),
  batch_size=batch_size)

  validation_set = tf.keras.utils.image_dataset_from_directory(
  base_dir,
  validation_split=0.2,
  subset="validation",
  seed=100,
  image_size=(img_height, img_width),
  batch_size=batch_size)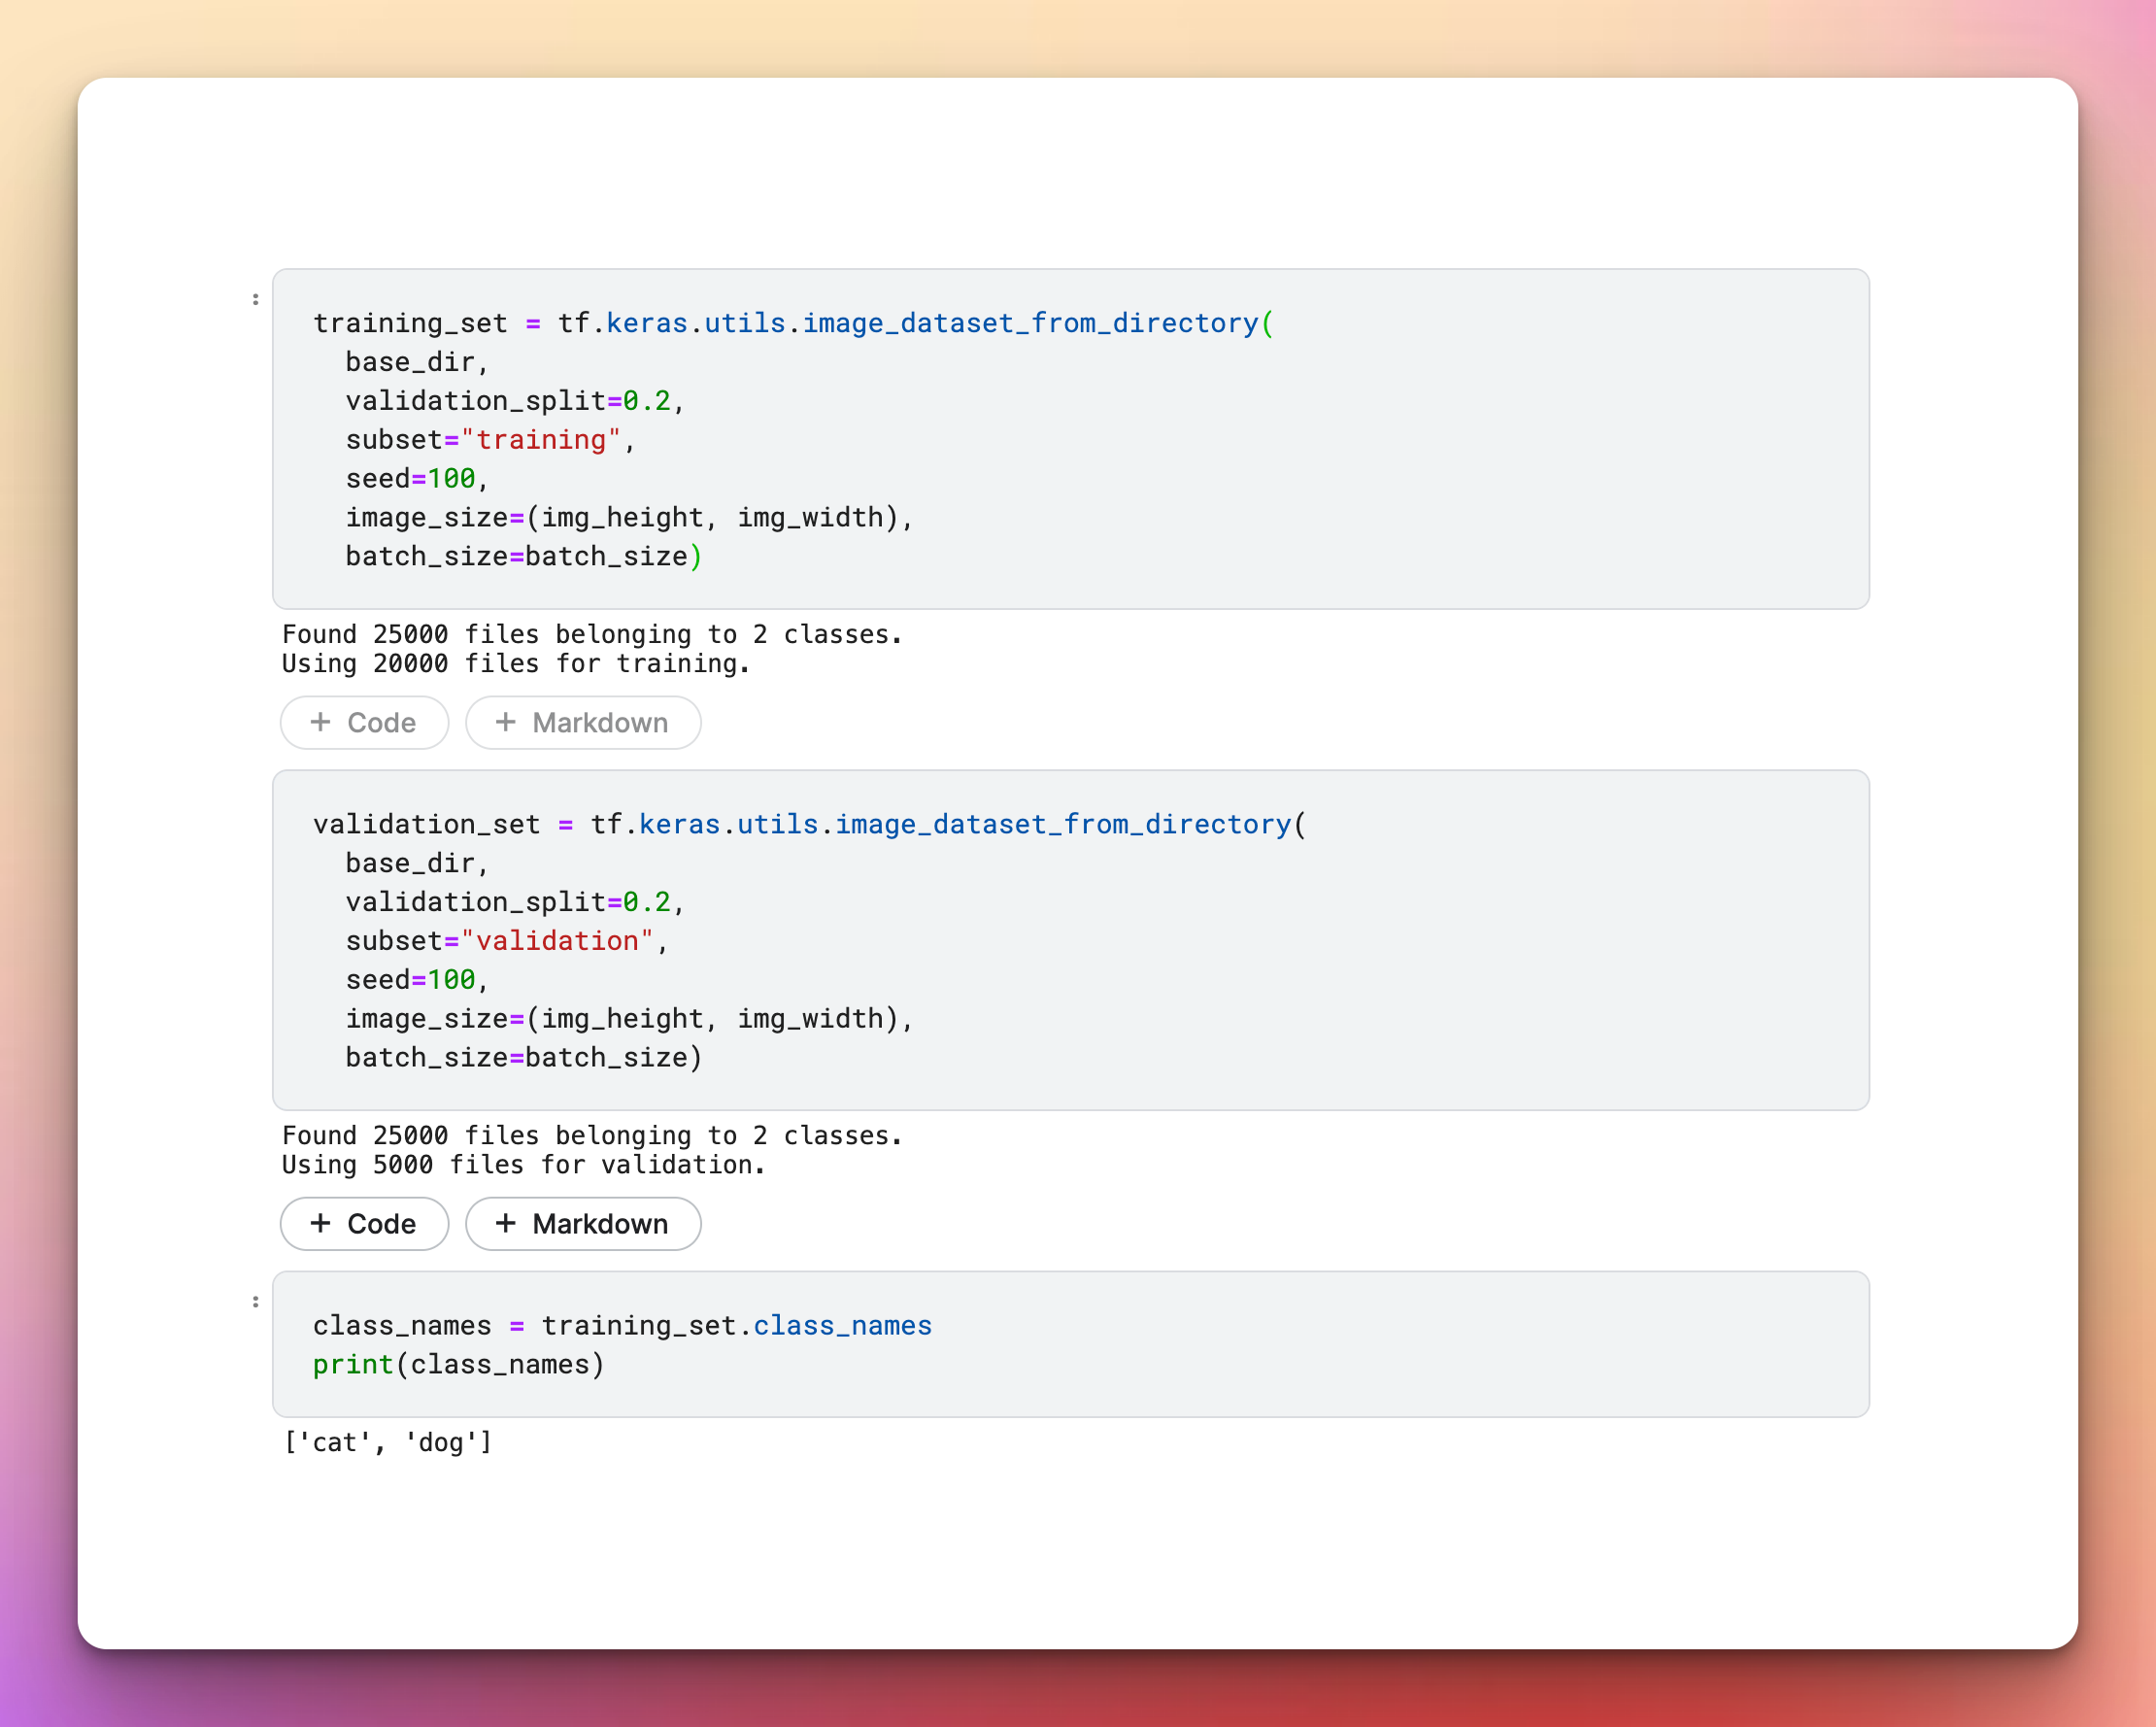
Next, set the class names and number of classes.
class_names = training_set.class_names
num_classes = len(class_names)
Visualize Image Data With Matplotlib
Here's a sample of the dataset visualized using Matplotlib.
plt.figure(figsize=(10, 10))
for images, labels in training_set.take(1):
  for i in range(9):
    ax = plt.subplot(3, 3, i + 1)
    plt.imshow(images[i].numpy().astype("uint8"))
    plt.title(class_names[labels[i]])
    plt.axis("off")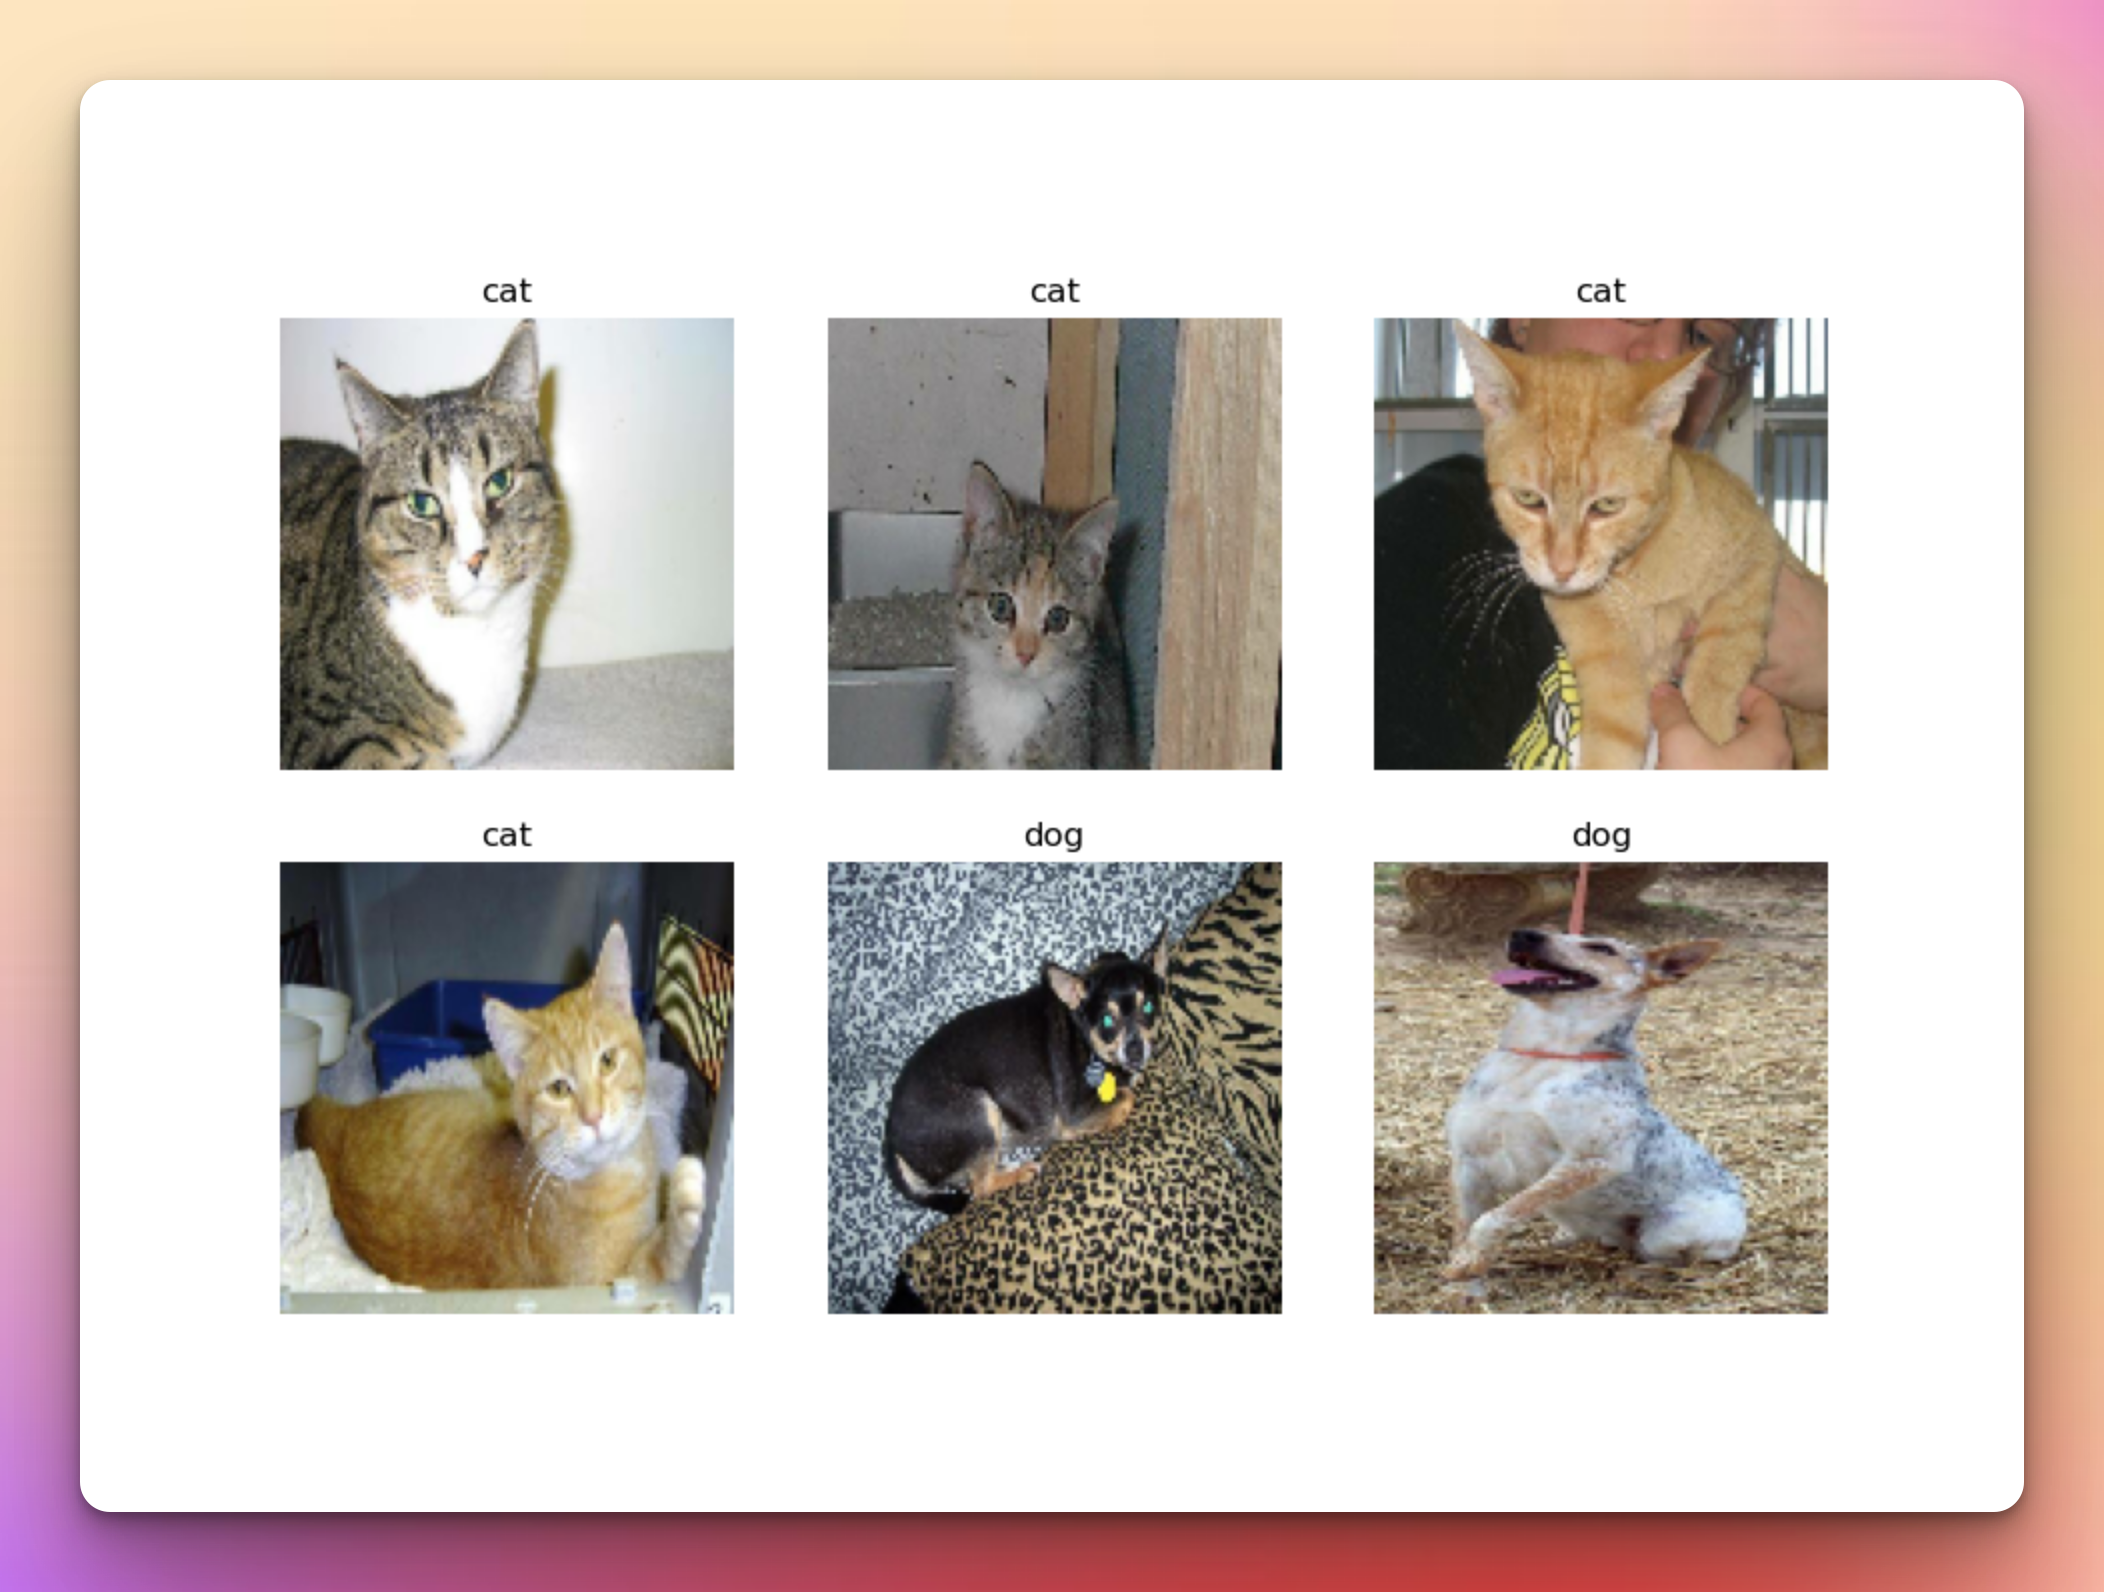
Configure Image Dataset for Performance
Prefetching data when training a machine learning model prevents data loading from becoming the bottleneck in the training process. Prefetching is done using the prefetch function, which allows you to set the buffer size manually or set it automatically at runtime by passing tf.data.AUTOTUNE.
AUTOTUNE = tf.data.AUTOTUNE
training_ds = training_set.cache().shuffle(1000).prefetch(buffer_size=AUTOTUNE)
validation_ds = validation_set.cache().prefetch(buffer_size=AUTOTUNE)
mlnuggets newsletter
Join the newsletter to receive the technical deep dives in your inbox.
Train CNN Model Without Image Augmentation
We will train an image classification model using image augmentation and, without then, compare the results. Training is done under the following conditions:
- Image size of 128, you can increase this to 224 if you have the memory and GPU required to do so with this large dataset
- Training on Kaggle Notebooks using the P100 GPU
- Visualizing the results using Matplotblib, but you can use something more powerful like TensorBoard
- Training the model with 100 epochs and early stopping with a patience of 5
The results may differ from what you get because of the random initialization of the weights and biases of the model.
First, let's define the Keras model.
Keras Model Definition
Start by training the model without any image augmentation.
epochs = 100
model = keras.Sequential([
    layers.Rescaling(1./255),
    layers.Conv2D(filters=32,kernel_size=(3,3),activation='relu'),
    layers.MaxPooling2D(pool_size=(2,2)),

    layers.Conv2D(filters=32,kernel_size=(3,3), activation='relu'),
    layers.MaxPooling2D(pool_size=(2,2)),
    layers.Dropout(0.25),

    layers.Conv2D(filters=64,kernel_size=(3,3), activation='relu'),
    layers.MaxPooling2D(pool_size=(2,2)),
    layers.Dropout(0.25),

    layers.Flatten(),
    layers.Dense(128, activation='relu'),
    layers.Dropout(0.25),
    layers.Dense(len(class_names), activation='sigmoid')])
   model.compile(optimizer='adam',
              loss=tf.keras.losses.SparseCategoricalCrossentropy(),
               metrics=['accuracy'])

log_folder ="logs"
tensorboard_callback = tf.keras.callbacks.TensorBoard(log_dir=log_folder, histogram_freq=1,write_graph=True,write_images=True, update_freq='epoch')
earlystopping = tf.keras.callbacks.EarlyStopping(monitor='loss', patience=5)
history = model.fit(training_ds,validation_data=validation_ds, epochs=epochs,callbacks=[earlystopping,tensorboard_callback])
Check out the How to Build CNN in TensorFlow tutorial to learn more about how to build CNN models and how they work.
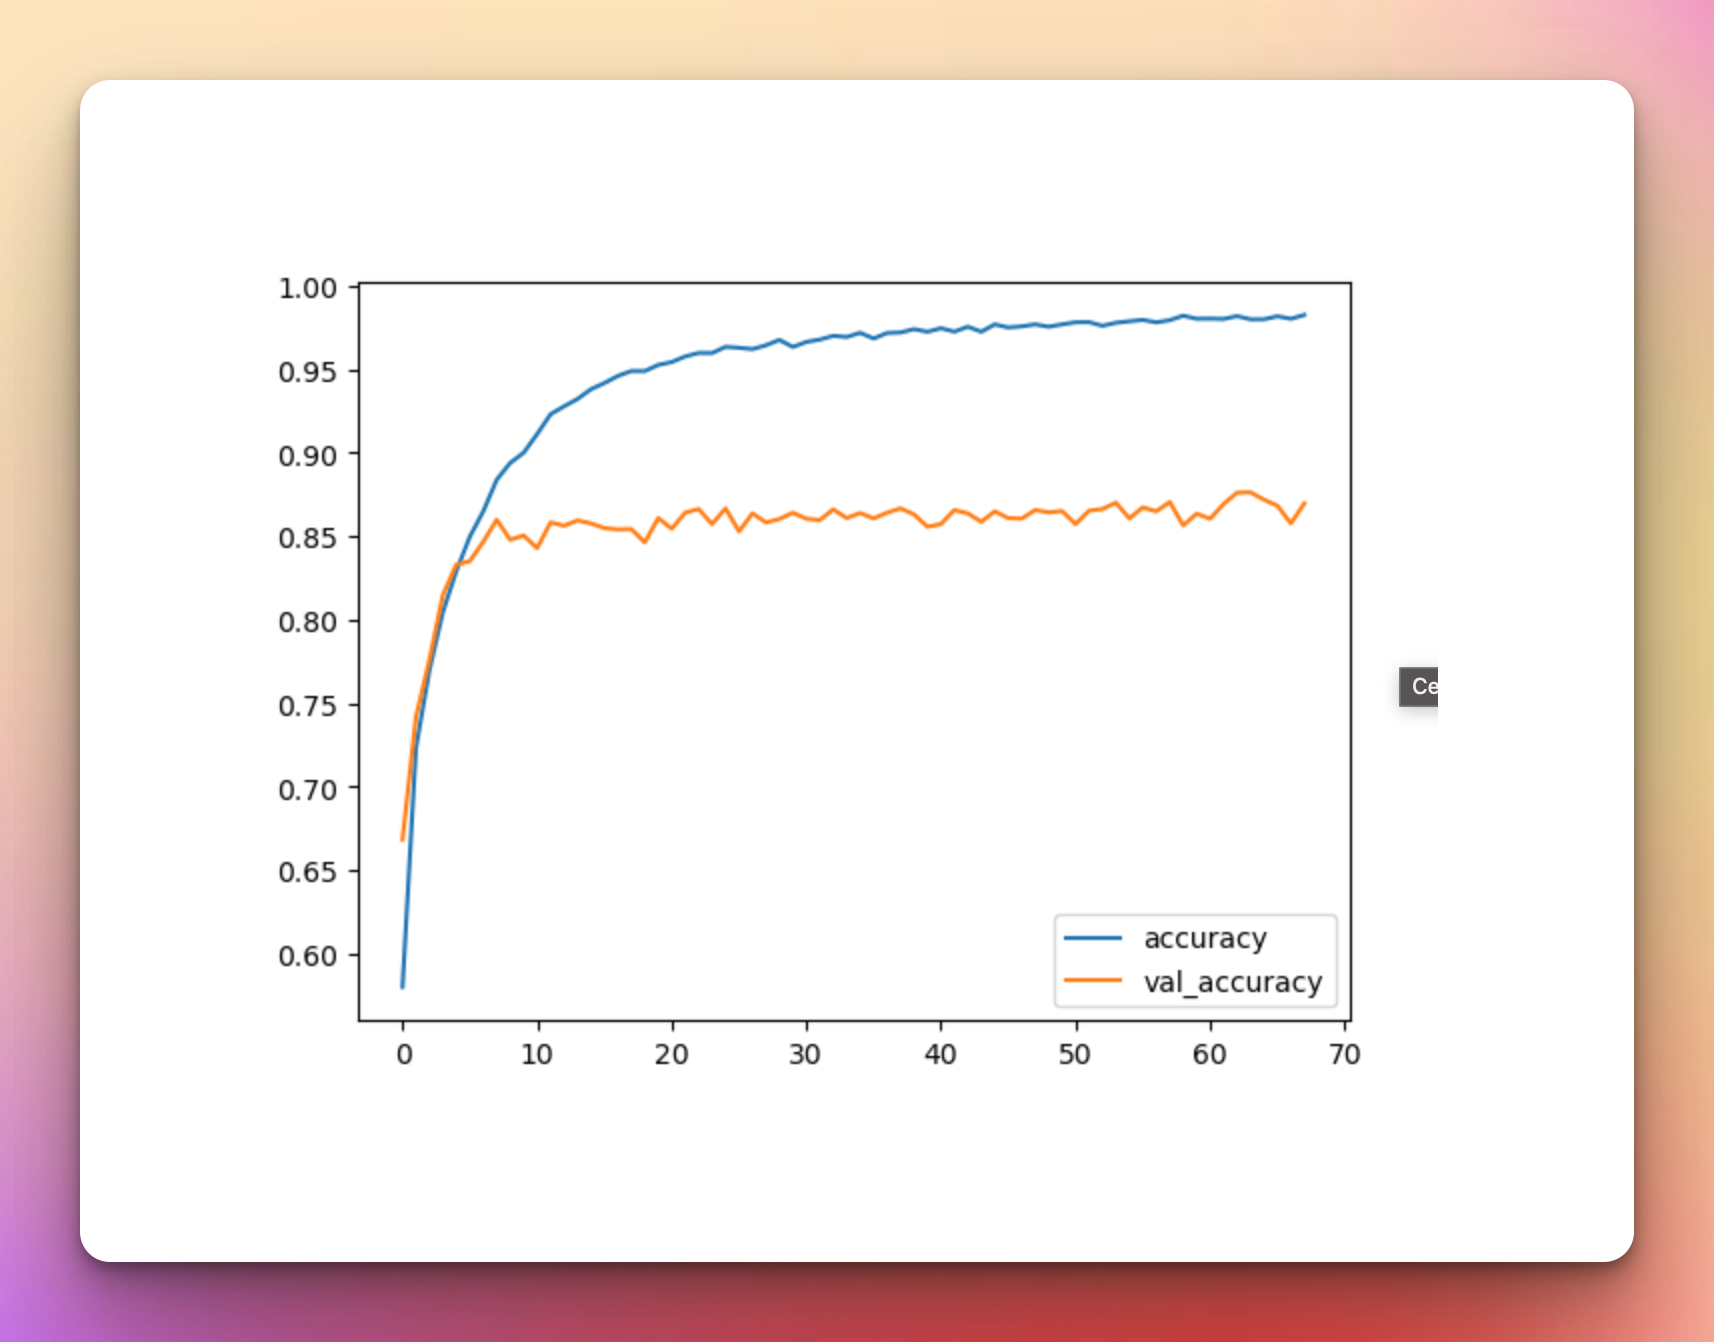
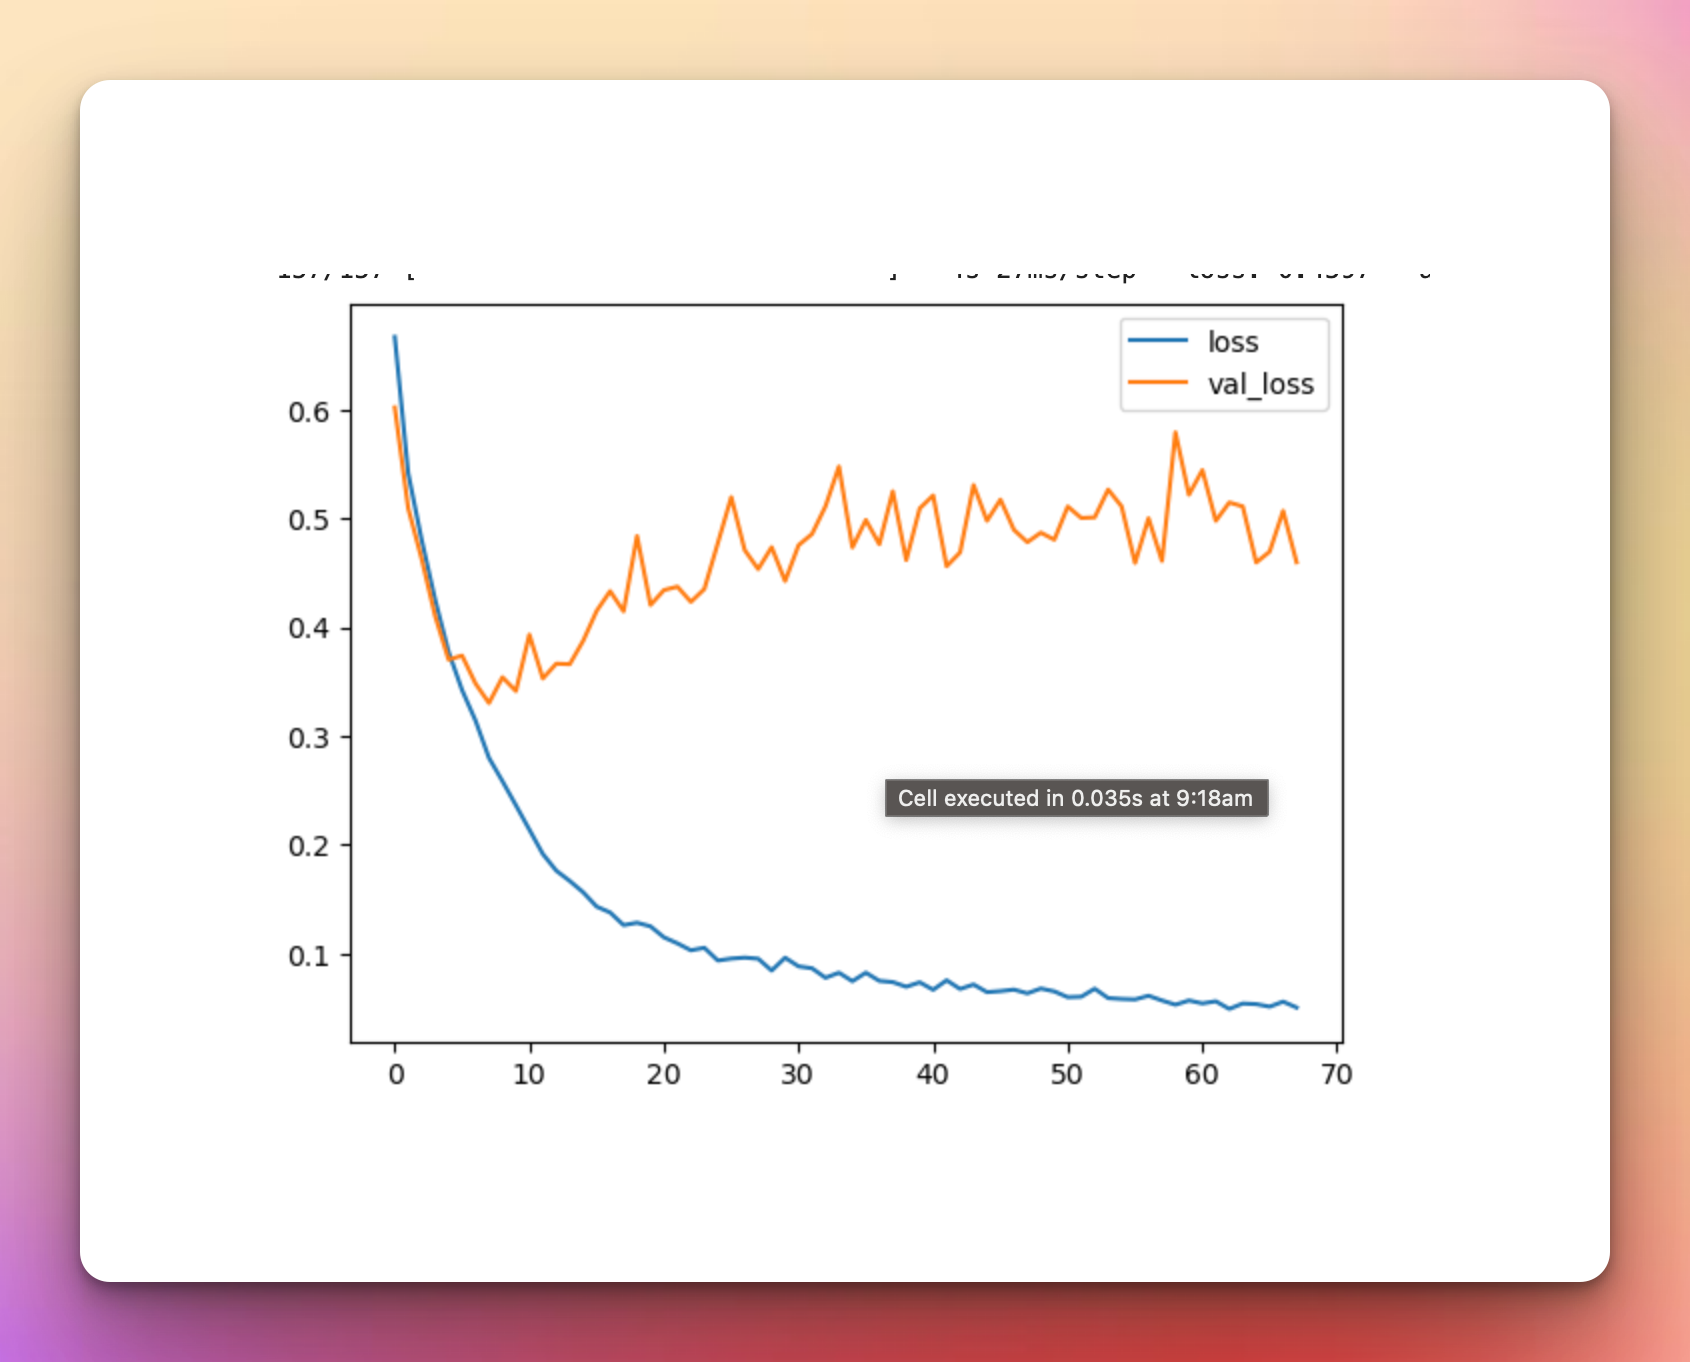
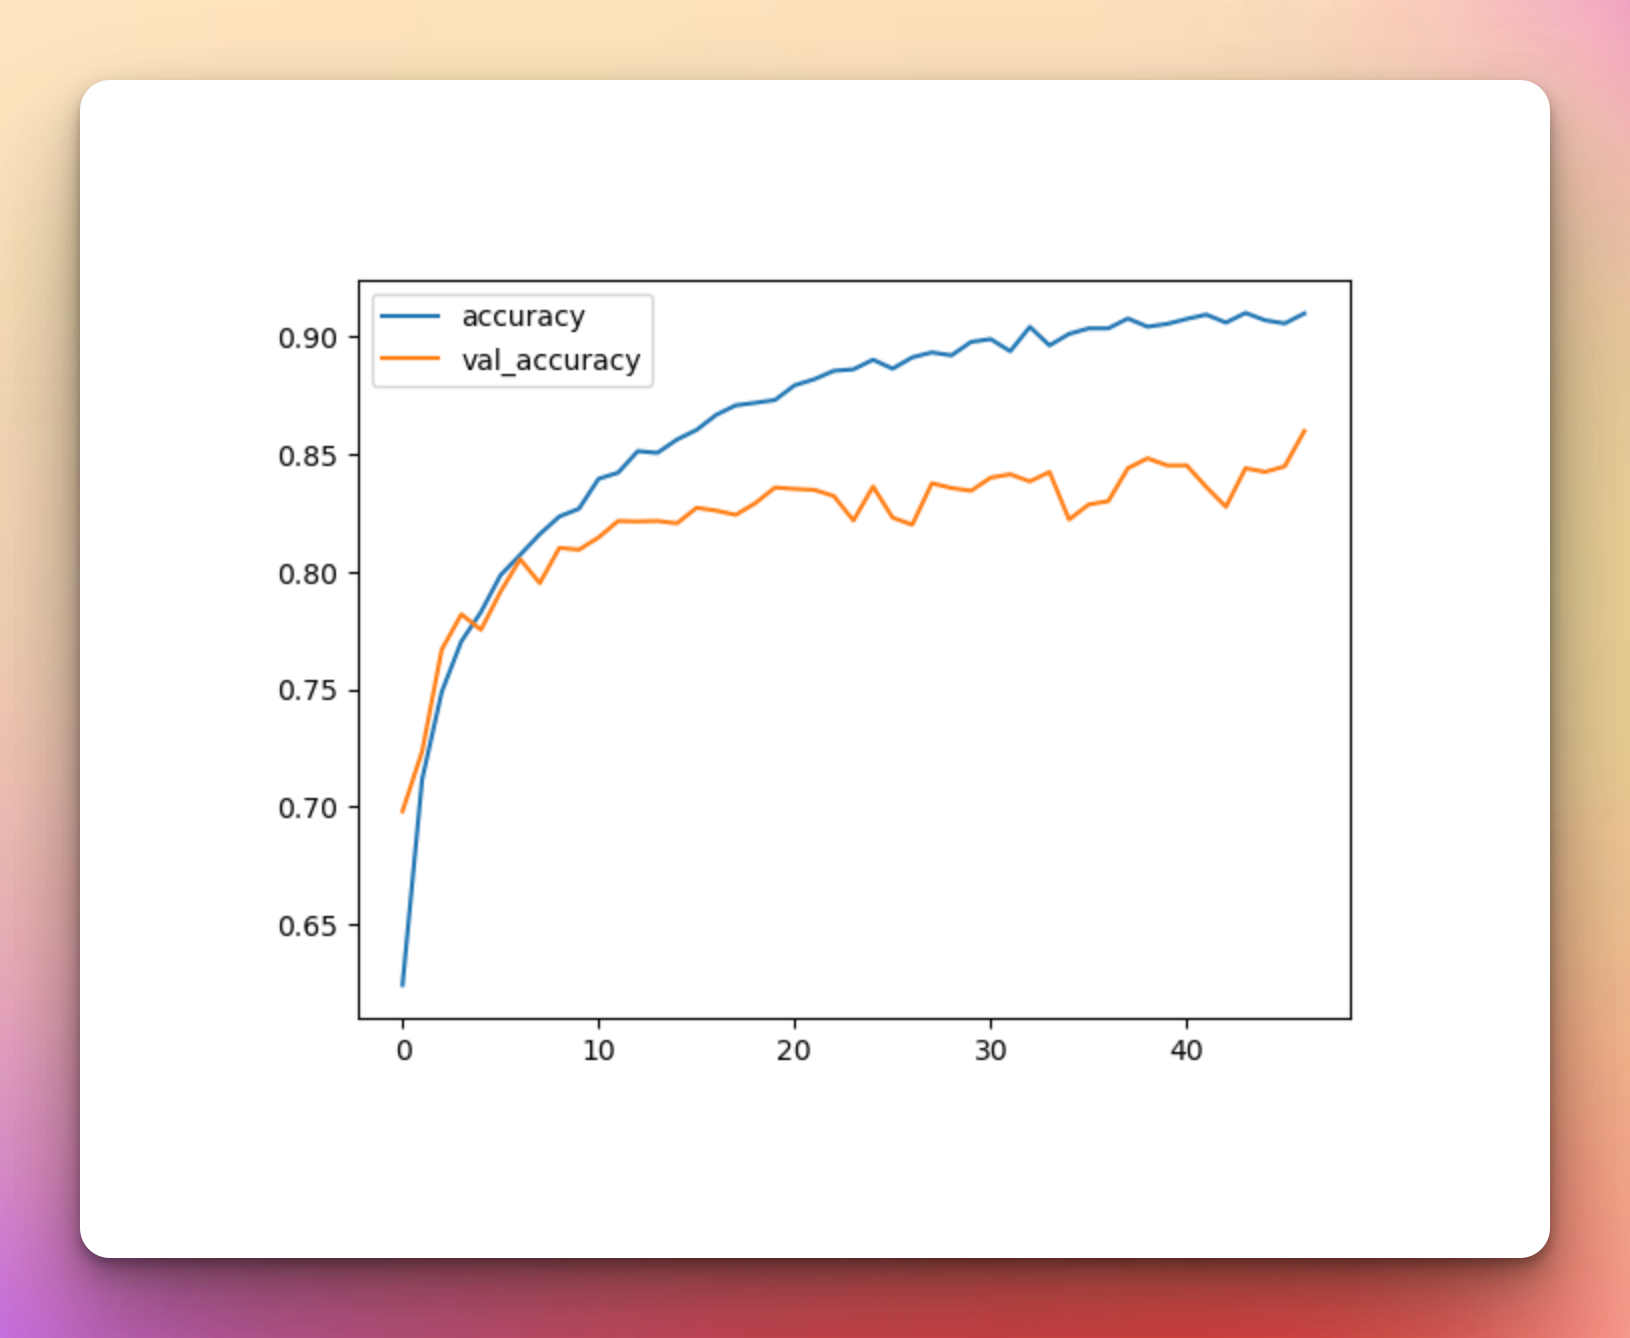
Model Performance Without Image Augmentation
Load the model metrics with Pandas and visualize them using Matplotlib.
metrics_df = pd.DataFrame(history.history)
loss, accuracy = model.evaluate(validation_set)
metrics_df[["loss","val_loss"]].plot();
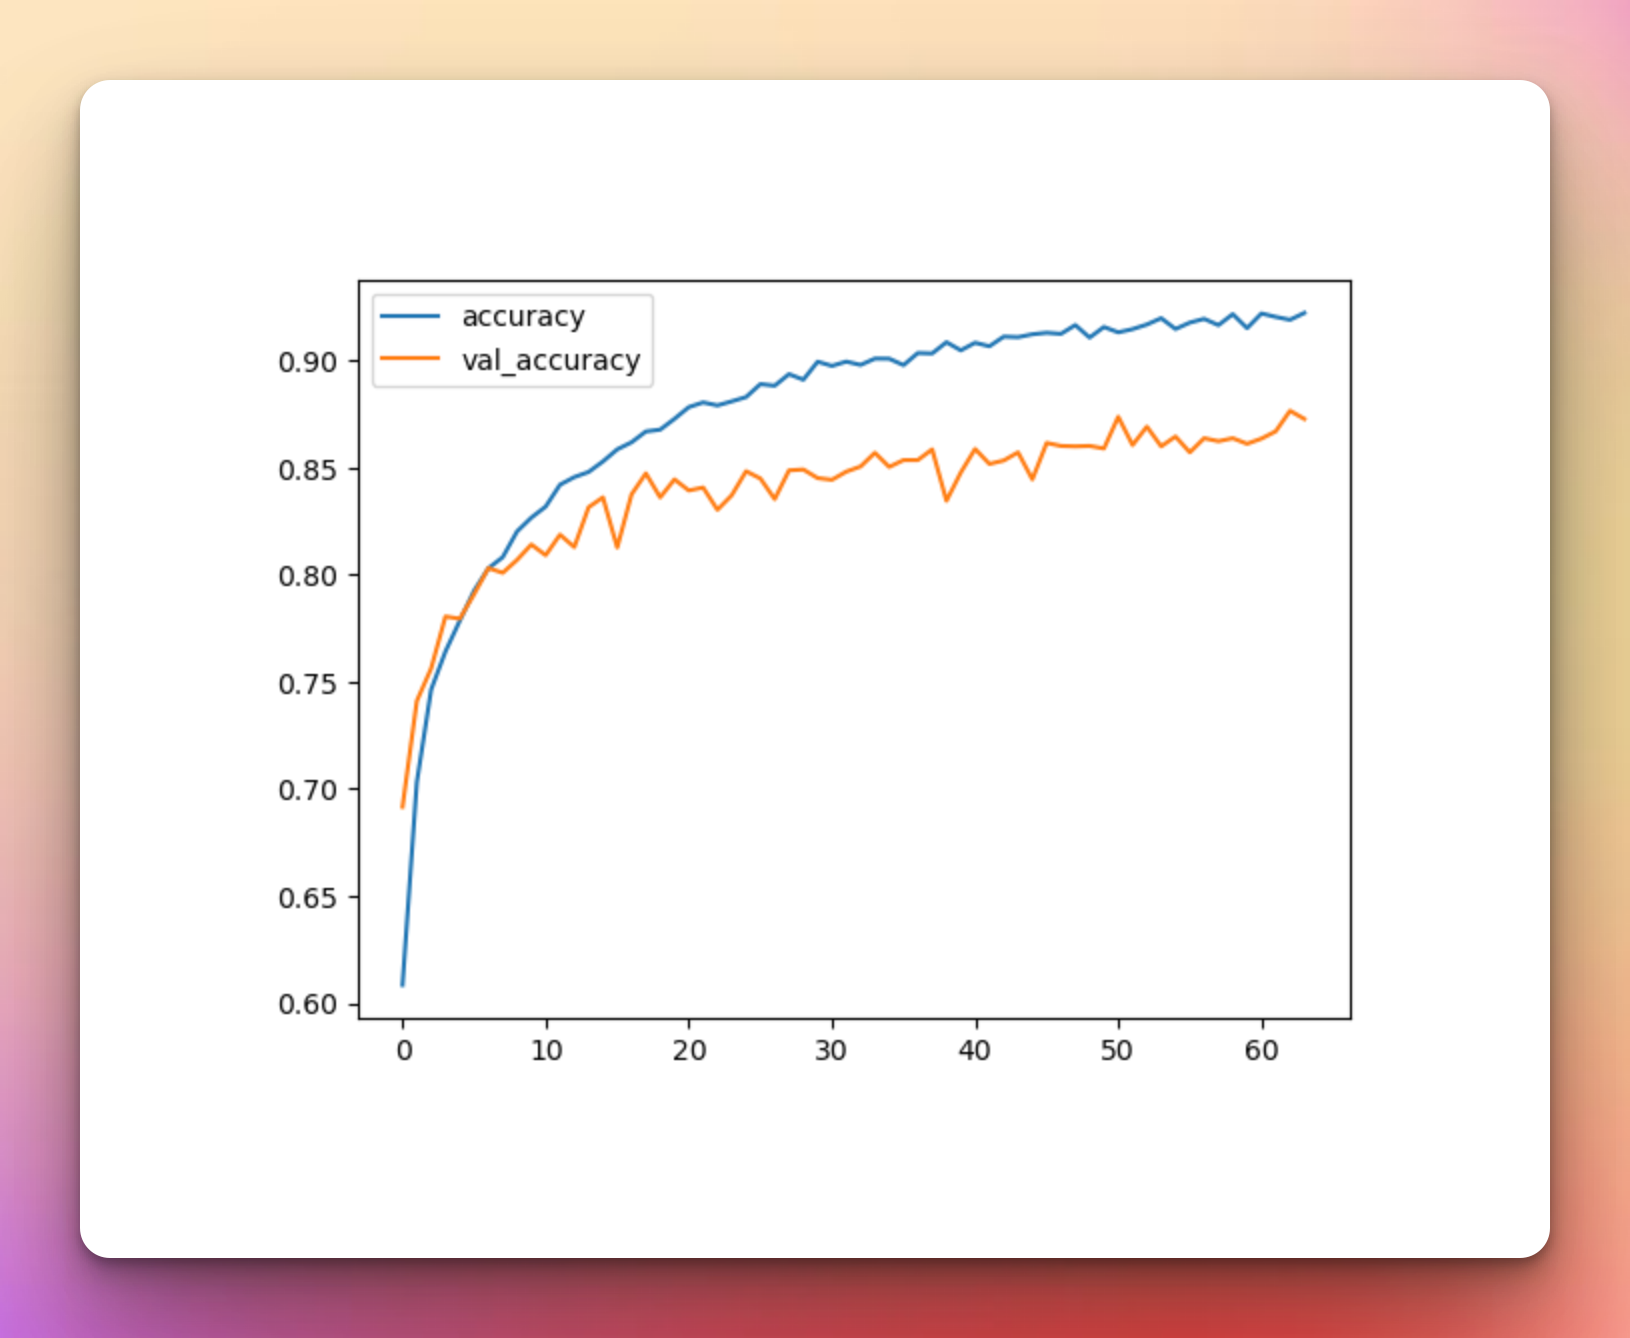
metrics_df[["accuracy","val_accuracy"]].plot();The model achieves an accuracy of 86% but is overfitting because the validation loss is higher than the training loss.
Train CNN Model RandAugment Augmentation
Next, train the model with RandAugment image augmentation. RandAugment performs random augmentations on the training dataset. Define the augmentation with the Keras Sequential layer for inclusion in the Keras Sequential model.
data_augmentation = keras.Sequential(
[
keras_cv.layers.RandAugment(
    value_range=(0, 255),
    augmentations_per_image=3,
    magnitude=0.3,
    magnitude_stddev=0.2,
    rate=0.5,
) ])
Visualize the RandAugment Image Augmentation
You can visualize the RandAugment to see the augmented images.
plt.figure(figsize=(10, 10))
for images, _ in training_set.take(1):
  for i in range(9):
    augmented_images = data_augmentation(images)
    ax = plt.subplot(3, 3, i + 1)
    plt.imshow(augmented_images[0].numpy().astype("uint8"))
    plt.axis("off")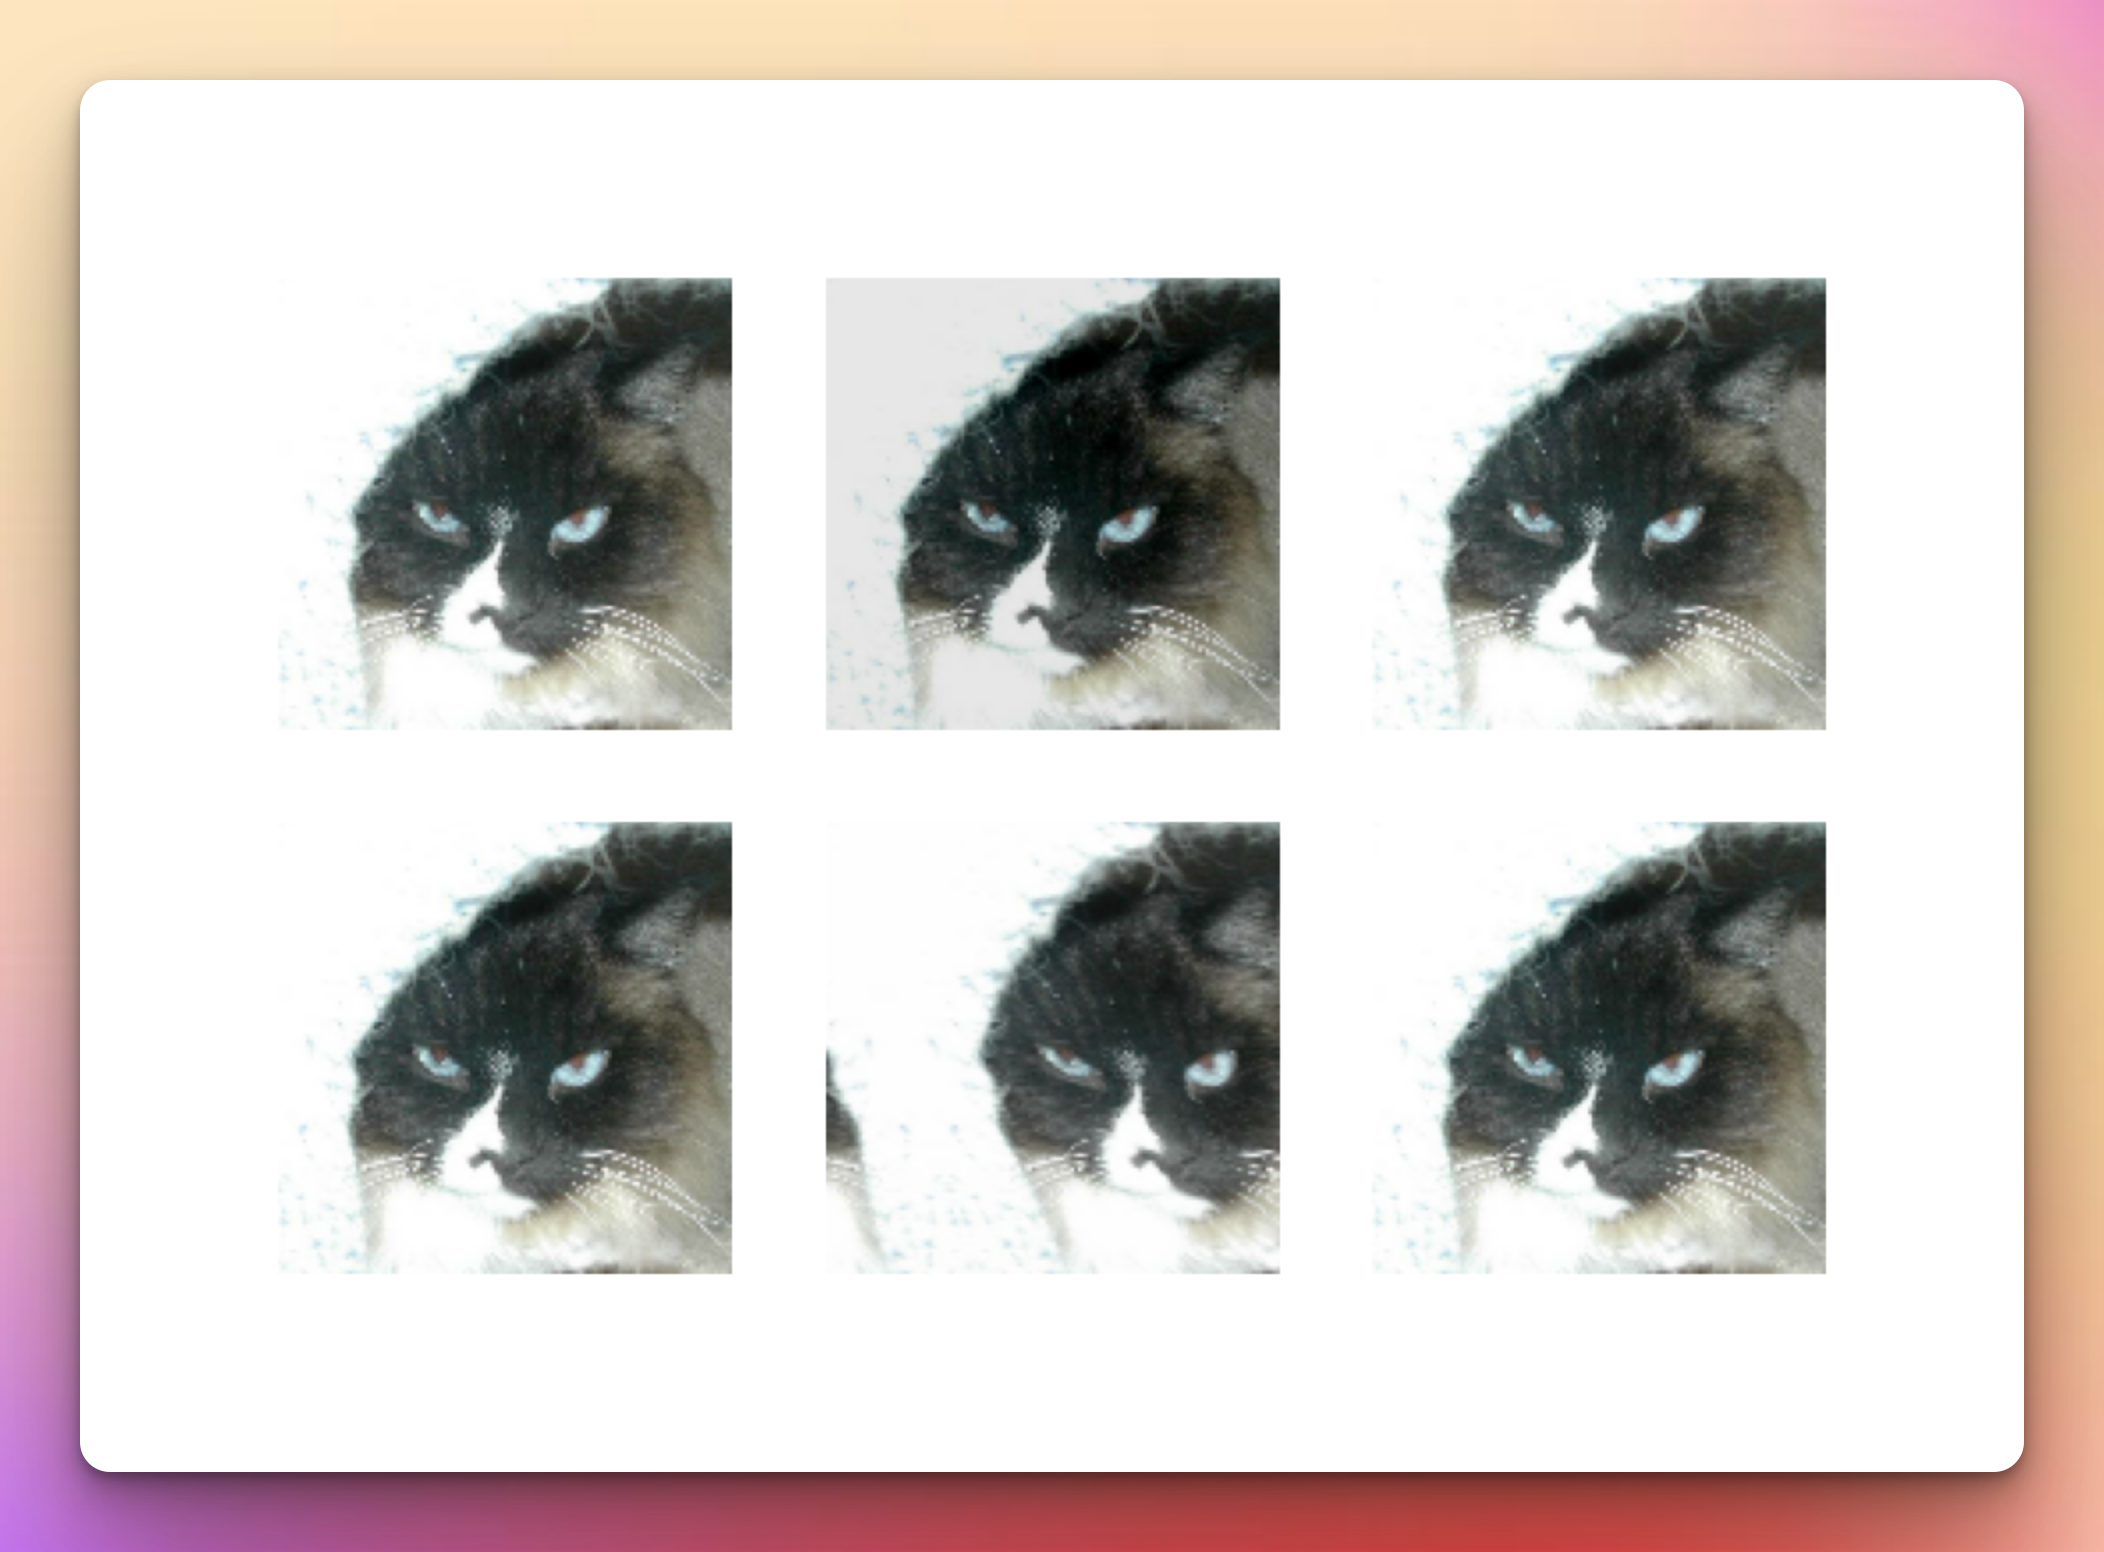
mlnuggets newsletter
Join the newsletter to receive the technical deep dives in your inbox.
Keras Model Definition With RandAugment Augmentation
Include the augmentation layer as part of the Keras model.
model = keras.Sequential([
    data_augmentation,
    layers.Rescaling(1./255),
    layers.Conv2D(filters=32,kernel_size=(3,3),activation='relu'),
    layers.MaxPooling2D(pool_size=(2,2)),

    layers.Conv2D(filters=32,kernel_size=(3,3), activation='relu'),
    layers.MaxPooling2D(pool_size=(2,2)),
    layers.Dropout(0.25),

    layers.Conv2D(filters=64,kernel_size=(3,3), activation='relu'),
    layers.MaxPooling2D(pool_size=(2,2)),
    layers.Dropout(0.25),

    layers.Flatten(),
    layers.Dense(128, activation='relu'),
    layers.Dropout(0.25),
    layers.Dense(len(class_names), activation='sigmoid')])
Next, train the model with this augmentation.
model.compile(optimizer='adam', loss=tf.keras.losses.SparseCategoricalCrossentropy(), metrics=['accuracy'])
history = model.fit(training_ds,validation_data=validation_ds,epochs=epochs, callbacks=[earlystopping,tensorboard_callback])
Model Performance With RandAugment Augmentation
With RandAugment, we get an accuracy of 86%, the curves are a bit smoother, but there is still some overfitting.
metrics_df = pd.DataFrame(history.history)
loss, accuracy = model.evaluate(validation_set)
metrics_df[["loss","val_loss"]].plot();
metrics_df[["accuracy","val_accuracy"]].plot();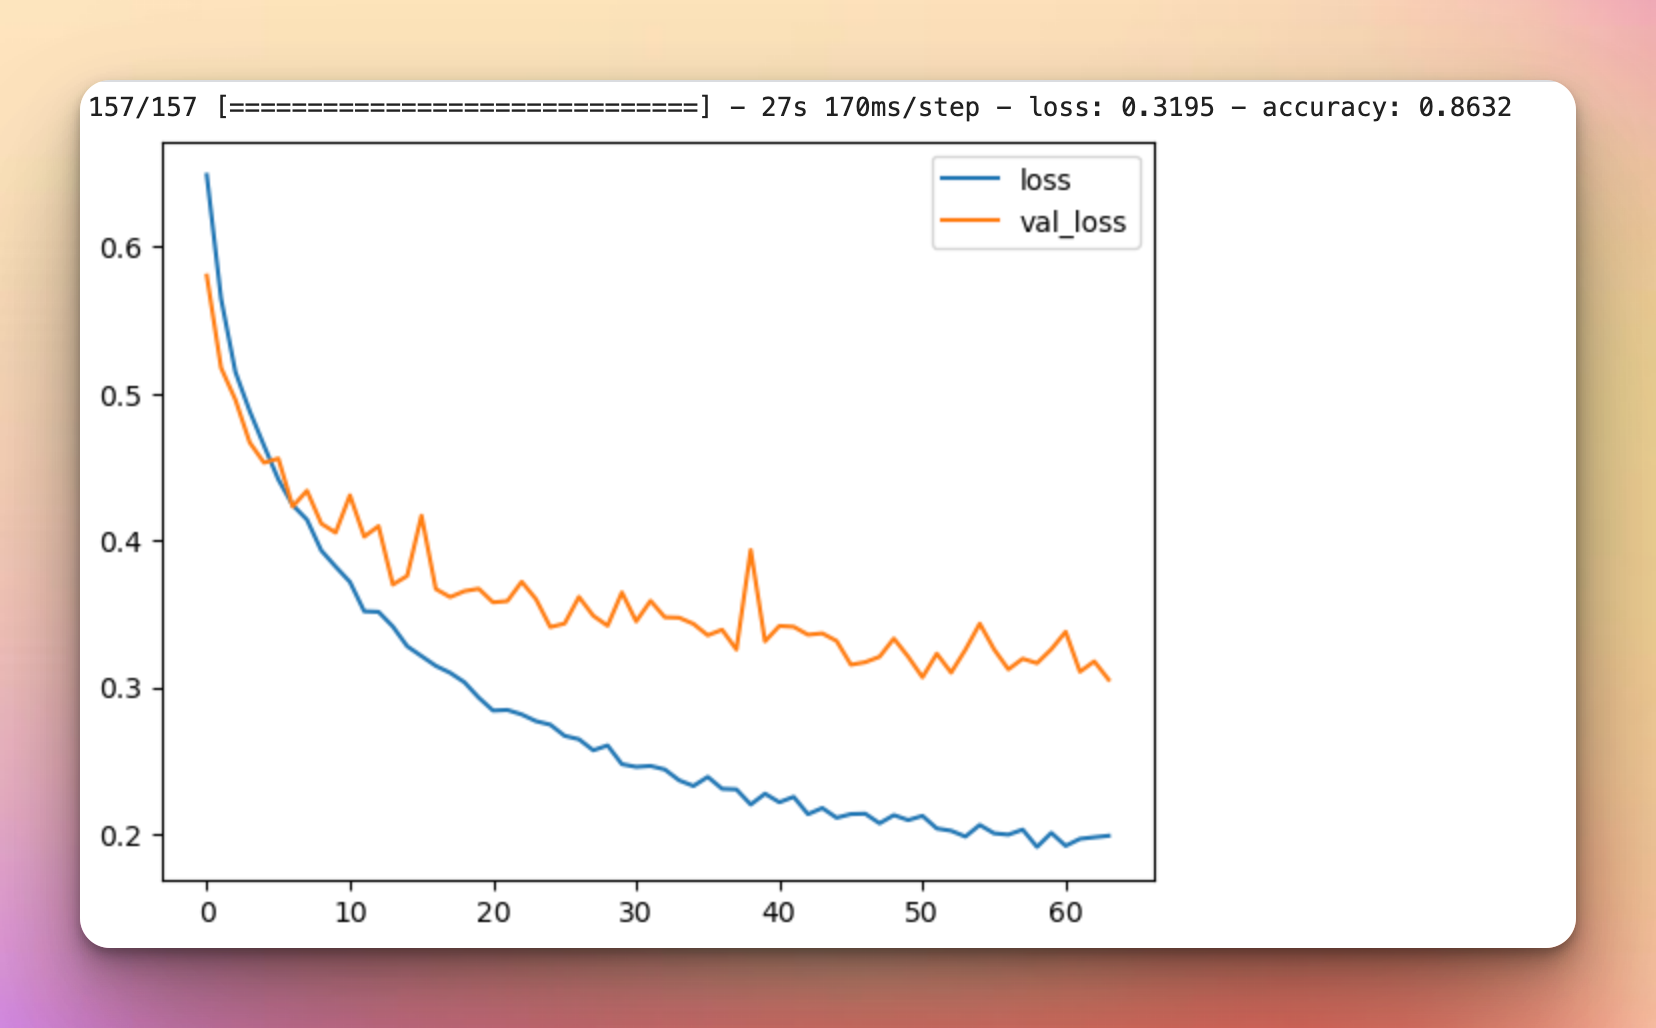

Train CNN Model CutMix and MixUp Augmentation
The CutMix augmentation cuts an image randomly and places it on another, preventing the model from depending on any particular feature. MixUp merges two images. CutMix and MixUp augmentation prevents a model from overfitting on the training data. These augmentation also help the model perform better on testing data that are from a distribution that's different from the training data.
Keras Model Definition With CutMix and MixUp Augmentation
Define the CutMix and MixUp augmentation. The to_dict function ensures that the data is in the format the augmentation layer expects.
def to_dict(image, label):
    image = tf.cast(image, tf.float32)
    label = tf.one_hot(label, num_classes)
    return {"images": image, "labels": label}

AUTOTUNE = tf.data.AUTOTUNE
training_ds = training_set.shuffle(1000).map(to_dict)
validation_ds = validation_set.map(to_dict, num_parallel_calls=AUTOTUNE)
cut_mix = keras_cv.layers.CutMix()
mix_up = keras_cv.layers.MixUp()

def cut_mix_and_mix_up(samples):
    samples = cut_mix(samples, training=True)
    samples = mix_up(samples, training=True)
    return samples

 tada = training_ds.map(cut_mix_and_mix_up)
Visualize some of the augmented images.
image_iterator = iter(training_set)
image_batch, labels_batch = image_iterator.get_next()
output = cut_mix_and_mix_up({"images": image_batch, "labels": tf.cast(labels_batch, tf.float32)})
plt.figure(figsize=(10, 10))
for images in output['images']:
  for i in range(9):
    ax = plt.subplot(3, 3, i + 1)
    plt.imshow(images.numpy().astype("uint8"))
    plt.axis("off")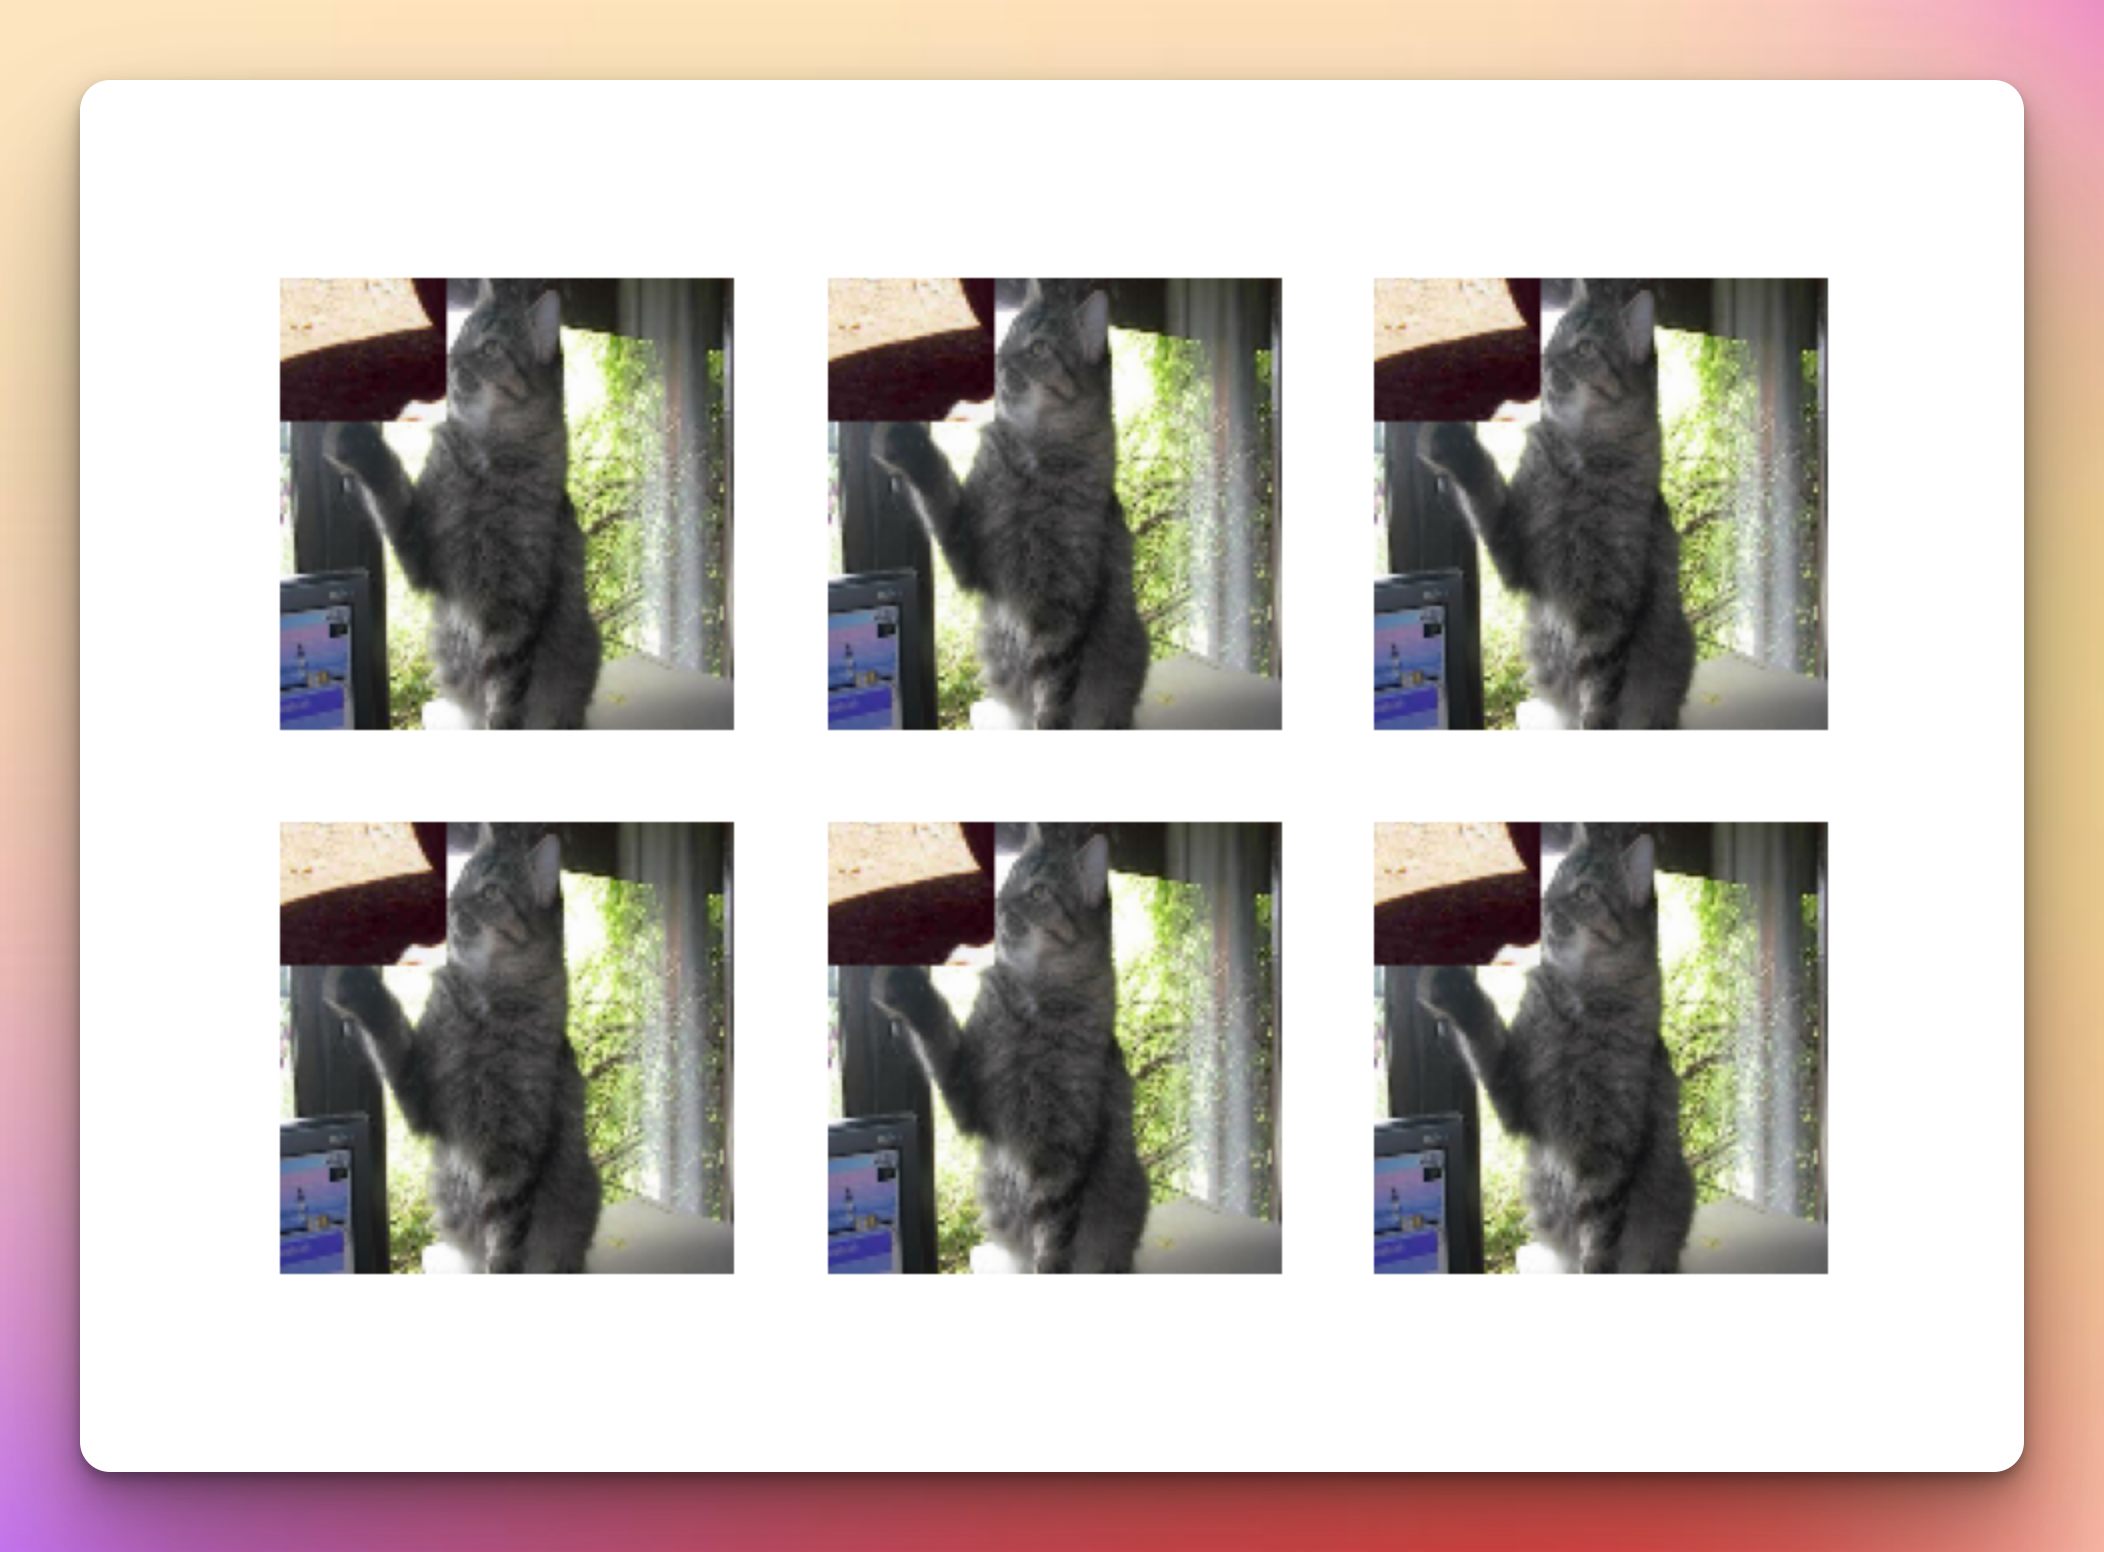
Next, add the augmentation layer to the model and train it.
model = keras.Sequential([
    data_augmentation,
    layers.Rescaling(1./255),
    layers.Conv2D(filters=32,kernel_size=(3,3),activation='relu'),
    layers.MaxPooling2D(pool_size=(2,2)),

    layers.Conv2D(filters=32,kernel_size=(3,3), activation='relu'),
    layers.MaxPooling2D(pool_size=(2,2)),
    layers.Dropout(0.25),

    layers.Conv2D(filters=64,kernel_size=(3,3), activation='relu'),
    layers.MaxPooling2D(pool_size=(2,2)),
    layers.Dropout(0.25),

    layers.Flatten(),
    layers.Dense(128, activation='relu'),
    layers.Dropout(0.25),
    layers.Dense(len(class_names), activation='sigmoid')])

   def preprocess_for_model(inputs):
    images, labels = inputs["images"], inputs["labels"]
    images = tf.cast(images, tf.float32)
    return images, labels

train_dataset = tada.map(preprocess_for_model, num_parallel_calls=AUTOTUNE)

train_dataset = train_dataset.prefetch(AUTOTUNE)

test_dataset = validation_ds.map(preprocess_for_model, num_parallel_calls=AUTOTUNE)

test_dataset = test_dataset.prefetch(AUTOTUNE)
model.compile(optimizer='adam', loss=tf.keras.losses.CategoricalCrossentropy(), metrics=['accuracy'])
model.fit(train_dataset, validation_data = test_dataset, epochs=epochs, callbacks=[earlystopping,tensorboard_callback])
Model Performance With CutMix and MixUp Augmentation
With CutMix and MixUp, training stopped after 8 epochs, but the graphs look similar to what we have seen before. The accuracy failed to reach even 50% after 8 epochs meaning that the CutMix and MixUp image augmentation might not be best suited for this dataset.
metrics_df = pd.DataFrame(history.history)
loss, accuracy = model.evaluate(test_dataset)
metrics_df[["loss","val_loss"]].plot();
metrics_df[["accuracy","val_accuracy"]].plot();
mlnuggets newsletter
Join the newsletter to receive the technical deep dives in your inbox.
Train CNN Model Multiple KerasCV Augmentaions
You can also apply multiple KerasCV augmentations such as RandAugment, Equalization, and Posterization. Define them in a Keras Sequential layer.
data_augmentation = keras.Sequential(
  [
    keras_cv.layers.RandAugment(
    value_range=(0, 255),
    augmentations_per_image=3,
    magnitude=0.3,
    magnitude_stddev=0.2,
    rate=0.5,),
     keras_cv.layers.Equalization(value_range=[0, 255]),
    keras_cv.layers.Posterization(bits=4, value_range=[0, 255])
  ])
Visualize some augmented images:
plt.figure(figsize=(10, 10))
for images, _ in training_set.take(1):
  for i in range(9):
    augmented_images = data_augmentation(images)
    ax = plt.subplot(3, 3, i + 1)
    plt.imshow(augmented_images[0].numpy().astype("uint8"))
    plt.axis("off")
Keras Model Definition With Multiple Augmentations
Next, add the augmentation layers to the model and train it.
model = keras.Sequential([
    data_augmentation,
    layers.Rescaling(1./255),
    layers.Conv2D(filters=32,kernel_size=(3,3),activation='relu'),
    layers.MaxPooling2D(pool_size=(2,2)),

    layers.Conv2D(filters=32,kernel_size=(3,3), activation='relu'),
    layers.MaxPooling2D(pool_size=(2,2)),
    layers.Dropout(0.25),

    layers.Conv2D(filters=64,kernel_size=(3,3), activation='relu'),
    layers.MaxPooling2D(pool_size=(2,2)),
    layers.Dropout(0.25),

    layers.Flatten(),
    layers.Dense(128, activation='relu'),
    layers.Dropout(0.25),
    layers.Dense(len(class_names), activation='sigmoid')])
    model.compile(optimizer='adam', loss=tf.keras.losses.SparseCategoricalCrossentropy(), metrics=['accuracy'])
history = model.fit(training_ds,validation_data=validation_ds,epochs=epochs, callbacks=[earlystopping,tensorboard_callback])
Model Performance With Multiple KerasCV Augmentations
The results with the multiple augmentatons are quite similar to the previous one with a slight drop in accuracy.
metrics_df = pd.DataFrame(history.history)
loss, accuracy = model.evaluate(validation_set)
metrics_df[["loss","val_loss"]].plot();
metrics_df[["accuracy","val_accuracy"]].plot();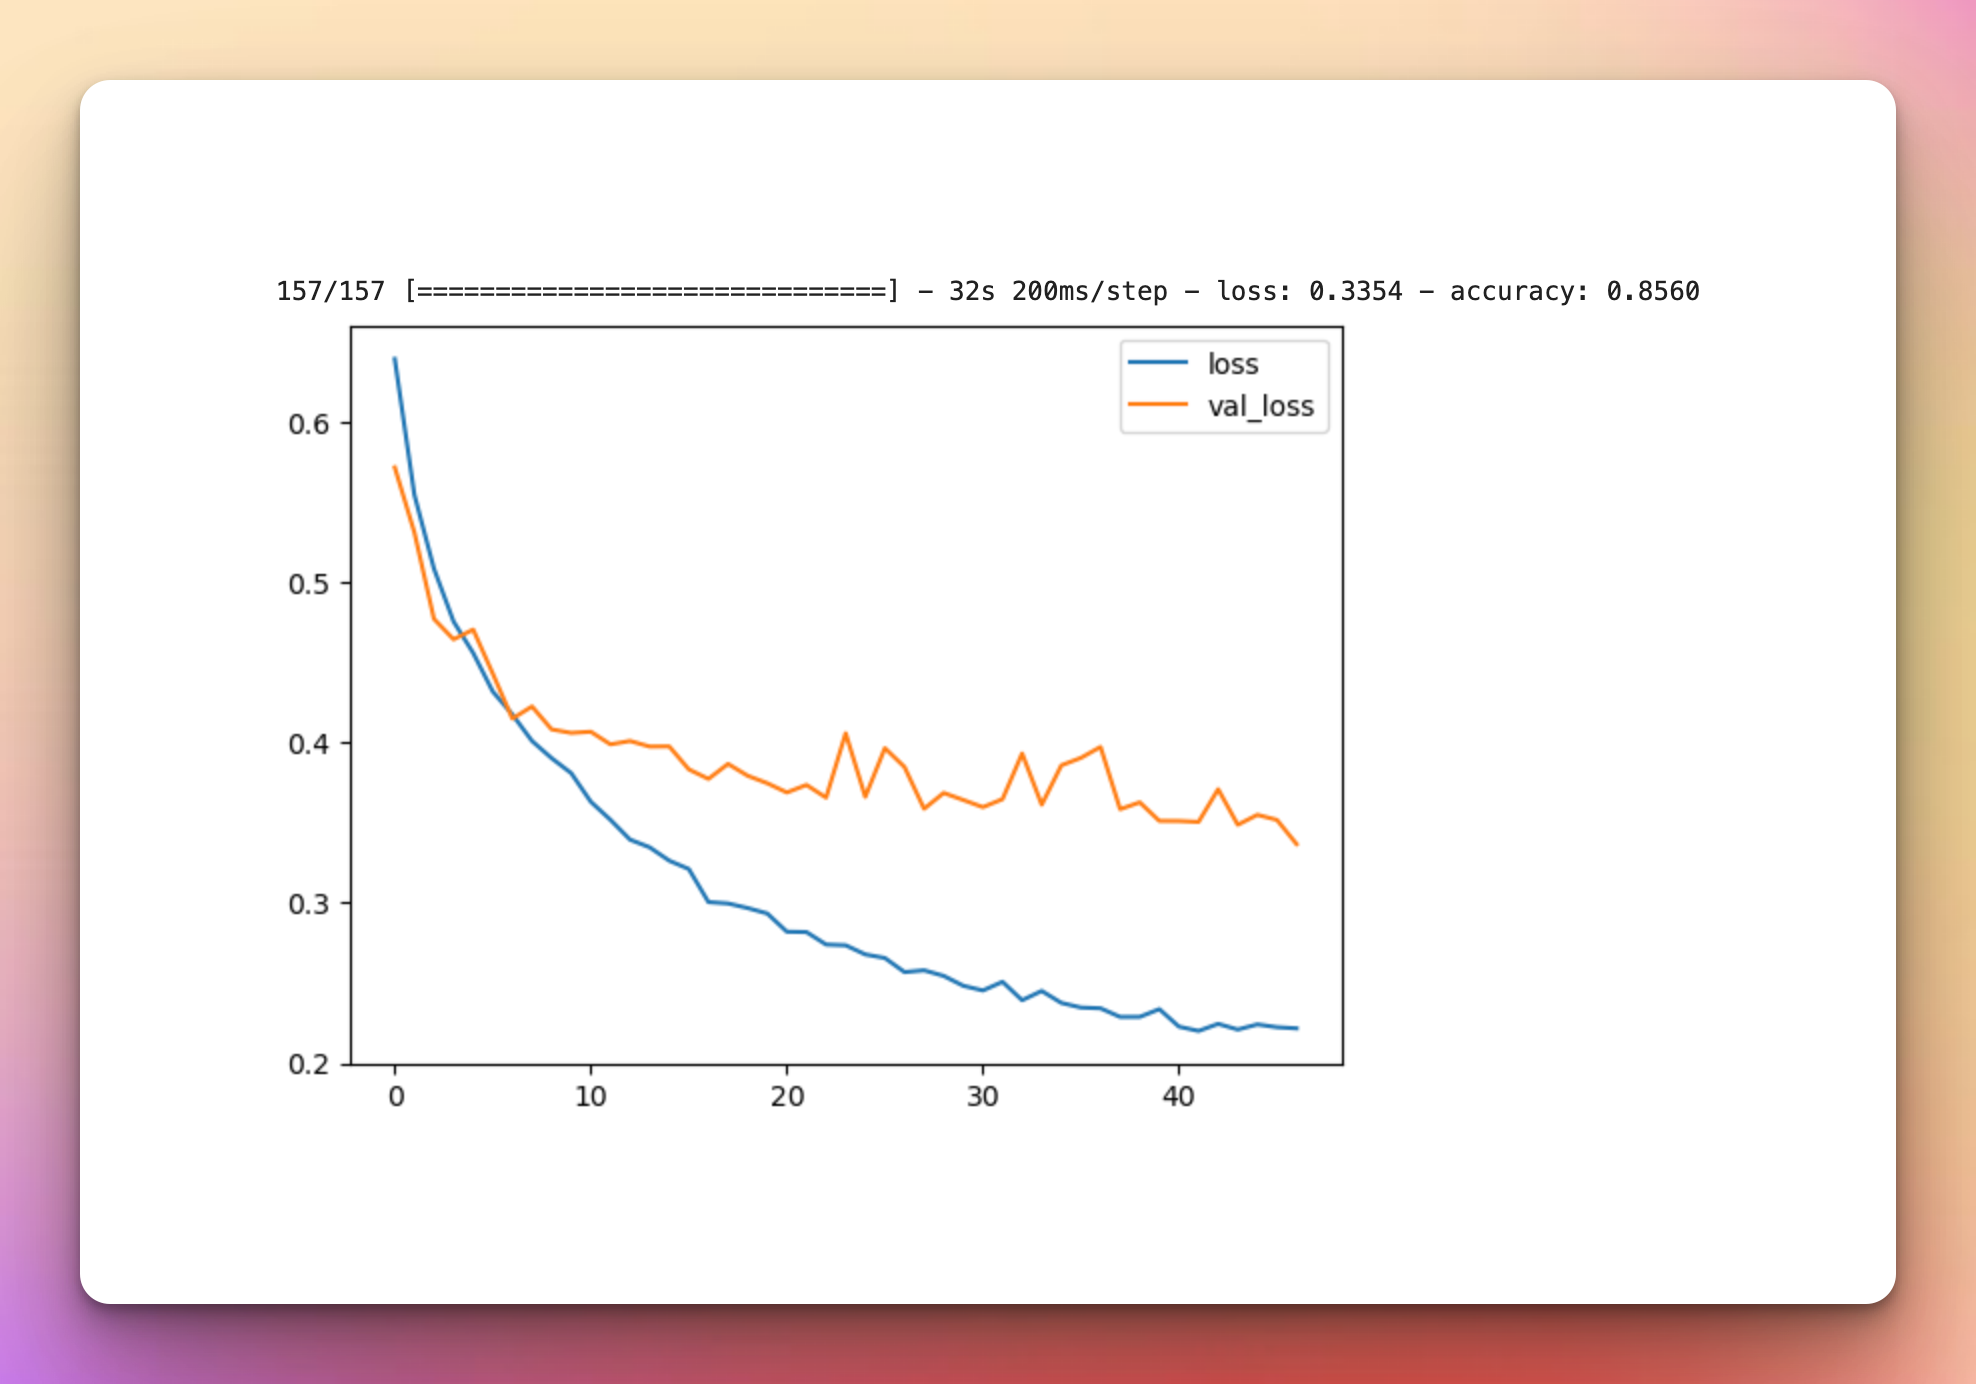
Final Thoughts
Even after trying multiple augmentations it still looks like we are still overfitting on the training images based on the fact that the validation loss curve is going up while the training loss in going down. You can try a pretrained model instead of desing a CNN from scratch to see if the results will be different.
Whenever you're ready, there is 2 way I can help you:
If you're looking to accelerate your career, I'd recommend starting with an affordable ebook:
→ Writing for Data Scientists: The exact path I followed to get technical work that pays between $250-$500 from machine learning companies such as Comet, Neptune, cnvrg, Paperspace, Layer, Neural Magic, Determined, Activeloop, and many more. Get your copy.
→ Data Science and Machine Learning Ebook: I offer numerous free and paid data science and machine learning ebooks to help you in your data science and machine learning career. Check them out.