
How to build TensorFlow models with the Keras Functional API (Examples, code, and notebook)


The Keras Functional API provides a way to build flexible and complex neural networks in TensorFlow. The Functional API is used to design networks that are not linear. In this article, you will discover that the Keras Functional API is used to create networks that:
- Are non-linear.
- Share layers.
- Have multiple inputs and outputs.
Keras Sequential models
We used the Sequential API in the CNN tutorial to build an image classification model with Keras and TensorFlow. The Sequential API involves stacking layers. One layer is followed by another layer until the final dense layer. This makes designing networks with the Sequential API easy and straightforward.
parameters = {"shape":28, "activation": "relu", "classes": 10, "units":12, "optimizer":"adam", "epochs":1,"kernel_size":3,"pool_size":2, "dropout":0.5}
# Setup the layers
model = keras.Sequential(
  [
      layers.Conv2D(32, kernel_size=(parameters["kernel_size"], parameters["kernel_size"]), input_shape =(parameters["shape"], parameters["shape"], 1),activation=parameters["activation"]),
      layers.MaxPooling2D(pool_size=(parameters["pool_size"], parameters["pool_size"])),
      layers.Conv2D(64, kernel_size=(parameters["kernel_size"], parameters["kernel_size"]), activation=parameters["activation"]),
      layers.MaxPooling2D(pool_size=(parameters["pool_size"], parameters["pool_size"])),
      layers.Flatten(),
      layers.Dropout(parameters["dropout"]),
      layers.Dense(parameters["classes"], activation="softmax"),
  ]
)
mlnuggets newsletter
Join the newsletter to receive the technical deep dives in your inbox.
The Sequential API limits you to one input and one output. However, you may want to design neural networks with multiple inputs and outputs in certain scenarios. For example, given an image of a person, you can design a network to predict several attributes such as gender, age, and hair color. This is a network with one input but multiple outputs. To achieve this, the Sequential API is required. Plotting the network shows that the layers are arranged in a linear manner.
keras.utils.plot_model(model, "model.png",show_shapes=True)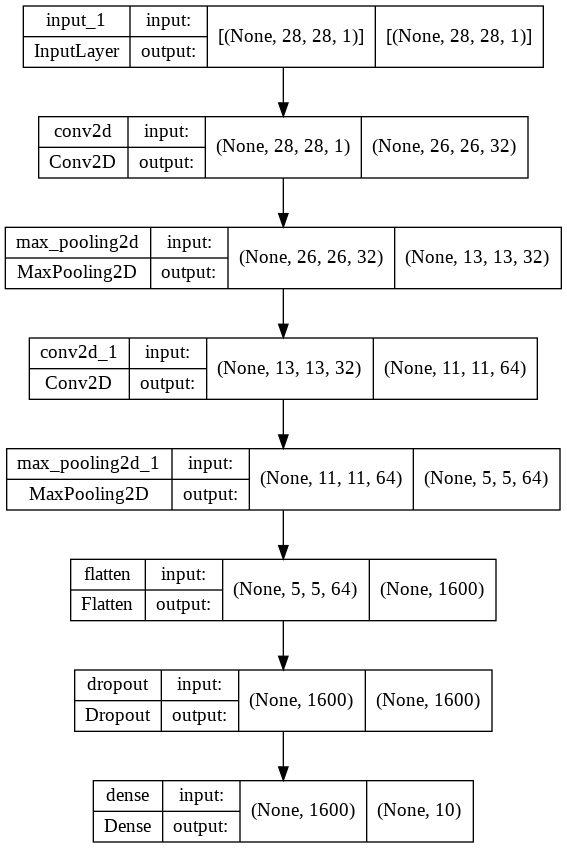
Keras Functional models
Designing Functional models is a little different from developing Sequential models. Let's look at those differences.
👉 Check our Transfer learning guide(With examples for text and images in Keras and PyTorch) tutorial.
Defining input
The first difference is the requirement to create an input layer. With the Sequential API, you don't have to define the input layer. Defining the input shape in the first layer is sufficient.
The inputs layer contains the shape and type of data to be passed to the network.
inputs = keras.Input(shape=(parameters["shape"], parameters["shape"], 1))
inputs.shape
# TensorShape([None, 28, 28, 1])
inputs.dtype
# tf.float32
The input layer is defined without the batch size if the data is one-dimensional.
inputs = keras.Input(shape=(784,))
Connecting layers
The next difference is how layers are connected using the Functional API. To create the connection, we create another layer and pass the inputs layer to it. This is best understood by considering each of the layers as a function. Since the layers are functions, they can be called with parameters. For example, let's pass the inputs to a Conv2D layer.
conv2D = layers.Conv2D(32)
x = conv2D(inputs)
x
# <KerasTensor: shape=(None, 26, 26, 32) dtype=float32 (created by layer 'conv2d_7')>
In the above example, we create a Conv2D layer, call it as a function and pass the inputs. The resulting output's shape is different from the initial inputs shape as a result of being passed to the convolution layer.
mlnuggets newsletter
Join the newsletter to receive the technical deep dives in your inbox.
Functional API Python syntax
The above example shows how to define and connect the networks verbosely. However, the syntax can be simplified. The simplified version looks like this:
conv2D = Conv2d(...) (inputs)conv2D() is similar to conv2D.__call__(self,....). Python objects implement the __call__() method. Keras layers also implement this method. The method returns the output given an input tensor.
inputs = keras.Input(shape=(parameters["shape"], parameters["shape"], 1))
conv2D = layers.Conv2D(32, kernel_size=(parameters["kernel_size"], parameters["kernel_size"]), input_shape =(parameters["shape"], parameters["shape"], 1),activation=parameters["activation"])(inputs)
conv2D
# <KerasTensor: shape=(None, 26, 26, 32) dtype=float32 (created by layer 'conv2d_8')>
Creating the model
Let's add a few more layers to the network to demonstrate how to create a Keras model when layers are defined using the Functional API.
parameters = {"shape":28, "activation": "relu", "classes": 10, "units":12, "optimizer":"adam", "epochs":1,"kernel_size":3,"pool_size":2, "dropout":0.5}

inputs = keras.Input(shape=(parameters["shape"], parameters["shape"], 1))

conv2D = layers.Conv2D(32, kernel_size=(parameters["kernel_size"], parameters["kernel_size"]), input_shape =(parameters["shape"], parameters["shape"], 1),activation=parameters["activation"])(inputs)

maxPooling2D = layers.MaxPooling2D(pool_size=(parameters["pool_size"], parameters["pool_size"]))(conv2D)

conv2D_2 =layers.Conv2D(64, kernel_size=(parameters["kernel_size"], parameters["kernel_size"]), activation=parameters["activation"])(maxPooling2D)

maxPooling2D_2 = layers.MaxPooling2D(pool_size=(parameters["pool_size"], parameters["pool_size"]))(conv2D_2)

flatten =   layers.Flatten()(maxPooling2D_2)

dropout = layers.Dropout(parameters["dropout"])(flatten)

ouputs = layers.Dense(parameters["classes"], activation="softmax")(dropout)
A Keras model is created using the keras.Model function while passing the inputs and outputs.
model = keras.Model(inputs=inputs, outputs=outputs, name="mnist_model")
We can plot the model to confirm that it's similar to the one we defined using the Sequential API.
keras.utils.plot_model(model, "model.png",show_shapes=True)
Training and evaluation of Functional API models
Training and evaluating models are the same in the Functional API and the Sequential API. keras.Model avails the fit and evaluate methods.
(x_train, y_train), (x_test, y_test) = keras.datasets.mnist.load_data()

x_train = x_train.astype("float32") / 255
x_test = x_test.astype("float32") / 255

model.compile(
    loss=keras.losses.SparseCategoricalCrossentropy(from_logits=True),
    optimizer=keras.optimizers.RMSprop(),
    metrics=["accuracy"],
)

history = model.fit(x_train, y_train, batch_size=64, epochs=2, validation_split=0.2)

test_scores = model.evaluate(x_test, y_test, verbose=2)
print("Test loss:", test_scores[0])
print("Test accuracy:", test_scores[1])
Save and serialize Functional API models
Model saving and serialization work the same in the Functional API and the Sequential API. For instance, we can save the entire model using model.save().
model.save("saved_model")
del model
model = keras.models.load_model("saved_model")
model.summary()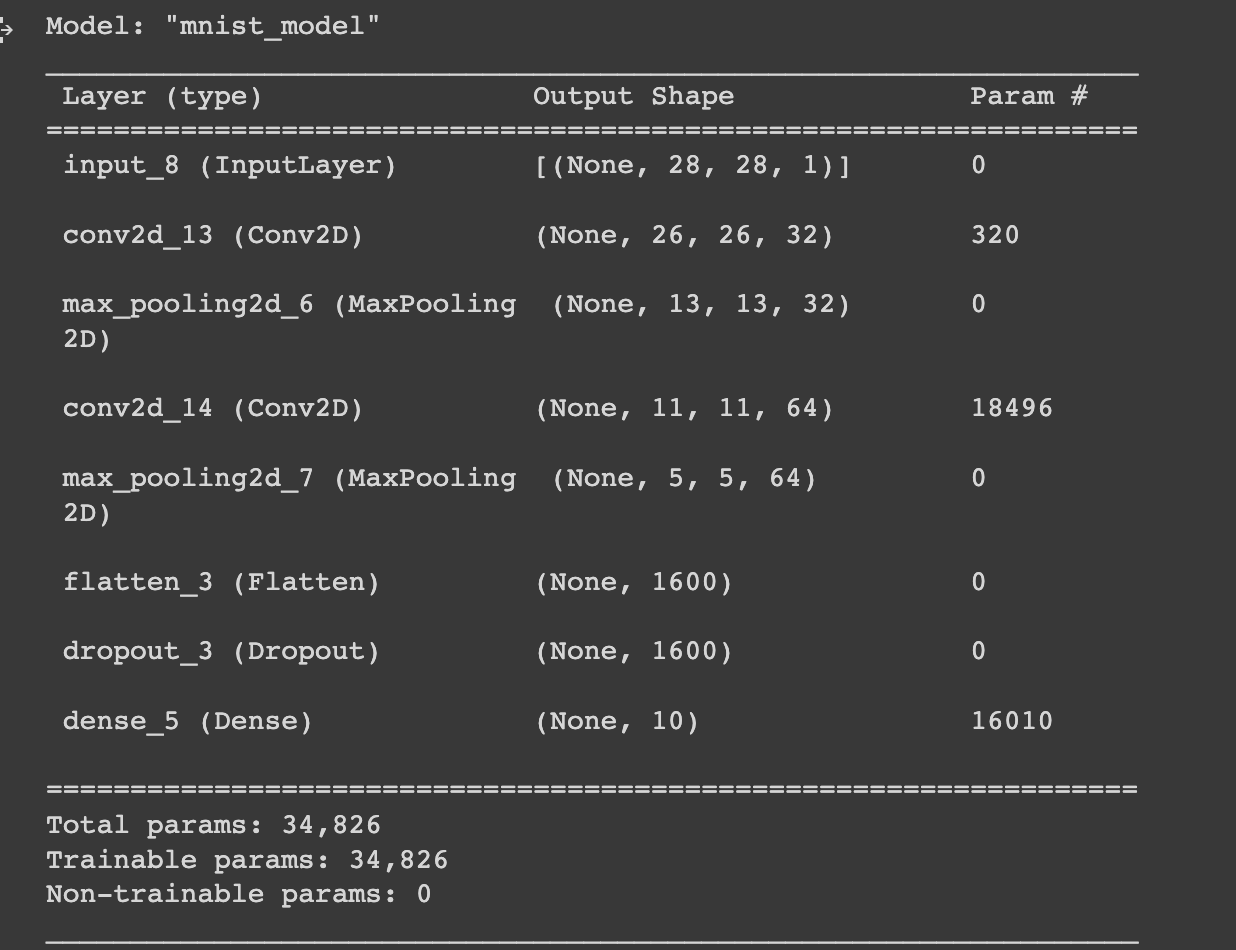
mlnuggets newsletter
Join the newsletter to receive the technical deep dives in your inbox.
How to convert a Functional model to a Sequential API model
A Functional model with linear layers can be converted into a Sequential model by creating an instance of Sequential and adding the layers.
seq_model = keras.models.Sequential()
for layer in model.layers:
    seq_model.add(layer)
seq_model.summary()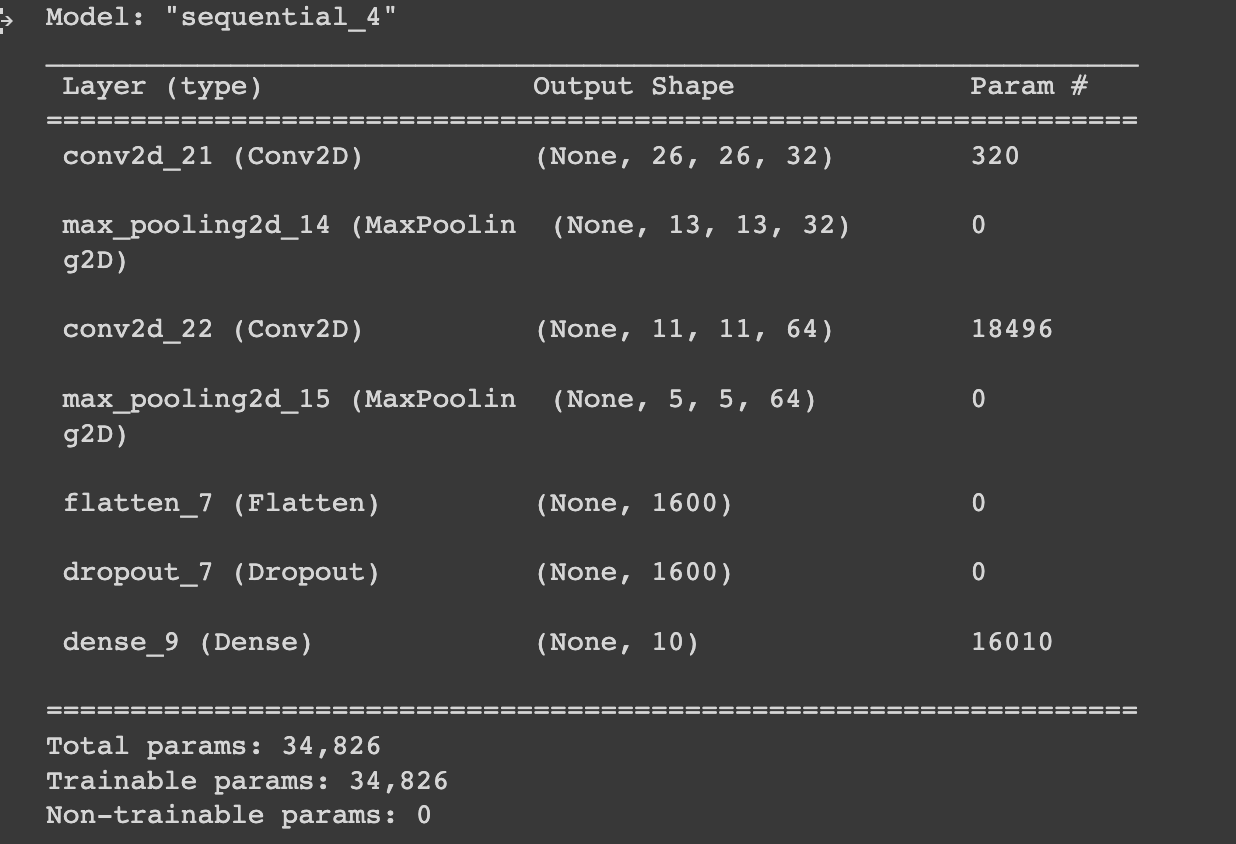
How to convert a Sequential model to a Functional API model
Similarly, we can convert Sequential networks to Functional models.
inputs = keras.Input(batch_shape=seq_model.layers[0].input_shape)
x = inputs
for layer in seq_model.layers:
    x = layer(x)
outputs = x
func_model = keras.Model(inputs=inputs, outputs=outputs, name="func_mnist_model")
func_model.summary()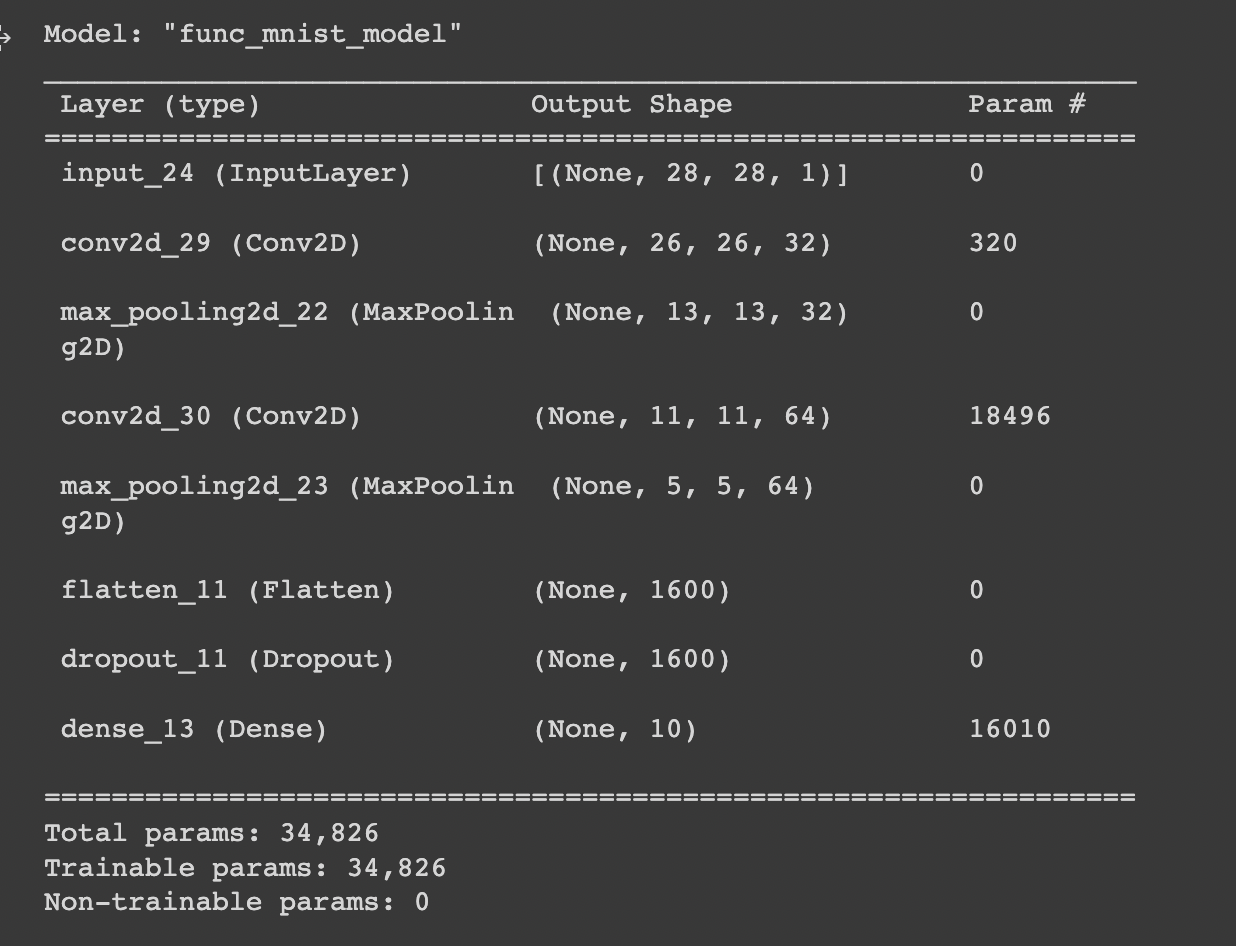
Standard network models
Let's look at how to define standard neural networks using the Functional Keras API.
Multilayer perception
We start by defining a neural network with multiple hidden layers and plot the model.
inputs = keras.Input(shape=(parameters["shape"], parameters["shape"], 1))
dense1 = layers.Dense(128)(inputs)
dropout = layers.Dropout(parameters["dropout"])(dense1)
dense2 = layers.Dense(128)(dropout)
dropout1 = layers.Dropout(parameters["dropout"])(dense2)
outputs = layers.Dense(parameters["classes"], activation="softmax")(dropout1)
model = keras.Model(inputs=inputs, outputs=outputs, name="mnist_model")
keras.utils.plot_model(model, "model.png",show_shapes=True)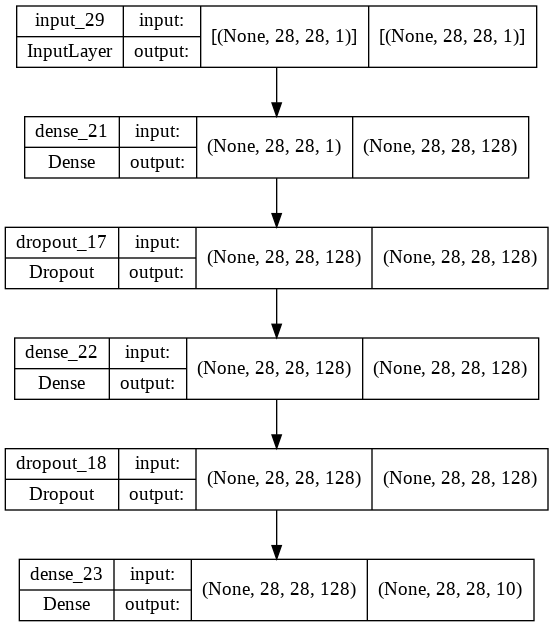
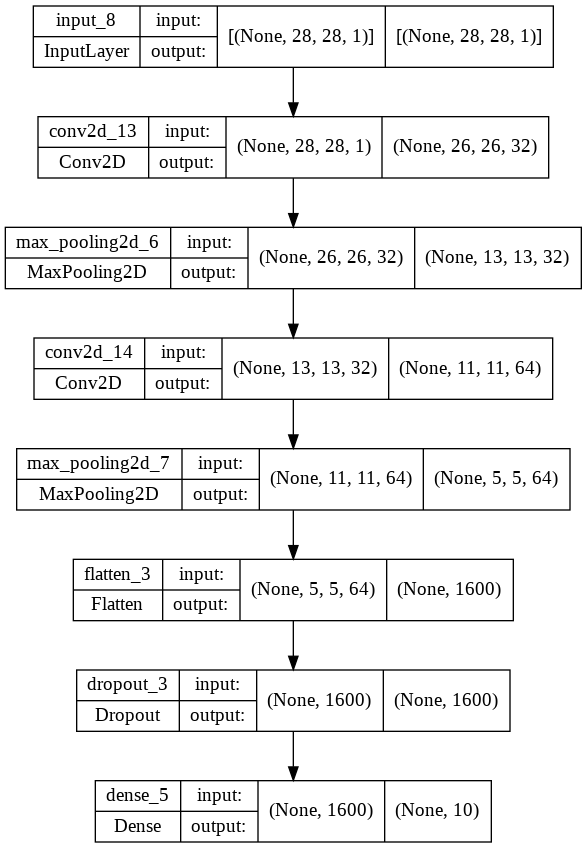
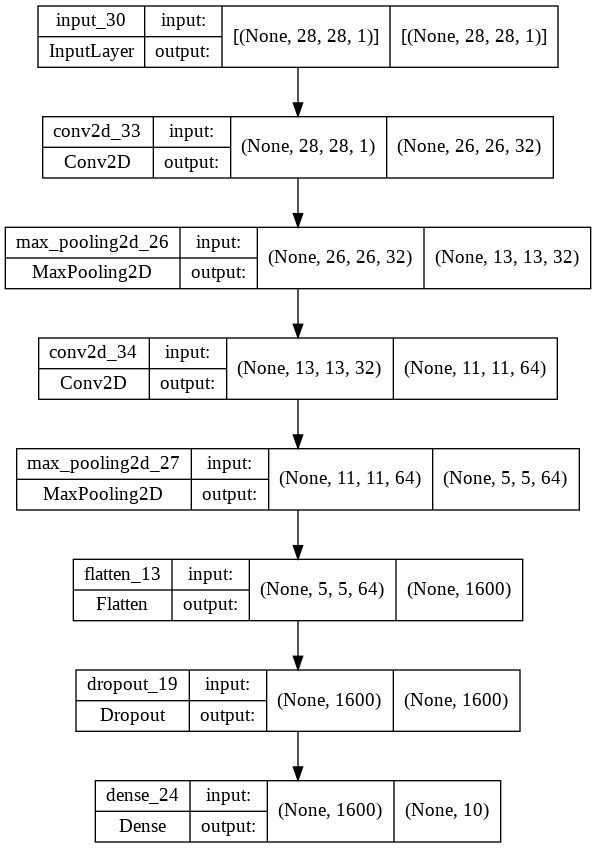
Convolutional Neural Network
Next, we look at how to define Convolutional Neural Networks using the Functional API. The network has convolution, pooling, flatten, and dense layers.
inputs = keras.Input(shape=(parameters["shape"], parameters["shape"], 1))
conv2D = layers.Conv2D(32, kernel_size=(parameters["kernel_size"], parameters["kernel_size"]), input_shape =(parameters["shape"], parameters["shape"], 1),activation=parameters["activation"])(inputs)
maxPooling2D = layers.MaxPooling2D(pool_size=(parameters["pool_size"], parameters["pool_size"]))(conv2D)
conv2D_2 =layers.Conv2D(64, kernel_size=(parameters["kernel_size"], parameters["kernel_size"]), activation=parameters["activation"])(maxPooling2D)
maxPooling2D_2 = layers.MaxPooling2D(pool_size=(parameters["pool_size"], parameters["pool_size"]))(conv2D_2)
flatten =   layers.Flatten()(maxPooling2D_2)
dropout = layers.Dropout(parameters["dropout"])(flatten)
outputs = layers.Dense(parameters["classes"], activation="softmax")(dropout)
model = keras.Model(inputs=inputs, outputs=outputs, name="mnist_model")
keras.utils.plot_model(model, "model.png",show_shapes=True)
mlnuggets newsletter
Join the newsletter to receive the technical deep dives in your inbox.
Recurrent Neural Network
Let's look at the definition of a bidirectional LSTM using the Functional API. The network contains an Embedding layer.
inputs = keras.Input(784,)
embedding = layers.Embedding(512, 64, input_length=1024)(inputs)
bidirectional1 = layers.Bidirectional(layers.LSTM(64, return_sequences=True))(embedding)
bidirectional2 = layers.Bidirectional(layers.LSTM(64,))(bidirectional1)
dense1 = layers.Dense(32, activation='relu')(bidirectional2)
outputs = layers.Dense(1, activation='sigmoid')(dense1)
model = keras.Model(inputs=inputs, outputs=outputs, name="lstm_model")
keras.utils.plot_model(model, "model.png",show_shapes=True)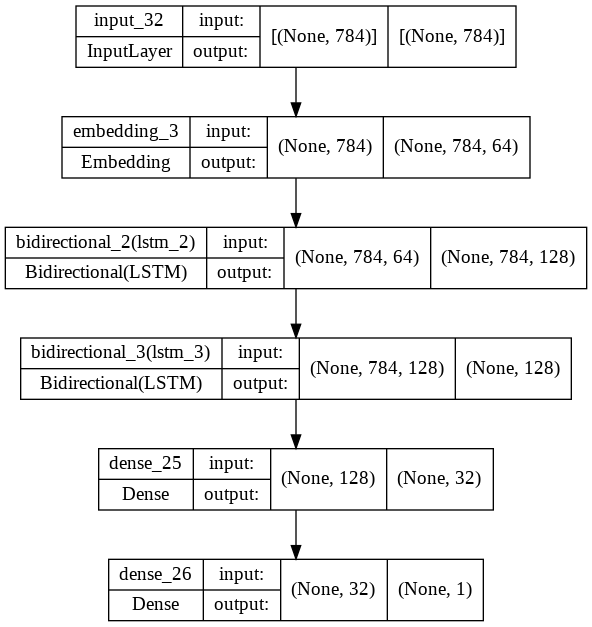
Shared layers model
Defining layers with the Functional API enables the creation of networks that share certain layers. Shared layers are used several times in a network.
Shared input layer
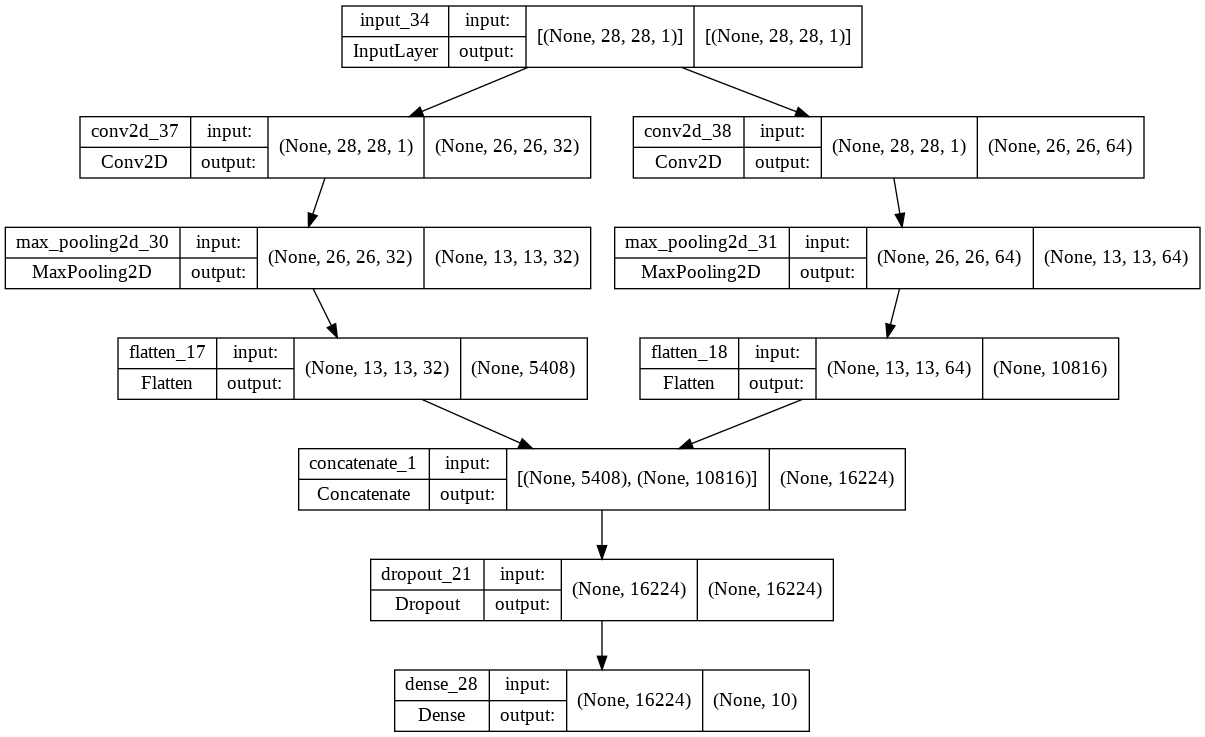
This example defines a CNN with one input layer shared by two convolution blocks. We then join the outputs from these blocks using the concatenate layer. After that, we pass the result to a DropOut layer and finally to fully connected layer.
inputs = keras.Input(shape=(parameters["shape"], parameters["shape"], 1))
conv2D = layers.Conv2D(32, kernel_size=(parameters["kernel_size"], parameters["kernel_size"]), input_shape =(parameters["shape"], parameters["shape"], 1),activation=parameters["activation"])(inputs)
maxPooling2D = layers.MaxPooling2D(pool_size=(parameters["pool_size"], parameters["pool_size"]))(conv2D)
flatten1 =   layers.Flatten()(maxPooling2D)

conv2D_2 = layers.Conv2D(64, kernel_size=(parameters["kernel_size"], parameters["kernel_size"]), activation=parameters["activation"])(inputs)
maxPooling2D_2 = layers.MaxPooling2D(pool_size=(parameters["pool_size"], parameters["pool_size"]))(conv2D_2)
flatten2 =   layers.Flatten()(maxPooling2D_2)

# merge layers
merged_layers = layers.concatenate([flatten1, flatten2])

dropout = layers.Dropout(parameters["dropout"])(merged_layers)
outputs = layers.Dense(parameters["classes"], activation="softmax")(dropout)
model = keras.Model(inputs=inputs, outputs=outputs, name="mnist_model")
keras.utils.plot_model(model, "model.png",show_shapes=True)
Plotting the network shows the connection between the different layers.
Shared feature extraction layer
In this example, we create an embedding layer shared by two bidirectional LSTMs. A shared feature extraction layer enables sharing the same feature extractor multiple times in the network. For example, sharing this information between two inputs can make it possible to train a network with less data.
inputs = keras.Input(784,)
embedding = layers.Embedding(512, 64, input_length=1024)(inputs)
bidirectional1 = layers.Bidirectional(layers.LSTM(64, return_sequences=True))(embedding)
bidirectional2 = layers.Bidirectional(layers.LSTM(64, return_sequences=True))(embedding)

# merge layers
merged_layers = layers.concatenate([bidirectional1, bidirectional2])

dense1 = layers.Dense(32, activation='relu')(merged_layers)
outputs = layers.Dense(1, activation='sigmoid')(dense1)
model = keras.Model(inputs=inputs, outputs=outputs, name="lstm_model")
keras.utils.plot_model(model, "model.png",show_shapes=True)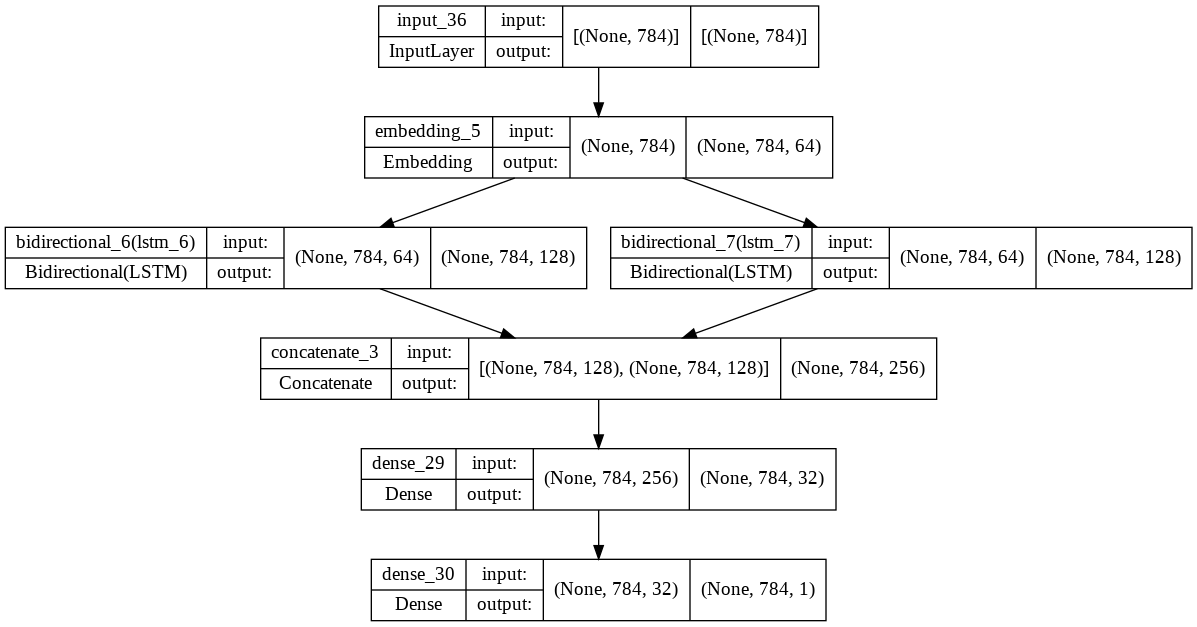
Next, let's discuss the multiple inputs and outputs scenario.
mlnuggets newsletter
Join the newsletter to receive the technical deep dives in your inbox.
Multiple input and output models
Networks with multiple inputs and outputs can also be defined using the Functional API. This is not possible with the Sequential API.
Multiple input model
In this example, we define a network that takes two inputs of different lengths. We pass the inputs to dense layers and sum them using the add layer.
input1 = keras.Input(shape=(16,))
x1 =layers.Dense(8, activation='relu')(input1)
input2 = layers.Input(shape=(32,))
x2 = layers.Dense(8, activation='relu')(input2)
# equivalent to `added = tf.keras.layers.add([x1, x2])`
added = layers.Add()([x1, x2])
out = layers.Dense(4)(added)
model = keras.Model(inputs=[input1, input2], outputs=out)
keras.utils.plot_model(model, "model.png",show_shapes=True)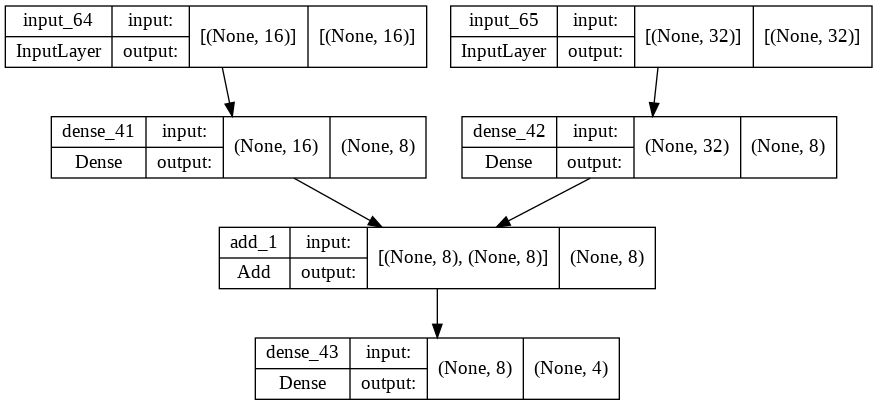
Multiple output model
The Functional API enables the definition of models with multiple outputs. The example below defines a convolutional neural network with two output layers. For instance, given an image of a person, this network can predict gender and hair color.
image_input = keras.Input(shape=(parameters["shape"], parameters["shape"], 3), name="images")
x = layers.Conv2D(filters=32,kernel_size=(3,3),activation='relu')(image_input)
x = layers.MaxPooling2D(pool_size=(2,2))(x)

x = layers.Conv2D(filters=32,kernel_size=(3,3), activation='relu')(x)
x = layers.Dropout(0.25)(x)
x = layers.Conv2D(filters=64,kernel_size=(3,3), activation='relu')(x)
x = layers.MaxPooling2D(pool_size=(2,2))(x)

x = layers.Dropout(0.25)(x)
x = layers.Flatten()(x)
x = layers.Dense(128, activation='relu')(x)
x = layers.Dropout(0.25)(x)

gender_prediction = layers.Dense(3, activation='softmax')(x)
age_prediction = layers.Dense(3, activation='softmax')(x)

model = keras.Model(
    inputs=image_input,
    outputs=[gender_prediction, age_prediction],
)
keras.utils.plot_model(model, "model.png",show_shapes=True)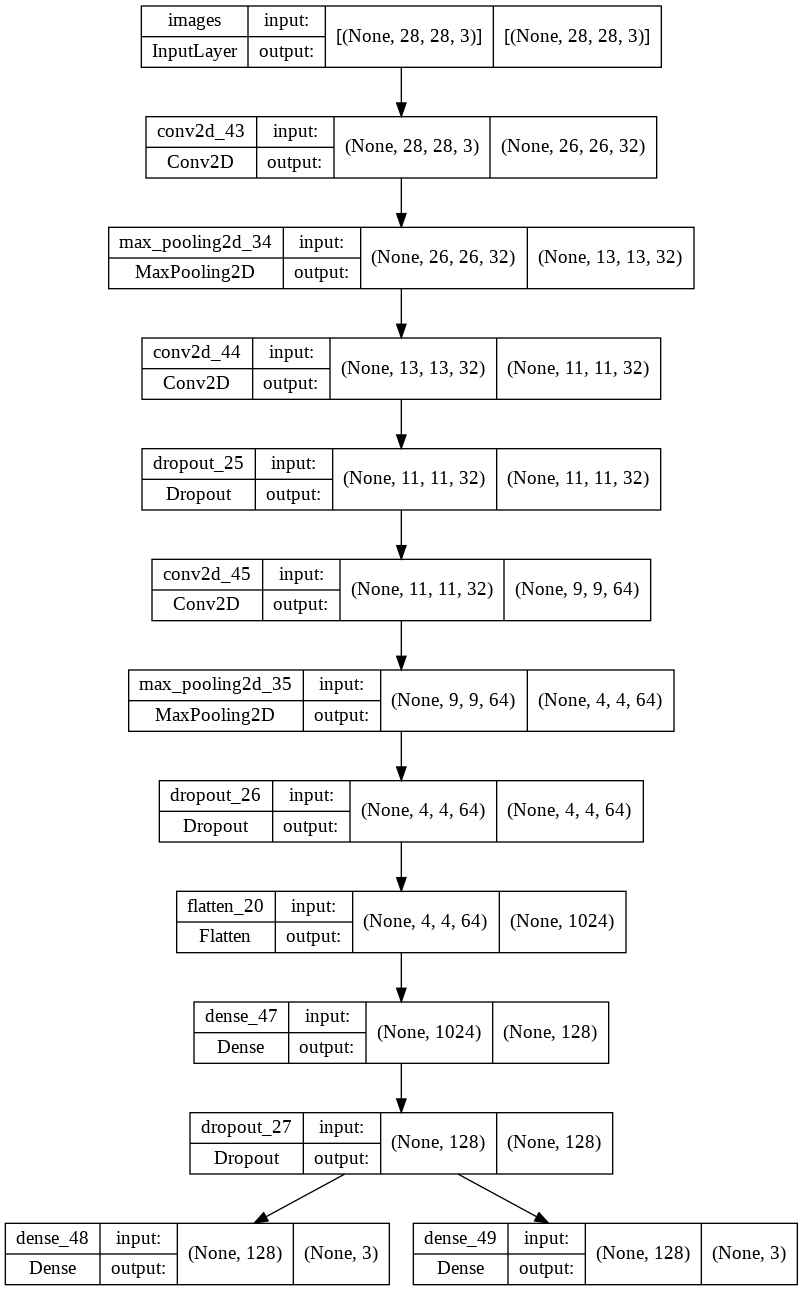
Use the same graph of layers to define multiple models
The Functional API also enables the definition of multiple models using the same layers. This is possible because creating a model using the Functional API requires only the inputs and outputs. For example, this is applicable in the encode decoder network architecture.
encoder_input = keras.Input(shape=(28, 28, 1), name="img")
x = layers.Conv2D(16, 3, activation="relu")(encoder_input)
x = layers.Conv2D(32, 3, activation="relu")(x)
x = layers.MaxPooling2D(3)(x)
x = layers.Conv2D(32, 3, activation="relu")(x)
x = layers.Conv2D(16, 3, activation="relu")(x)
encoder_output = layers.GlobalMaxPooling2D()(x)

encoder = keras.Model(encoder_input, encoder_output, name="encoder")
encoder.summary()

x = layers.Reshape((4, 4, 1))(encoder_output)
x = layers.Conv2DTranspose(16, 3, activation="relu")(x)
x = layers.Conv2DTranspose(32, 3, activation="relu")(x)
x = layers.UpSampling2D(3)(x)
x = layers.Conv2DTranspose(16, 3, activation="relu")(x)
decoder_output = layers.Conv2DTranspose(1, 3, activation="relu")(x)

autoencoder = keras.Model(encoder_input, decoder_output, name="autoencoder")
autoencoder.summary()
mlnuggets newsletter
Join the newsletter to receive the technical deep dives in your inbox.
Keras Functional API end-to-end example
Let's design a TensorFlow network that predicts various characteristics given an image of a face. The characteristics we will be predicting are:
- Age
- Hair color
- Mustache color
- Eye color
We will use the Face Classification Open Annotated Dataset from Ango AI.
Data download
We start by downloading the images. We'll use the download script provided by Ango AI. The images will be downloaded into an assets folder.
!git clone https://github.com/mlnuggets/tensorflow.git
!mv tensorflow/data/labels-en.json labels-en.json
!mv tensorflow/data/dataloader.py dataloader.py
!python dataloader.py -j labels-en.json
Data processing
Next, we load the JSON file using Pandas. The file contains the classification for each image.
import pandas as pd
df = pd.read_json("labels-en.json")
df.head()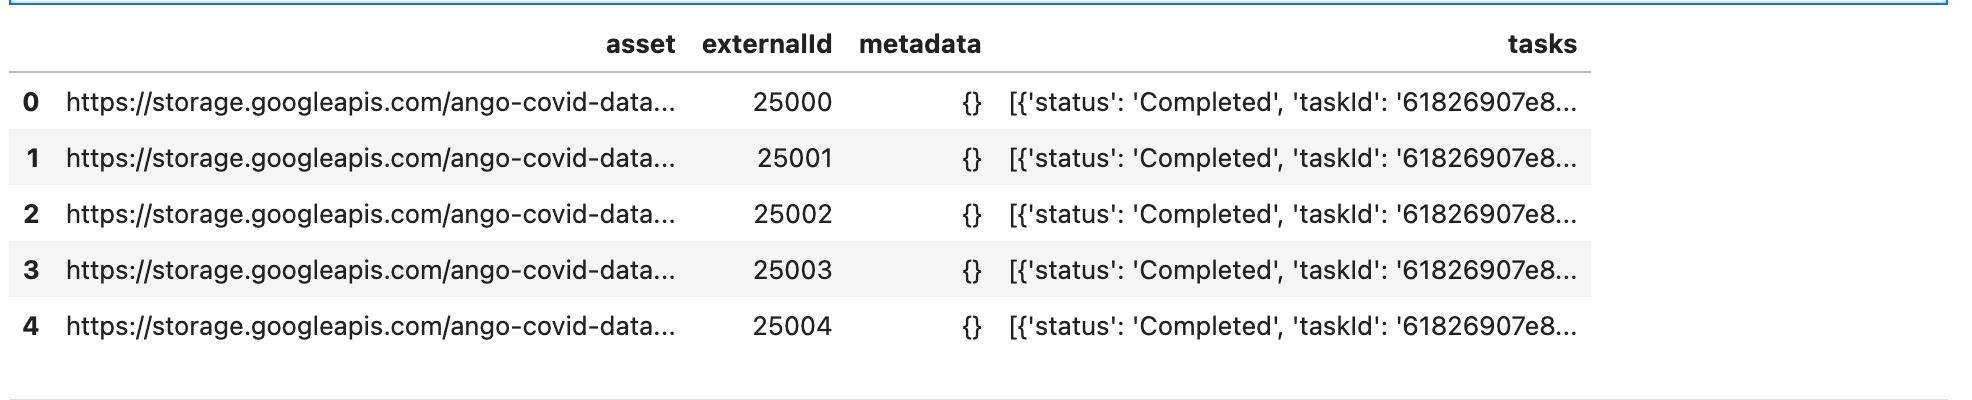
Add image path column
We will load the images using the Pandas DataFrame. To do that, we need to provide a path for each image. Let's add the image path column to the DataFrame.
def image_names(externalId):
    return f"{externalId}.png"
df["image_path"] = df["externalId"].map(image_names)
df.tail()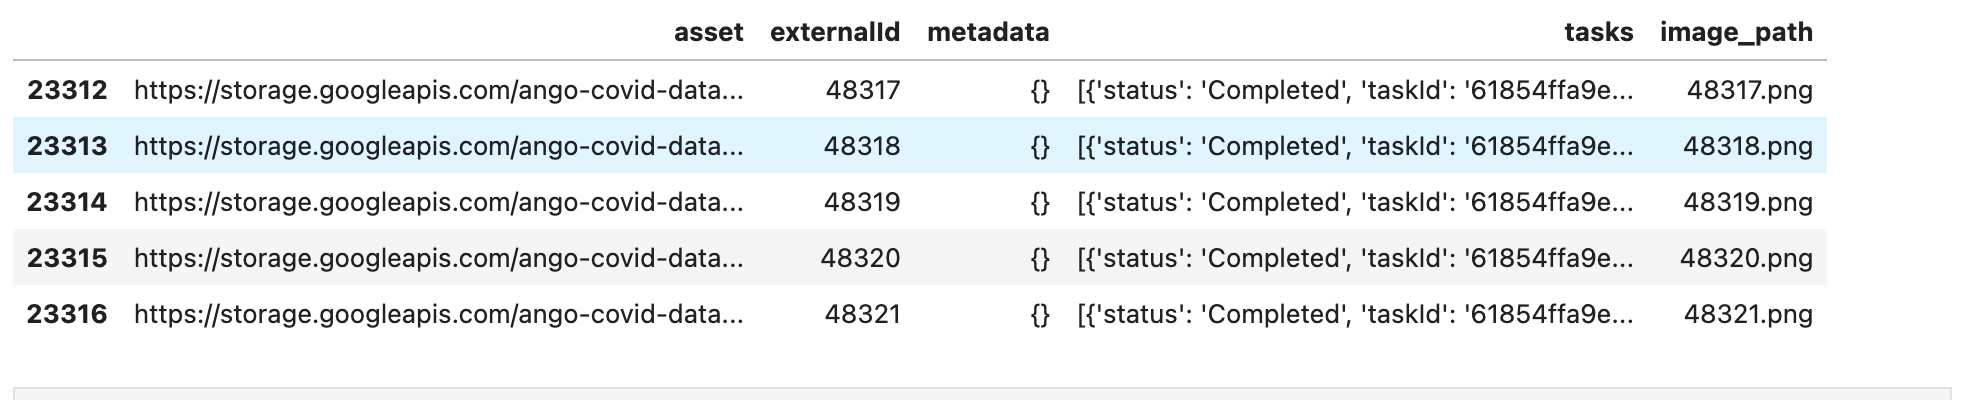
Create face attributes columns
The tasks column contains the labels for the face characteristics. We, therefore, define a function to get that information and create a column for each face attribute.
Let's start by obtaining all the labels and appending them to a list.
age = []
hair = []
beard = []
mustache = []
eye = []
def get_answers(tasks):
    for all_tasks in tasks:
        all_it = all_tasks[0]
        for item in all_it['classifications']:

            if item['title'] == 'Age':
                age.append(item['answer'])

            if item['title'] == 'Hair Color':
                hair.append(item['answer'])

            if item['title'] == 'Beard Color':
                beard.append(item['answer'])

            if item['title'] == 'Mustache Color':
                mustache.append(item['answer'])

            if item['title'] == 'Eye Color':
                eye.append(item['answer'])
Next, we use these lists to create a new column for each face attribute.
get_answers(df['tasks'])
df['age'] = age
df['hair_color'] = hair
df['beard_color'] = beard
df['mustache_color'] = mustache
df['eye_color'] = eye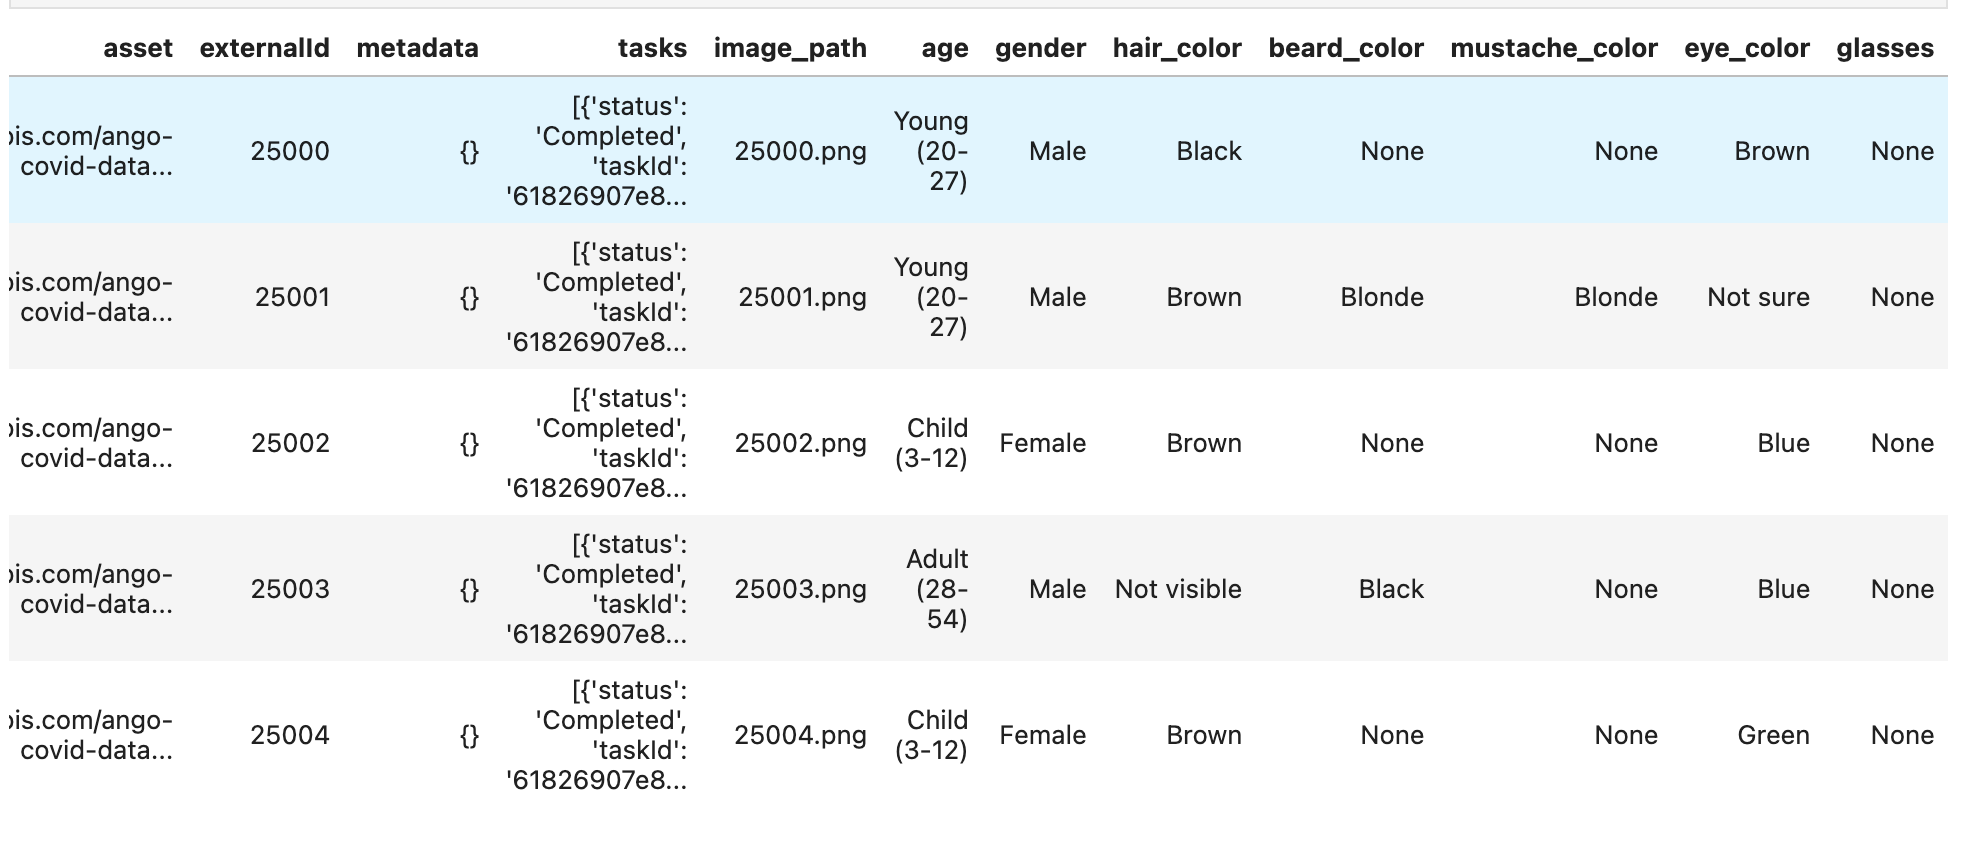
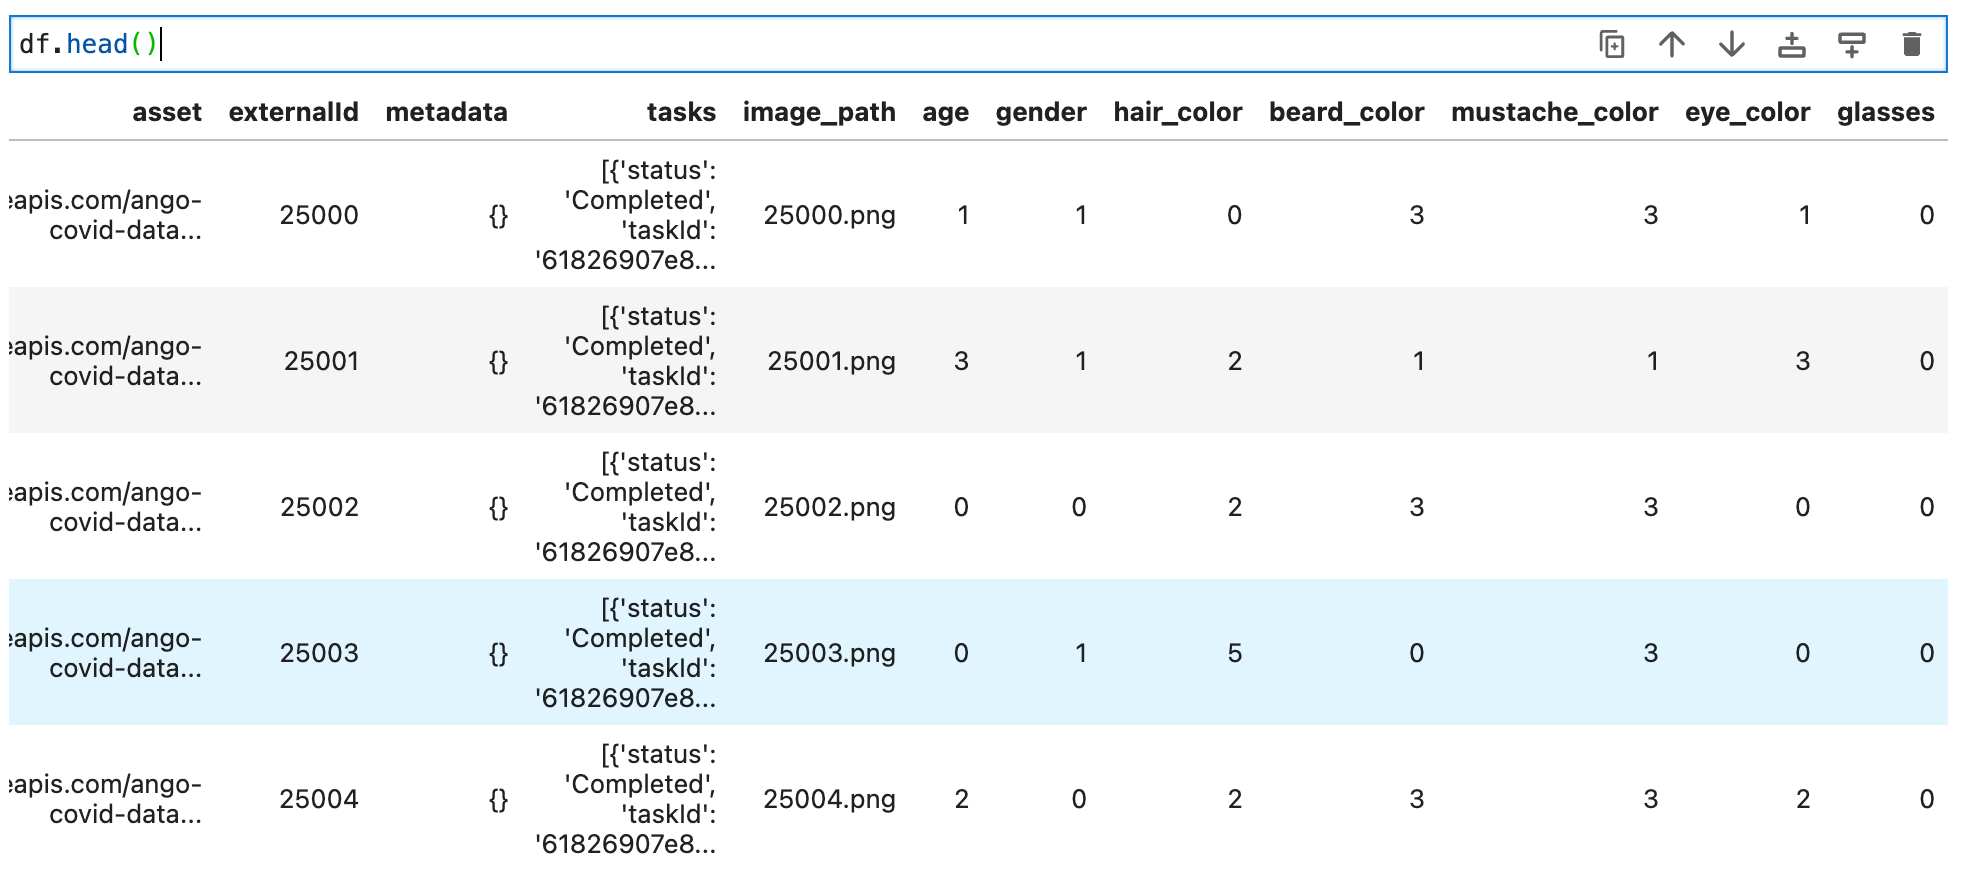
Label encoding
We now have the labels for each face attribute. The next step is to convert them to integer representation. We use Scikit-learns LabelEncoder to achieve that.
from sklearn.preprocessing import LabelEncoder
age_labelencoder = LabelEncoder()
hair_labelencoder = LabelEncoder()
beard_labelencoder = LabelEncoder()
mustache_labelencoder = LabelEncoder()
eye_labelencoder = LabelEncoder()

df = df.assign(age = age_labelencoder.fit_transform(df["age"]))
df = df.assign(hair_color = hair_labelencoder.fit_transform(df["hair_color"]))
df = df.assign(beard_color = beard_labelencoder.fit_transform(df["beard_color"]))
df = df.assign(mustache_color = mustache_labelencoder.fit_transform(df["mustache_color"]))
df = df.assign(age = age_labelencoder.fit_transform(df["eye_color"]))
df = df.assign(eye_color = eye_labelencoder.fit_transform(df["eye_color"]))
mlnuggets newsletter
Join the newsletter to receive the technical deep dives in your inbox.
Generate tf.data dataset
The next step is to create a TensorFlow dataset using this DataFrame and the image data. We achieve this using ImageDataGenerator. This function generates a batch of tensor image data with augmentation. Since the image information is a DataFrame, we load the images using flow_from_dataframe. The first step is to define the ImageDataGenerator with the desired configuration. In this case:
- Rescaling the images.
- Specifying the validation split.
- Defining the augmentation strategy, including horizontal flip and
shear_range.
from tensorflow.keras.preprocessing.image import ImageDataGenerator
train_datagen = ImageDataGenerator(rescale=1./255,
                                   shear_range=0.2,
                                   zoom_range=0.2,
                                   horizontal_flip=True,
                                   width_shift_range=0.1,
                                   height_shift_range=0.1,
                                   validation_split=0.2
                                   )
validation_gen = ImageDataGenerator(rescale=1./255,validation_split=0.2)
Next, use the flow_from_dataframe function to load the images. This requires the following parameters:
- The image size. The images will be resized to the defined size.
- The batch size.
-
base_dirindicating the folder containing the face images. target_columnsto specify the target columns.class_modeset tomulti_outputbecause the network will produce output for the 5 target columns.
image_size = (128, 128)
batch_size = 32
base_dir = 'assets'
target_columns = ['age','hair_color','beard_color','mustache_color','eye_color']


training_set = train_datagen.flow_from_dataframe(df,base_dir,
                                                seed=101,
                                                target_size=image_size,
                                                batch_size=batch_size,
                                                x_col='image_path',
                                                y_col=target_columns,
                                                subset = 'training',
                                                class_mode='multi_output')
validation_set = validation_gen.flow_from_dataframe(df,base_dir,
                                              target_size=image_size,
                                              batch_size=batch_size,
                                              x_col='image_path',
                                                y_col=target_columns,
                                              subset = 'validation',
                                              class_mode='multi_output'
                                                   )
Visualize the training data
Let's use Matplotlib to visualize a sample of the TensorFlow dataset.
import matplotlib.pyplot as plt

plt.figure(figsize=(10, 10))
for images, labels in training_set:
    for i in range(25):
        ax = plt.subplot(5, 5, i + 1)
        plt.imshow(images[i])
        plt.axis("off")
    break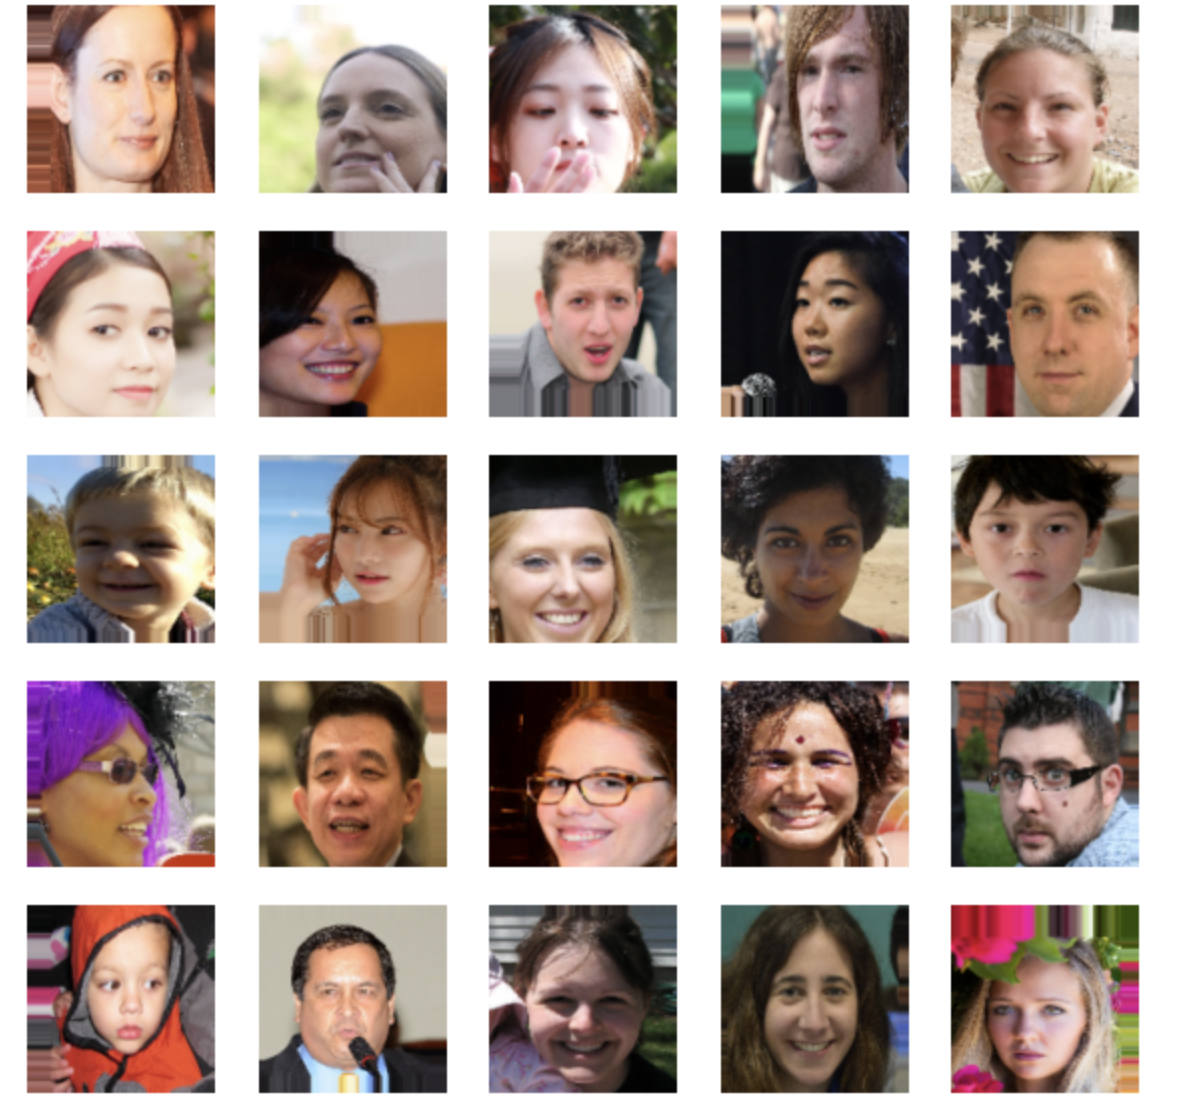
Define Keras Functional network
Given an image, the network should predict each of the five attributes of the face. To achieve that, we define a network with five output layers. This can not be achieved using the Sequential API. We, therefore, use the Functional API knowledge we learned at the beginning of this article.
Define a Convolutional Neural Network with three blocks followed by a DropOut and Dense layer. We use layers.add to sum the output from each block. After that, we create five dense layers that will produce the prediction for each of the face attributes. The number of units in each dense layer is the number of unique items in each of the five columns. We use the softmax activation for each layer because the classes are more than two.
We name each layer of the network to make it easier to inspect the summary and plot of the network. It will also make it easier to evaluate the performance of the network.
from tensorflow import keras
from tensorflow.keras import Sequential
from tensorflow.keras.layers import Dense,Conv2D,MaxPooling2D,Flatten,Dropout,Resizing
from tensorflow.keras.preprocessing.image import ImageDataGenerator
from tensorflow.keras.callbacks import EarlyStopping
image_input = keras.Input(shape=(image_size[0], image_size[0], 3), name="images_input")

x = Conv2D(filters=32,kernel_size=(3,3),activation="relu",name="first_block_conv2d")(image_input)
x = MaxPooling2D(pool_size=(2,2),name="first_block_maxpool2d")(x)
first_block_output = Flatten(name="first_block_flatten")(x)

x = Conv2D(filters=32,kernel_size=(3,3), activation='relu', name="second_block_conv2d")(image_input)
x = MaxPooling2D(pool_size=(2,2),name="second_block_maxpool2d")(x)
x = Flatten(name="second_block_flatten")(x)
second_block_output = layers.add([x, first_block_output], name="second_block_add")

x = Conv2D(filters=32,kernel_size=(3,3), activation='relu',name="third_block_conv2d")(image_input)
x = MaxPooling2D(pool_size=(2,2),name="third_block_maxpool2d")(x)
x = Flatten(name="third_block_flatten")(x)
third_block_output = layers.add([x, second_block_output],name="third_block_add")


x = Dropout(0.25, name="dropout1")(third_block_output)
x = Dense(128, activation="relu", name="dense1")(x)

age_prediction = Dense(df["age"].nunique(), activation="softmax",name="dense_age")(x)
hair_prediction = Dense(df["hair_color"].nunique(), activation="softmax",name="dense_hair")(x)
beard_prediction = Dense(df["beard_color"].nunique(), activation="softmax",name="dense_beard")(x)
mustache_prediction = Dense(df["mustache_color"].nunique(), activation="softmax",name="dense_mustache")(x)
eye_prediction = Dense(df["eye_color"].nunique(), activation="softmax",name="dense_eye")(x)
After that, we pass the inputs and outputs to keras.Model to create the model. There are five outputs in the model as required.
model = keras.Model(
    inputs=image_input,
    outputs=[ age_prediction,
             hair_prediction,beard_prediction,
             mustache_prediction,eye_prediction
             ],
)
mlnuggets newsletter
Join the newsletter to receive the technical deep dives in your inbox.
Plot and inspect the Keras Functional model
Plot the network to confirm that the connections are expected. It also helps to check if the shapes at various stages are as intended.
keras.utils.plot_model(model, "model.png",show_shapes=True)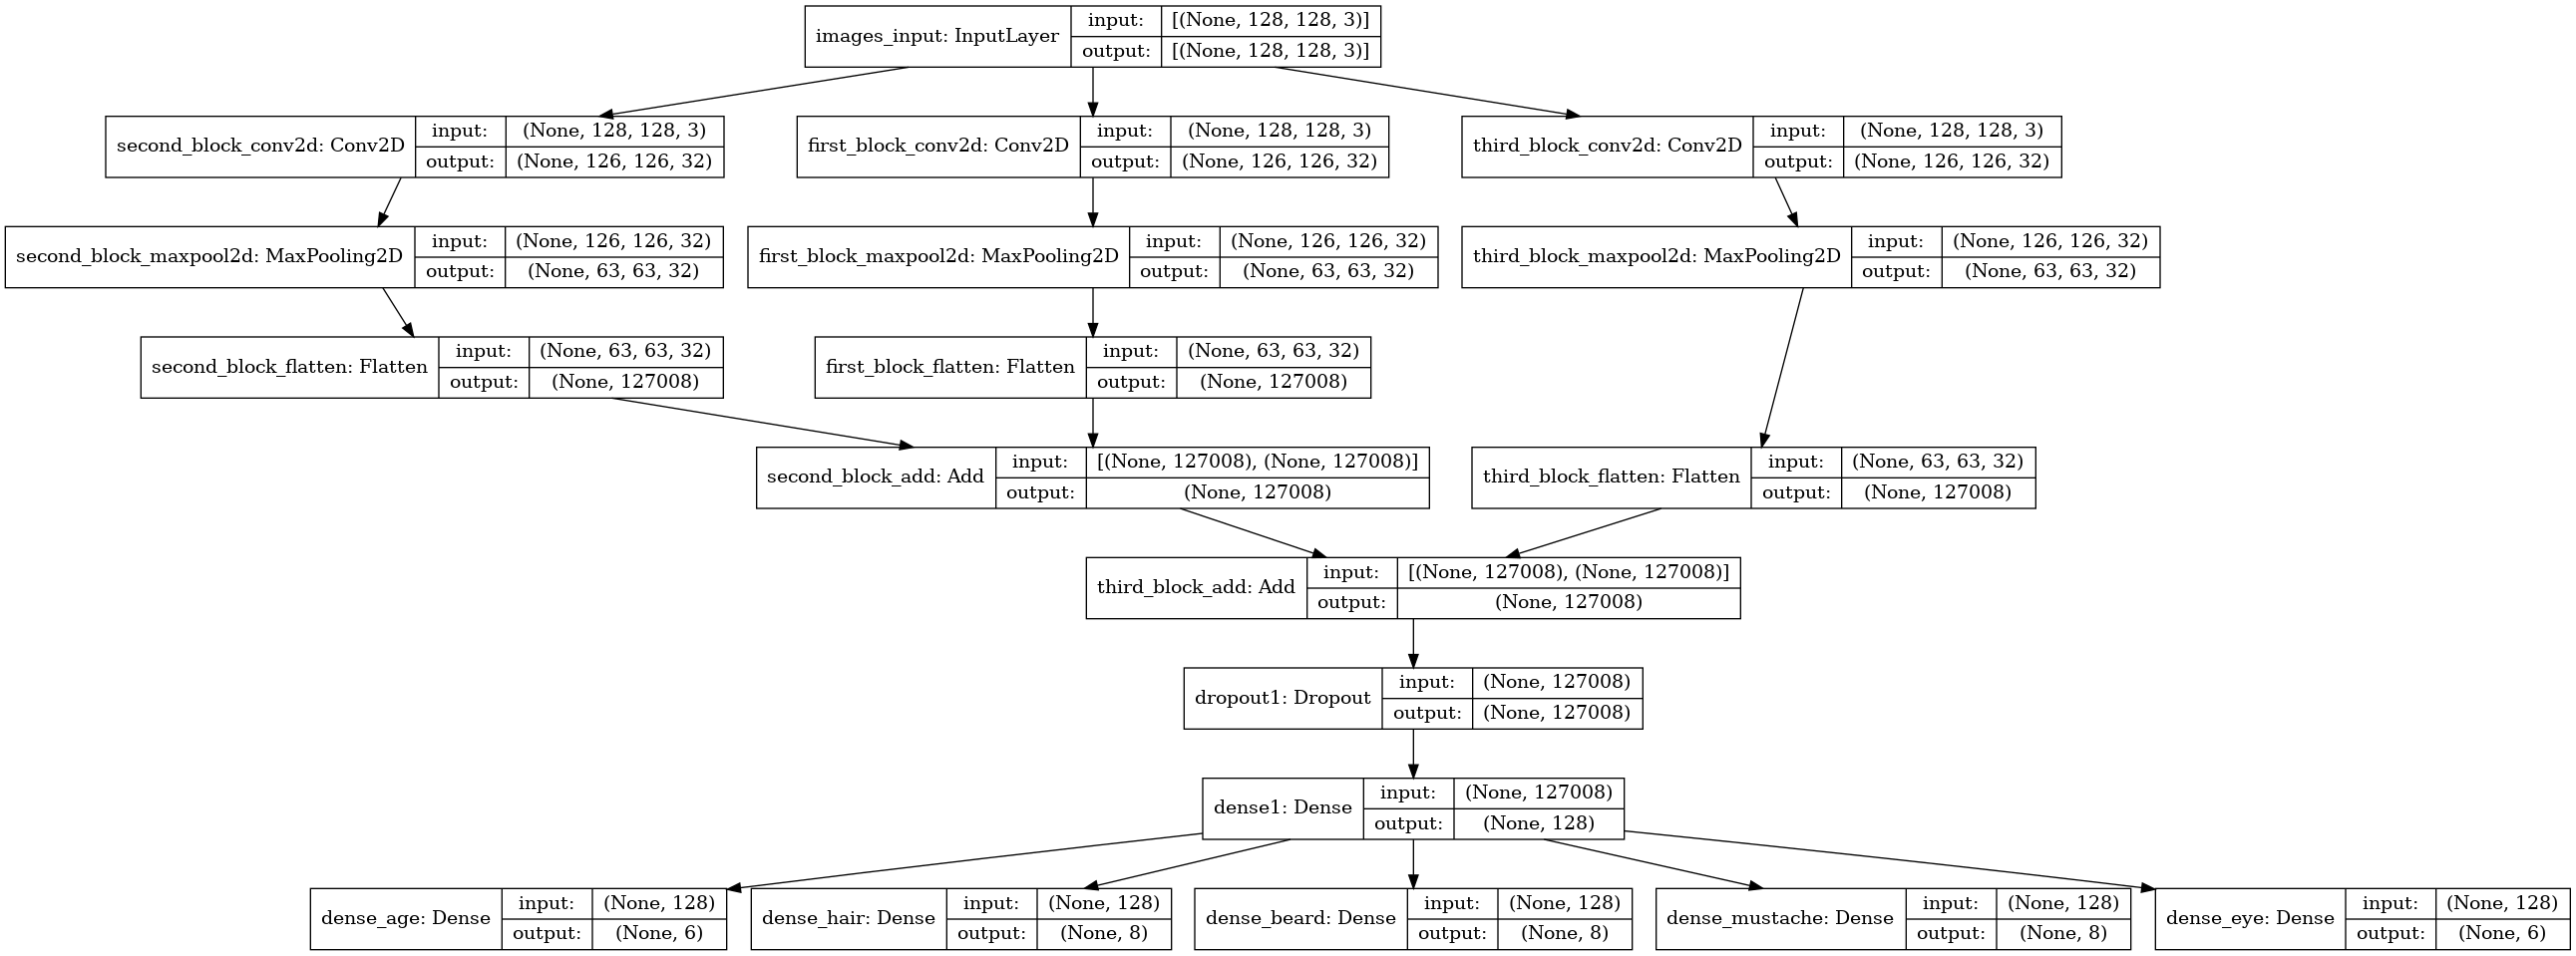
Compile Keras Functional network
Specify the loss for each prediction layer when compiling a Keras Functional network. This is passed as a list. In this case, we pass one loss, which will be applied to the five layers. We use the SparseCategoricalCrossentropy loss and SparseCategoricalAccuracy because the labels are integers.
model.compile(optimizer='adam', loss=keras.losses.SparseCategoricalCrossentropy(), metrics=keras.metrics.SparseCategoricalAccuracy())Training the Functional network
Let's train this network with the Earlystopping callback and 100 epochs. We stop training if the network doesn't improve for 10 consecutive iterations. You will see the training and validation metrics for the five items we want to predict as the network trains.
callback = EarlyStopping(monitor='loss', patience=10)
epochs=100
history = model.fit(training_set,validation_data=validation_set, epochs=epochs, callbacks = [callback])
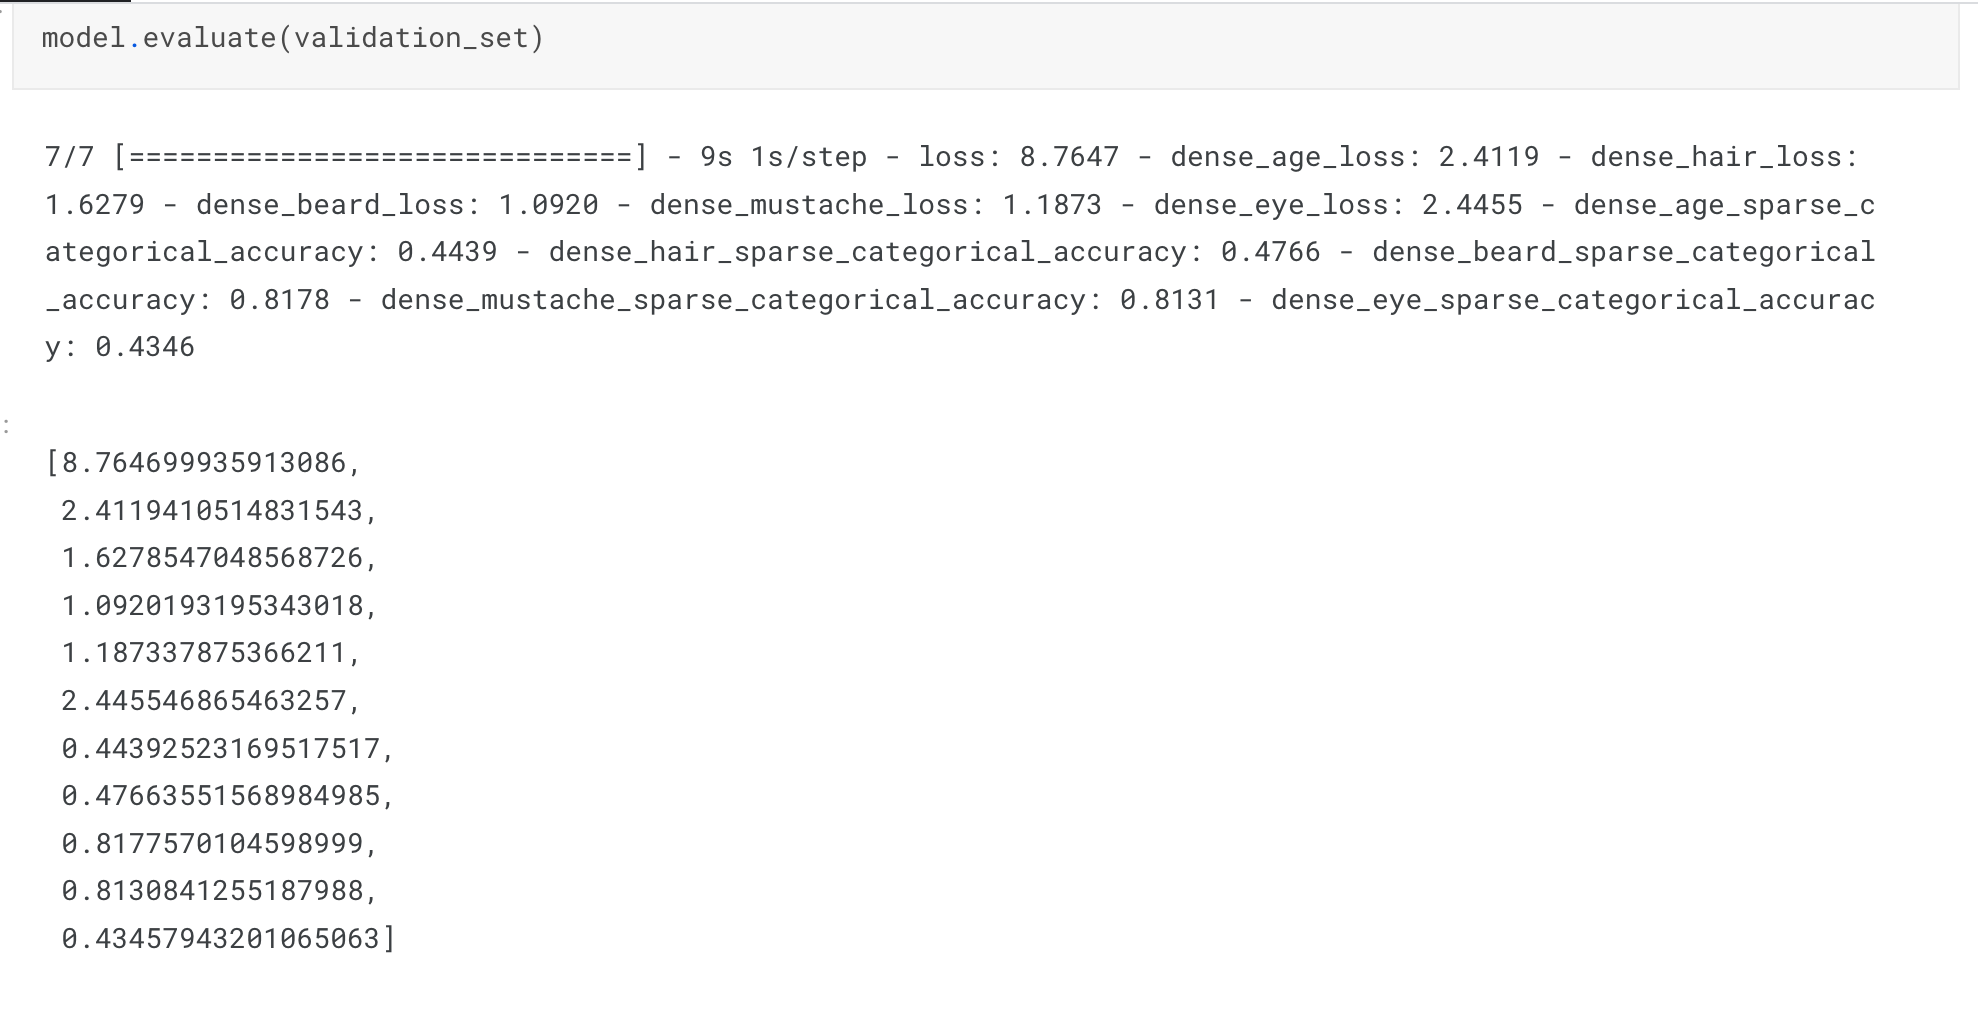
Evaluate TensorFlow Functional network
Check the performance of the network using the evaluate method.
model.evaluate(validation_set)This prints the validation metrics for the five prediction attributes.
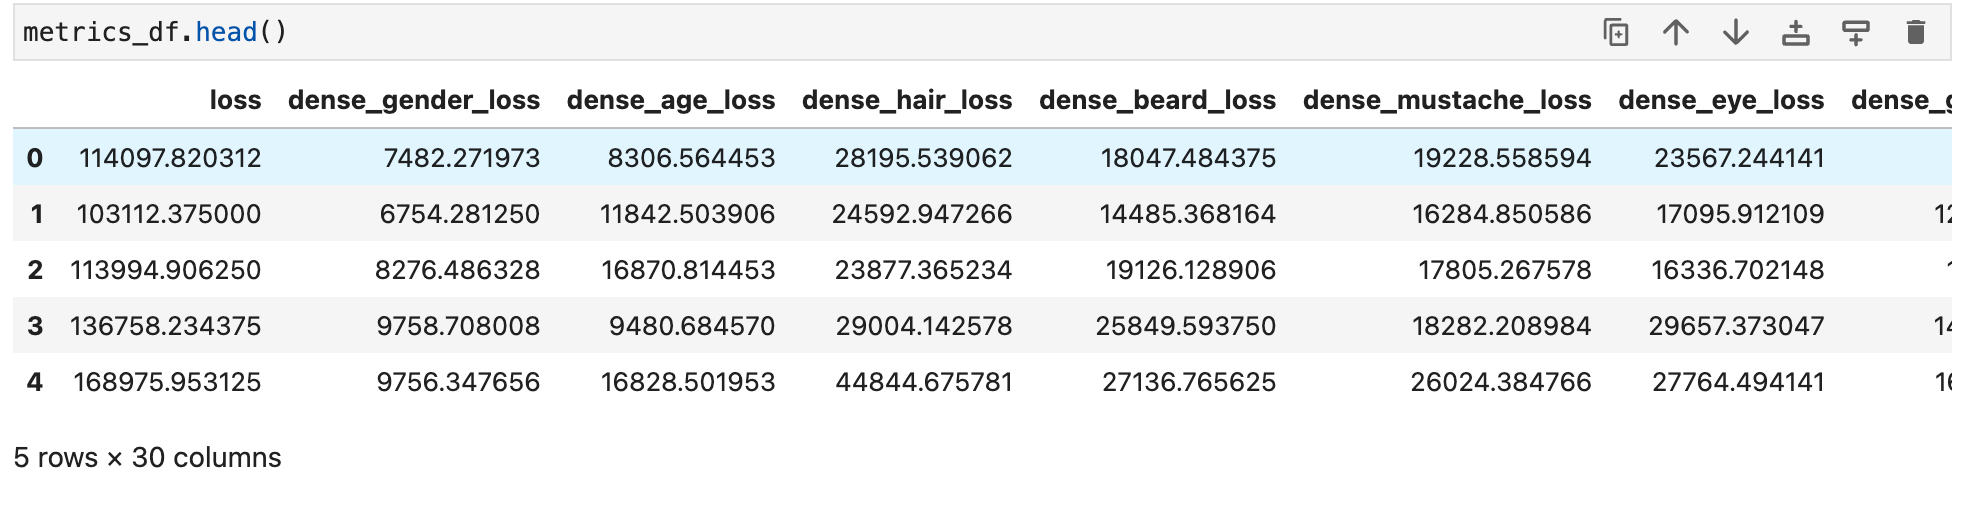
We can also plot the performance metrics of the network. The history variable contains the metrics for the five attributes.
metrics_df = pd.DataFrame(history.history)The metric names have the layer names we defined when creating the network. This makes it easy to identify the layers in this metrics DataFrame.
Using this DataFrame, we can plot some of these metrics. Let's plot the hair accuracy.
metrics_df[["dense_hair_sparse_categorical_accuracy","val_dense_hair_sparse_categorical_accuracy"]].plot()
You can tune the network or change the architecture to get better results.

Read more: TensorBoard tutorial (Deep dive with examples and notebook)
Make predictions with Keras Functional model
We download, process, and resize an image to make predictions with the Keras Functional model. The image size should be the same as the one used during training.
image_url = "https://storage.googleapis.com/ango-covid-dataset/ffhq-dataset/batch2/25000.png"
image_path = keras.utils.get_file('Face', origin=image_url)
test_image = keras.utils.load_img(
    image_path, target_size=(image_size[0], image_size[1])
)
import matplotlib.pyplot as plt
plt.axis("off")
plt.imshow(test_image);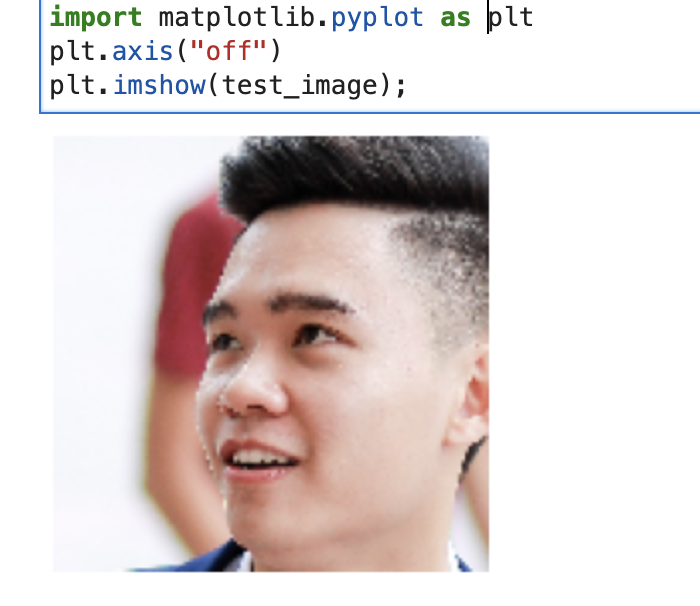
Next, convert the image to an array and expand the dimensions to include the batch dimension.
img_array = tf.keras.utils.img_to_array(test_image)
img_array = tf.expand_dims(img_array, 0)
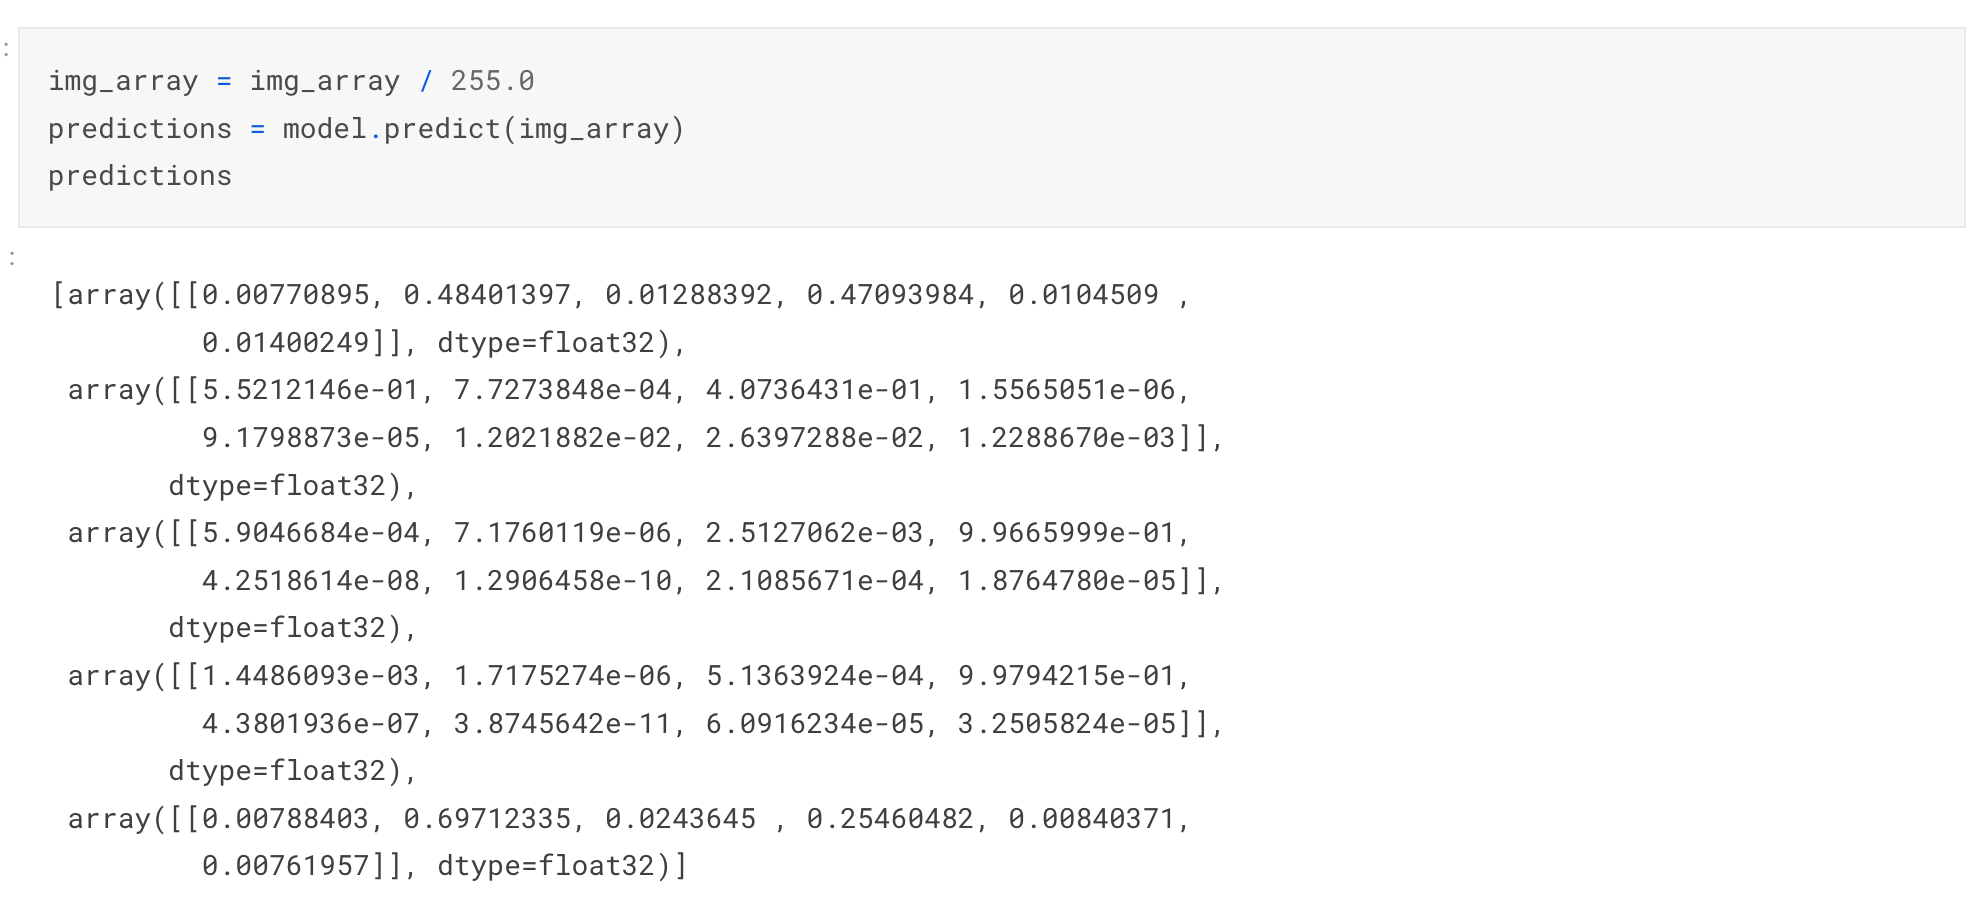
img_array = img_array / 255.0
Next, pass this image to the model to get predictions.
predictions = model.predict(img_array)
predictions
We get five attributes. One for each of the face attributes.
We need to map the above numerical output to the various face attributes to get the actual predictions. To achieve that, we use the classes_ attributes to get the categories.
age_labelencoder.classes_
# array(['Blue', 'Brown', 'Green', 'Not sure', 'Not visible', 'Other'],
#      dtype=object)
Let's bundle all this into a function that will receive an image URL and do the following:
- Download the image.
- Convert it to NumPy.
- Rescale the image.
- Expand the dimensions and add a batch dimension.
- Run predictions on the image.
- Obtain the predictions for each face attribute.
- use
tf.nn.softmaxto process the prediction and map it to a category. - Print the five predictions for the image.
def make_face_prediction(image_url):
    import tensorflow as tf
    import numpy as np
    image_path = keras.utils.get_file('Face', origin=image_url)
    test_image = keras.utils.load_img(
    image_path, target_size=(image_size[0], image_size[1]))
    img_array = tf.keras.utils.img_to_array(test_image)
    img_array = tf.expand_dims(img_array, 0)
    img_array = img_array / 255.0
    predictions = model.predict(img_array)
    age_predictions = predictions[0][0]
    hair_predictions = predictions[1][0]
    beard_predictions = predictions[2][0]
    mustache_predictions = predictions[3][0]
    eye_predictions = predictions[4][0]


    age_scores = tf.nn.softmax(age_predictions).numpy()

    hair_scores = tf.nn.softmax(hair_predictions).numpy()

    beard_scores = tf.nn.softmax(beard_predictions).numpy()

    mustache_scores = tf.nn.softmax(mustache_predictions).numpy()

    eye_scores = tf.nn.softmax(eye_predictions).numpy()


    print(f"Age: {list(age_labelencoder.classes_)[np.argmax(age_scores)]} with a { (100 * np.max(age_scores)).round(2) } percent confidence.")
    print(f"Hair Color: {list(hair_labelencoder.classes_)[np.argmax(hair_scores)]} with a { (100 * np.max(hair_scores)).round(2) } percent confidence.")
    print(f"Beard Color: {list(beard_labelencoder.classes_)[np.argmax(beard_scores)]} with a { (100 * np.max(beard_scores)).round(2) } percent confidence.")
    print(f"Mustache Color: {list(mustache_labelencoder.classes_)[np.argmax(mustache_scores)]} with a { (100 * np.max(mustache_scores)).round(2) } percent confidence.")
    print(f"Eye Color: {list(eye_labelencoder.classes_)[np.argmax(eye_scores)]} with a { (100 * np.max(eye_scores)).round(2) } percent confidence.")
Let's run the function on an image.
make_face_prediction('https://storage.googleapis.com/ango-covid-dataset/ffhq-dataset/batch2/25000.png')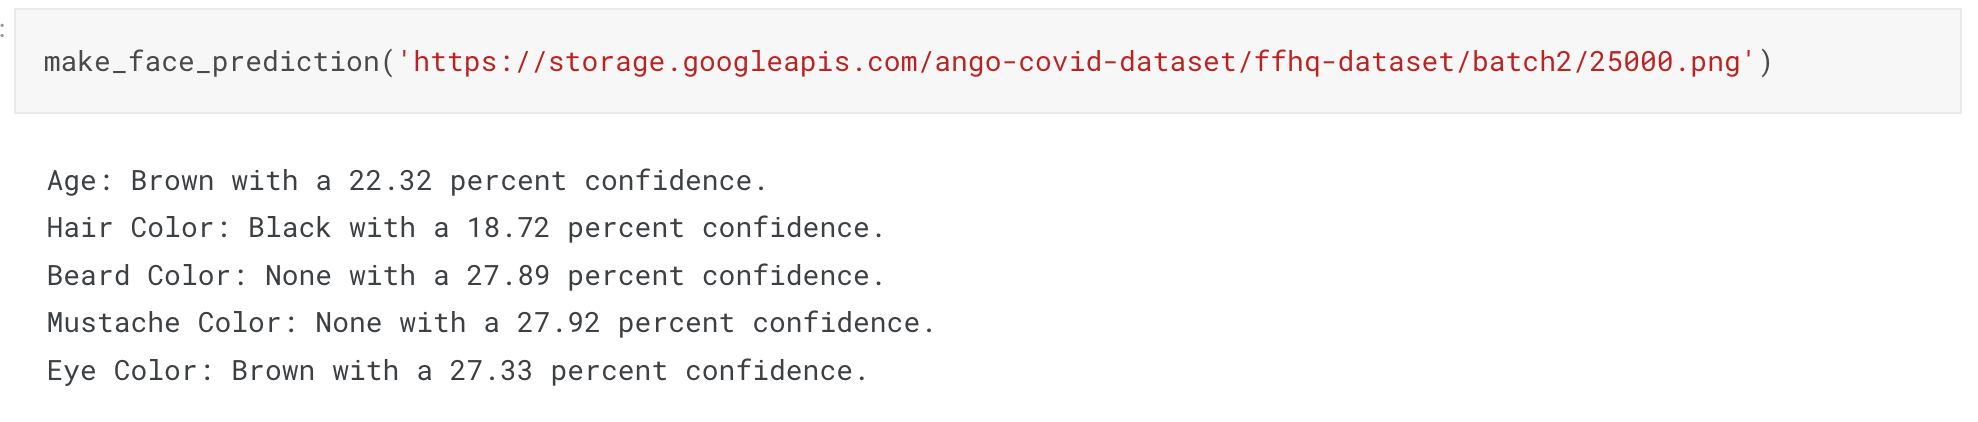
mlnuggets newsletter
Join the newsletter to receive the technical deep dives in your inbox.
Keras Functional API strengths and weaknesses
Keras Functional API is handy when designing non-linear networks. If you think that you may need to convert a network to a non-linear structure, then you should use the Functional API. Some of the strengths of the Functional API include:
- It is less verbose compared to subclassing the
Modelclass. - The requirement to create an
Inputensures that all Functional networks will run because passing the wrong shape leads to an immediate error. - A Functional model is easier to plot and inspect.
- Easy to serialize and save Functional models because they are data structures.
However, one drawback of using the Functional API is that it doesn't support dynamic architectures such as recursive networks or Tree RNNs.
Functional API best practices
Keep best practices in mind while working with the Keras Functional API:
- Always print a summary of the network to confirm that the shapes of the various layers are as expected.
- Plot the network to ensure the layers are connected as you expect them.
- Name the layers to make it easy to identify them in the network plot and summary. For example
Conv2D(...,name="first_conv_layer"). - Use variable names that are related to the layers, for example,
conv1andconv2for convolution layers. This will clarify the type of layer when inspecting plots and network summary. - Instead of creating a custom training loop, use the
keras.Modelto create models because it makes it easier to train models via thefitmethod and evaluate them with theevalautemethod.
Final thoughts
In this article, you have discovered that you can design neural networks in Keras using the Sequential API. In particular, we have covered:
- How to define Functional models in Keras.
- How to train and evaluate Keras Sequential networks.
- Defining Keras networks with multiple inputs and outputs.
- How to plot and inspect Keras Sequential models.
- Feature extraction with Keras Sequential networks.
- Building an end-to-end face classification Convolutional Neural Network with Keras Sequential API.
TensorFlow resources
- Object detection with TensorFlow 2 Object detection API
- How to train deep learning models on Apple Silicon GPU
- How to build CNN in TensorFlow(examples, code, and notebooks)
- How to build artificial neural networks with Keras and TensorFlow
- Custom training loops in Keras and TensorFlow
Whenever you're ready, there is 2 way I can help you:
If you're looking for a way to build a career while writing about data science and machine learning, I'd recommend starting with an affordable ebook:
→ Writing for Data Scientists: The exact path I followed to get technical work that pays between $250-$500 from machine learning companies such as Comet, Neptune, cnvrg, Paperspace, Layer, Neural Magic, Determined, Activeloop, and many more. Get your copy.
→ Data Science and Machine Learning Ebook: I offer numerous free and paid data science and machine learning ebooks to help you in your data science career. Check them out.